

In the previous posts, I introduced the core sprite of the Blocky game, the “Blocks” sprite, which is responsible for adding, deleting or editing the environment blocks. Starting from this post, we are going to switch to the other core sprite – Hitbox.
Homescreen UI Sprite
Before introducing the code of Hitbox sprite, I would like to briefly introduce one code segment of Homescreen UI sprite. This sprite will show when game starts. It generates two clones with button-like costumes. One button displays “create new level”, the other displays “import a level”. The illustration is shown below.

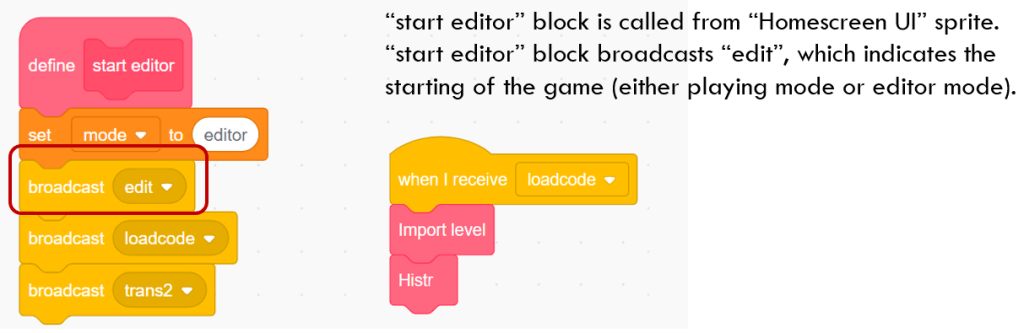
Homescreen UI sprite’s code calls “start editor” block whenever user clicks either of the buttons. In this block “start editor”, the program broadcasts three messages: “edit”, “loadcode” and “trans2”. The receiver of “edit” message is located in Hitbox sprite and it is responsible for creating main loop to monitor user input, allowing user play the game or editing the environmental blocks. We will analyze “when I receive edit” code segment soon.
The second message “loadcode” will call block “import level” to import an existing level’s data.
The third message “trans2” is simple. It is responsble for deleting the clones of Homescreen UI sprite.
Now, we have known how the program starts from Homescreen UI sprite. When user clicks either “start a new level” clone or “import a level” clone, the program will call “start editor” block to broadcast some messages, which indicates the starting of the game. Now, let’s switch to Hitbox sprite to analyse some core code segments.
“import level“ Block
This block is located in hitbox sprite. It initializes the environmental blocks’ status. The checkpoint value of 2 means that the player stands at block 2 of those data lists – including lists “x”, “y”, “mode”, “cs”. It then deletes all the items of x, y, mode, sign and cs lists. What those lists rerpresent have been introduced in the Post 2 of this series.
Since all the items of those lists have been cleared, we add two items by calling block “add platform”. The two blocks are added at position 1 (0, -100) and position 2 (0, -75). Their mode is 1 and 9, respectively. In order to keep block index synchronized, we add two empty items into “cs” list. The effect is shown below.
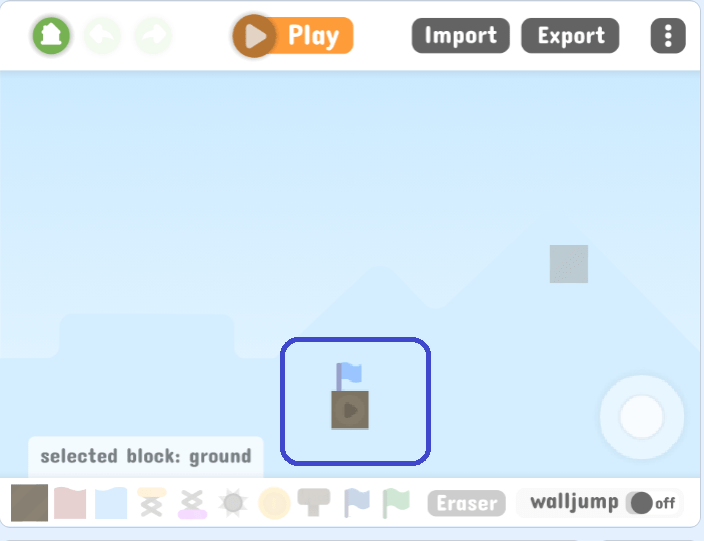
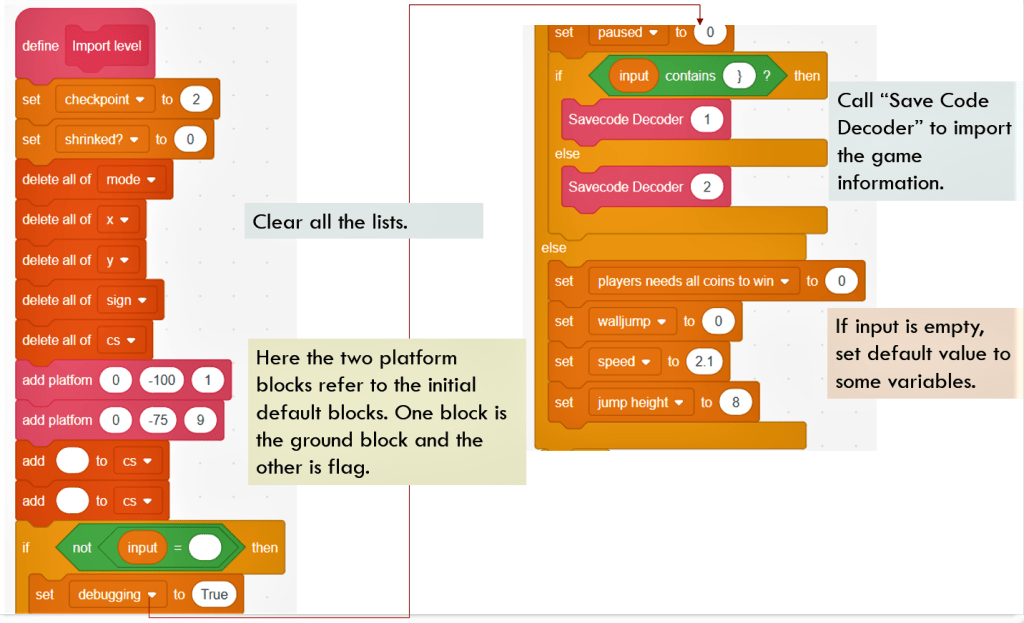
After that, the block checks if “input” variable is empty or not. if user does not provide block environment data, “input” variable is empty, and the program uses some default values for the variables “walljump”, “speed” and “jump height”. What you see is a blank new project with two blocks, as shown above.
If the “input” variable is not empty, that means user imports an existing level’s data. The block will call “SaveCode Decoder” block to import the data. The next step is to check “input” variable. However, I believe the author has not finished this part, yet because based on the current Unicodes list, it is not possible for “input” variable to contain “}”. Therefore, only “SaveCode Decoder 2” will be called.
Now, let’s switch to “SaveCode Decoder” block to take a look. As I have mentioned, the mode is always 2 since “input” does not contain “}”. When mode is equal to 2, the block just broadcasts a message “decode level” and it is done. You might ask which sprite receives the message of “decode level”. The answer is “Encoder / Decoder” sprite. we have introduced the code segment “when I receive decode level” in the Post 1 of this project series. Its basic functionality is to decode the saved file’s data and fill the data into those lists “x”, “y”, “mode”, “cs” and “sign”. Once all the data gets ready, the blocks will get stamped by reading the data from those lists continuously.

“when I receive edit” Code Segment
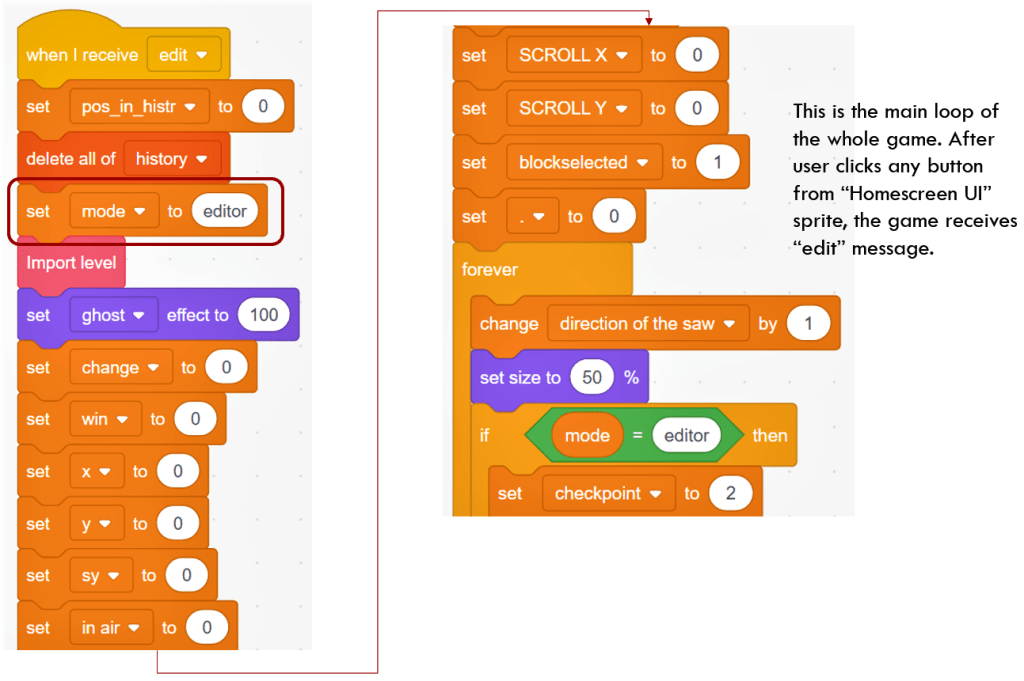
This code segment is the main loop of the whole game. It initiates the status of some variables, such as mode variable, “pos_in_histr”. It also initiates variables related to the movement of the “hitbox” player. If you are familiar with the scrolling platformer game design, you might know some important variables such as “x”, “y”, “sx”, “sy”, “in air”, “SCROLL X” and “SCROLL Y”. You could refer to Youtube tutorials to have a hands-on experience on how to design scrolling platformer game.
After entering forever loop, the program changes variable “direction of the saw” by 1 in each iteration. This variable controls Saw block type’s direction.
“mode” variable controls the state of the game. If mode value is “editor”, the program is editing the environmental blocks. The hitbox sprite could only move a distance of a block each time. It is not behaving like a game player. When mode value is not “editor”, the program enters player mode. The hitbox sprite could jump, run, fall, bump into different objects or die.
First, let us look at “editor” mode. It will set “checkpoint” to 2, meaning when the game switches to player mode later, the player would start playing the game at the beginning postion because the game has been edited. It then broadcasts “update” message continuously. This message “update” will be received by “Blocks” sprite to refresh the block position and stamp them on the stage.
Please note here, some special conditions need to be addressed. When block type is 8 (Sign type) or 1000 (Eraser type), the program needs to “broadcast update and wait”. Why? because the “Sign” block type needs to wait for user to input information. “Eraser” block type needs to use “remove platform” block to update the data lists. Therefore, the code segment of “when I receive edit” needs to call “broadcast update and wait” block.
For the following code, the program responds to the block type of 8. When variable “e?true” is 1 and user types “e”, the program will ask user to input information and then update it to sign list.


In the above section of the code segment, the program resets values of “sx”, “sy”, “x”, “y” and “win” and then calls block “Histr”. The purpose of block “Histr” is to encode the latest environmental block settings and store it to “history” list. When user presses “p” key, the environment setting will restore to the status represented by previous item in “history” list, while user presses “n” key, the environment will change to one represented by the next item in “history” list.
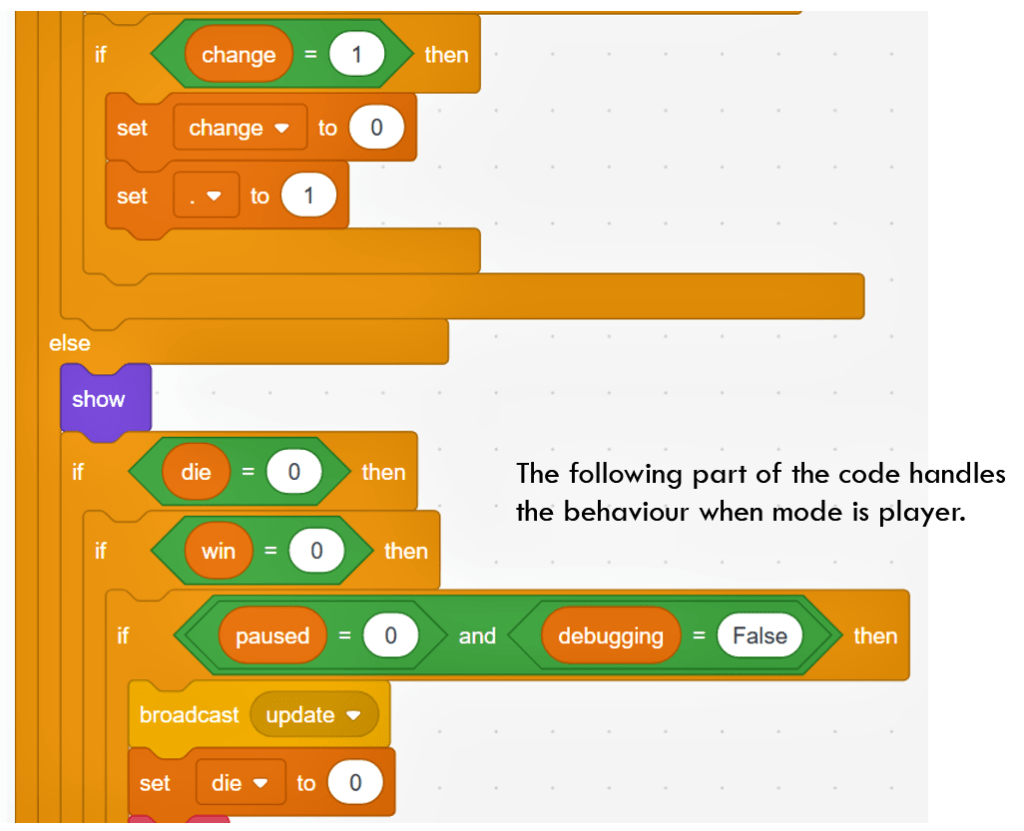
The above section of code handles the condition when the mode variable is not equal to editor. In another word, the user is playing the game. The program will still broadcast “update” message, so that the block could re-stamp themselves at proper position. The program will call “physics” block to make Hitbox sprite respond to the user input, so that it could run, jump and fall flexibly on the stage. “physics” block is pretty common in scrolling or static platformer game. It is basically defining an engine to drive the player adapt to different environment, obstacles, grounds, etc.
Since this game uses self defined environmental blocks, its “physics” block is similar to that of other projects, but incorporates some unique features. I will introduce this block in the next post.
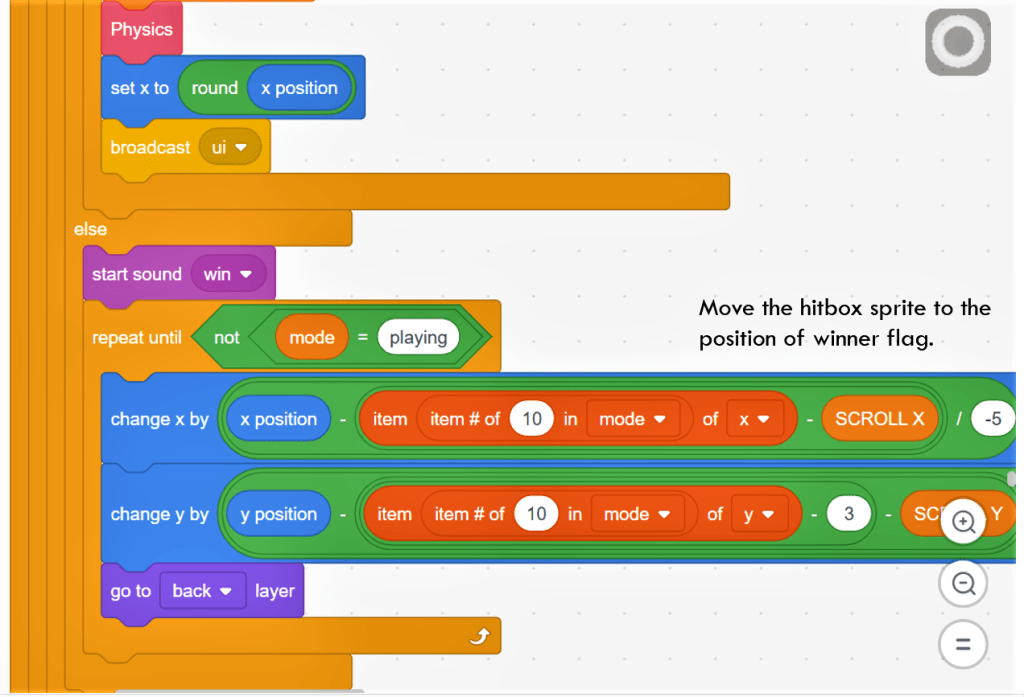
The above section of the code handles the condition when the hitbox player touches the winning flag and wins the game. The block “change x by ((x position – (item (item # of 10 in mode) of x) – SCROLL X) / -5)” looks pretty complicated. Its purpose is just to ensure that hitbox sprite moves to the position of winning flag smoothly.
While the next section handles the condition when the hitbox player dies. The program resets the variables “die”, “sx” and “sy”. Meanwhile, based on the stored value of “checkpoint”, the hitbox sprite will go to the position of latest checkpoint and resumes playing the game.

This is the code analysis for hitbox sprite. In this post, we focus on analysing the code segment of “import level” and “when I receive edit” of hitbox sprite. The latter contains the main loop of the game and collaborates with “when I receive update” and “stamp” segments of Blocks sprite, which I explained in the previous posts. Hope you still feel this project and analysis great! Keep tune in and see you later.
Note: All the analysis articles are copyright products of http://www.thecodingfun.com. Anyone re-posting them should credit author and original source. Anyone using them for commercial purposes or translating them into other languages should notify TheCodingFun and get confirmation first. All Rights Reserved.
