

In Part 1 of this project, I introduced how this game realized some stylish visual effects, how to encode its data and store the data in a file, and how to import the data from a file by decoding its data and filling in several lists.
In this post, I would like to explain how to use the data stored in the lists “x”, “y”, “mode”, “cs” and “sign” to present different environments, how to edit the game environment by adding, deleting or editing blocks. So let’s start now!
As I have mentioned in the first post, this project is the most complicated one I have analyzed till now, in terms of the amount of programming blocks. For example, both “Hitbox” and “Blocks” sprites have over 1,000 blocks. Generally speaking, “Blocks” sprite is used to display those environment blocks, while “Hitbox” sprite is used to control the player to play the game, such as jumping, swimming, collecting the coins or avoding the dangers, etc.
In this post and next, I am going to explain several core segments of “Blocks” sprite.
Blocks Sprite
Before we begin analysis, we need to be clear how many block types are designed by this project and their representation numbers. In the below table, we could see that each block type is represented by a number in “Mode” list. Since all the value in “mode” and “cs” lists are represented by number, it is difficult to understand the meaning of those numbers.
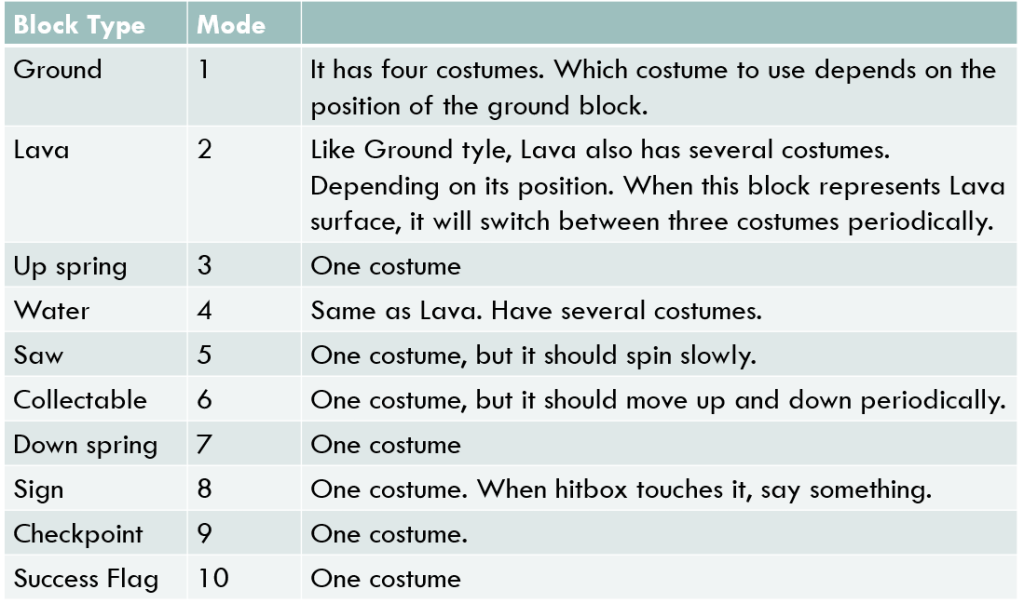
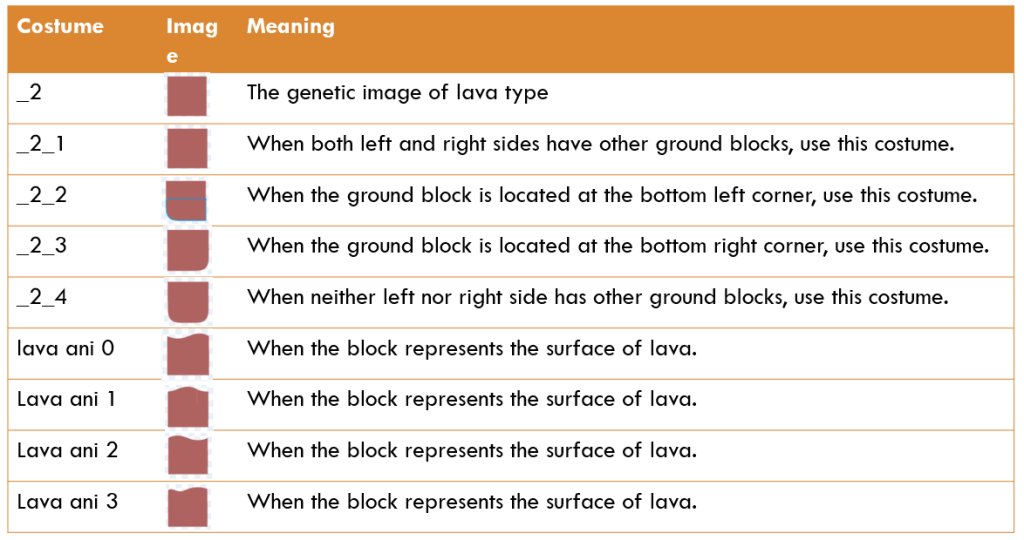
If you go to “Costumes” tab of “Blocks” sprite, you will notice that each block type consists of several costumes. For example, Ground block type has five costumes – “_1”, “_1_1”, “_1_2”, “_1_3” and “_1_4”, while lava block type has 9 costumes. The followng explains some of the custumes, and just for your reference.

The core segment in Blocks Sprite is the definition of “Stamp” block, which itself consists of more than 600 blocks. “Stamp” block is called by an event receiver “when I receive update”. The latter is called from “when I receive edit” code segment of “Hitbox” sprite. We will introduce “Hitbox” sprite in the following posts, so by now, we just need to know that “update” message is broadcasted in a forever block from “Hitbox” sprite. Therefore, “Stamp” block is also called continuously with a frequency of around 20 times per second.
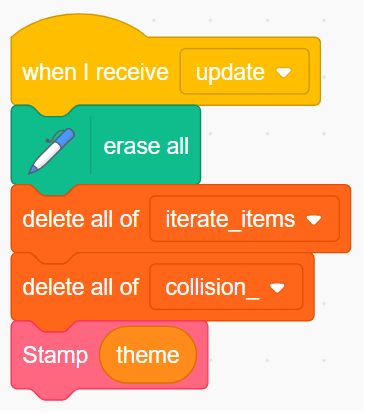
In the code segment of “when I receive update”, we could see that before calling “Stamp” sprite, the program “erase all” the drawing and clears all the items in “iterate_items” and “collision_” list. These two lists are used by “Hitbox” sprite to check if it touches any existing environmental blocks and causes any collision.
The following long code segment defines “Stamp” block. I would say that it is too long to be wrapped in one post. Therefore, I will separate it into 3 posts to explain its functionalities. Part 1 focuses on redrawing every environmental blocks with correct position and costume. Part 2 focuses on using “joystick” sprite or keyboard arrow keys to control the movement of map. Part 3 focuses on editing existing blocks and adding new blocks. Let’s do our analysis of Part 1 first.
At the start of “Stamp” block, it clears and resets all the necessary variables. After that, It will iterate each item in the “mode” list. Please note that those lists “x”, “y”, “mode”, “cs” and “sign” all are of the same length, and each item at the same index represents the same block’s different properties.

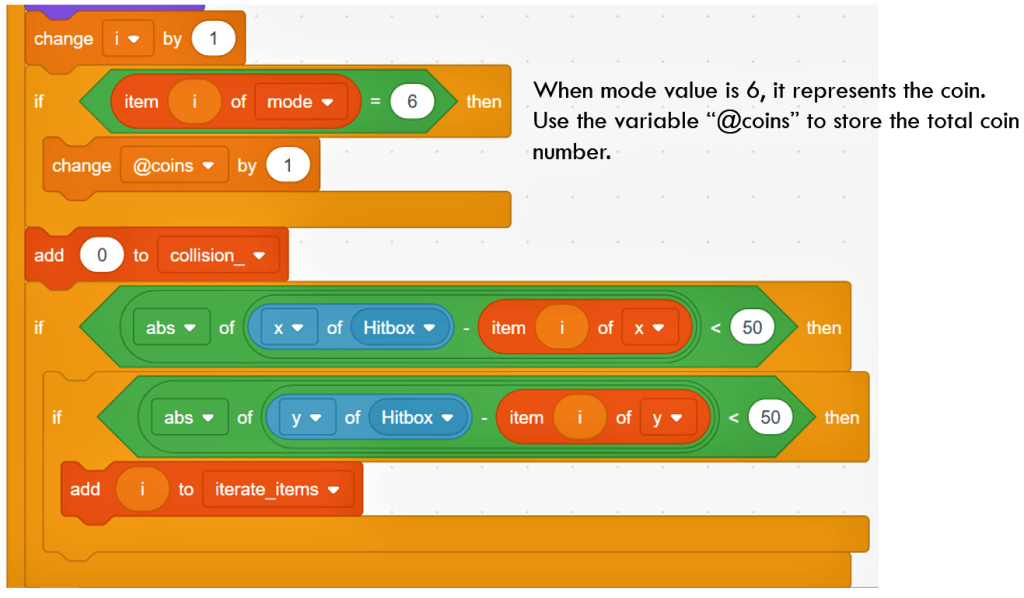
In this big iteration of “repeat (length of mode)”, the program iterates each item in “mode” list. When an item’s mode value is 6, it represents the coin block type (you could refer to the above block type table). The variable “@coins” increases 1 to record total amount of coins. Meanwhile, it adds “0” to “collision_” list. Therefore, the length of “collision_” list is also the same as that of other lists, such as “mode”, “x” or “y”. After that, the program checks if the positions of Hitbox and environmental block are close or not. If they do, it adds the item index of the environmental block into list “iterate_items”.
Here, I would briefly introduce the purpose of the two lists “collision_” and “iterate_items”. Both of them are used by “hitbox” sprite to check any potential collision with those environment blocks. We will introduce them in more detail later.
Continue our analysis. The program will then check if the current item’s mode value is “1”, “11” or “21”. These values represent three status of ground block type. Here, if the mode type is not any of those values, the program checks first if the item’s stage position (item’s value in lists “x” and “y”) is within a range. The range decides whether the environmental block displays on stage or not.
If you have learned how to design scrolling platformer game, you might have been familiar with the difference between map position x and y, as well as its stage position (x – SCROLL X), (y – SCROLL Y). When the block’s stage position falls within the range of (x – SCROLL X) = (-240, 240) and (y – SCROLL Y) = (-180, 180), it will display on the stage. Only when the block displays on the stage, the program would choose costume for it and stamp.
In the following part of the code, you will see that when the environmental block shows on the stage, the program “switch costume to (join _ round (item i of mode))” first. Right after that, it calls “Cc (theme)” blocks to further adjust the costume. As we have mentioned before, each block type has multiple costumes. The costume of a block is decided not only by its type, but also by theme and its position against other blocks. Those adjustment is done in “Cc (theme)” block.
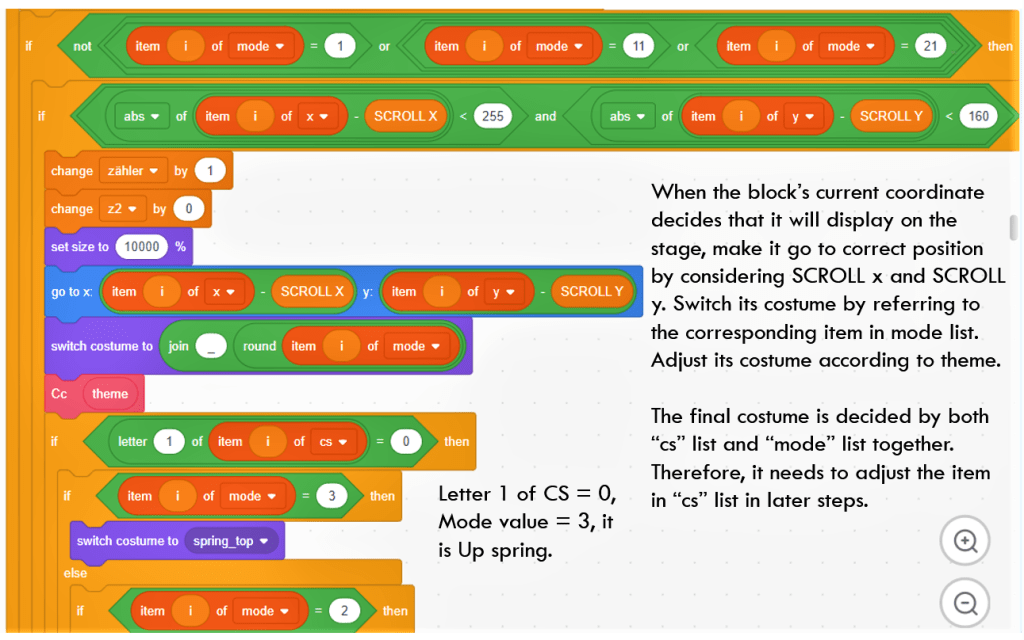
Next step, the program checks the item value in “cs” list. Based on the combination of mode and item value of “cs” list, it changes to different costumes and stamps them. This part of code is mainly used to add visual effect. For example, if first letter of “cs” item value is 0, it indicates that this block is upmost one and there is no other blocks right above it. If its mode is 3, it is a upward spring and there is no other springs above it. The program will switch costume to “spring_top” and then stamp it. If its mode is lava (mode = 2), it will switch to “lava ani” type of costumes. Through using “round (@@tick) / 0.1) mode 4”, the costume will change from “lava ani 0” to “lava ani 3” costumes periodically. The same applies for the mode of 4.
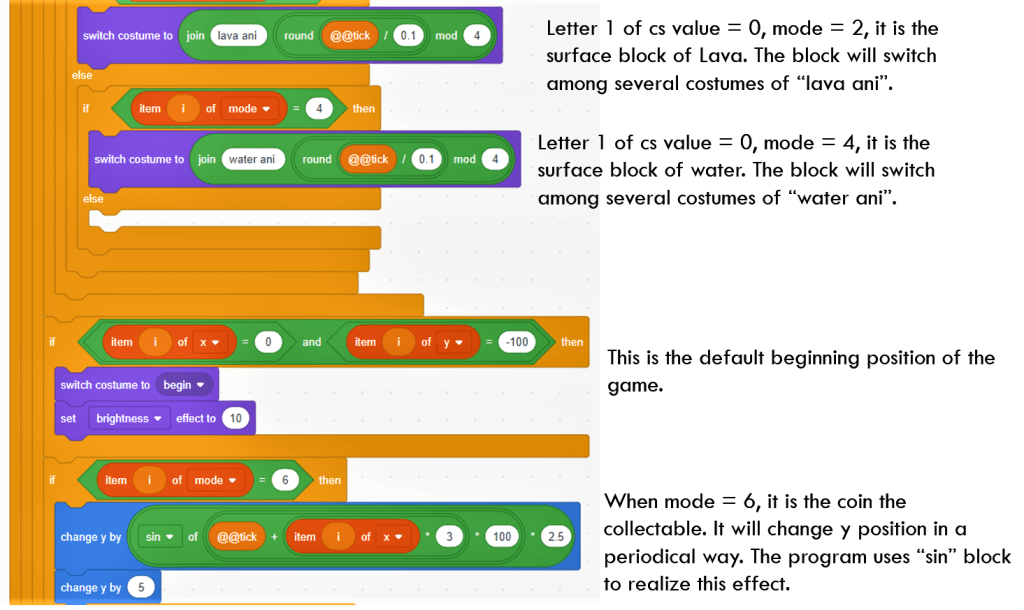
Here, the program continues to adjust the costume based on the value of “cs” and “mode”. Since the beginning block of the game is located at x position of 0 and y position of -100, the program will switch costume to “begin”. When mode is 6, representing the current block type is collectable, the program uses “sin” block to make its y position change periodically. The final effect is that the coin fluctuates vertically. The program also checks if “collected_coins” list contains the current item index. If it does, it means the user has collected this coin, so the coin block will show as transparent.
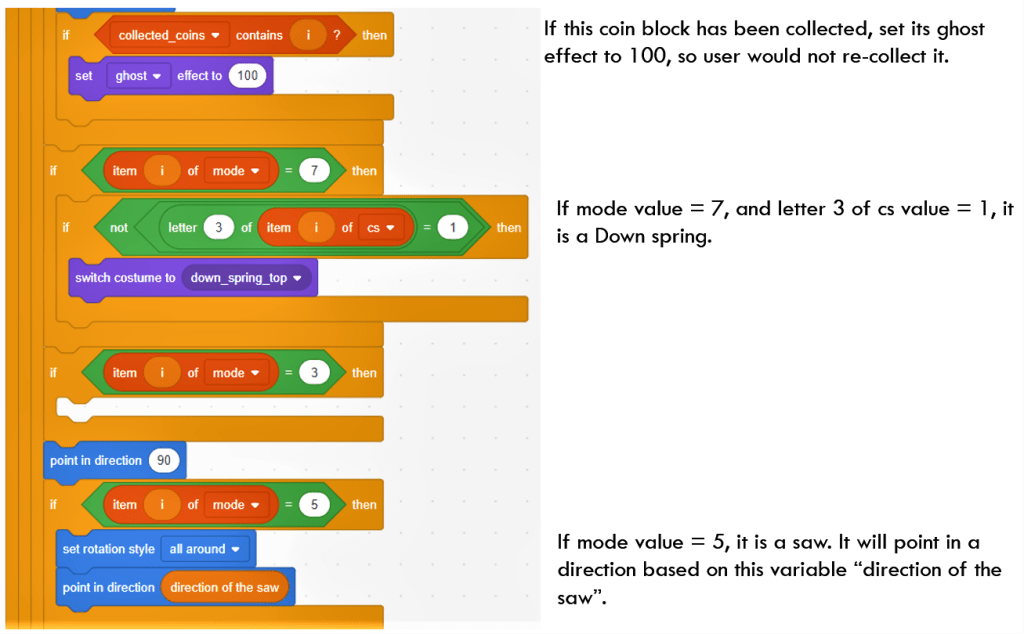
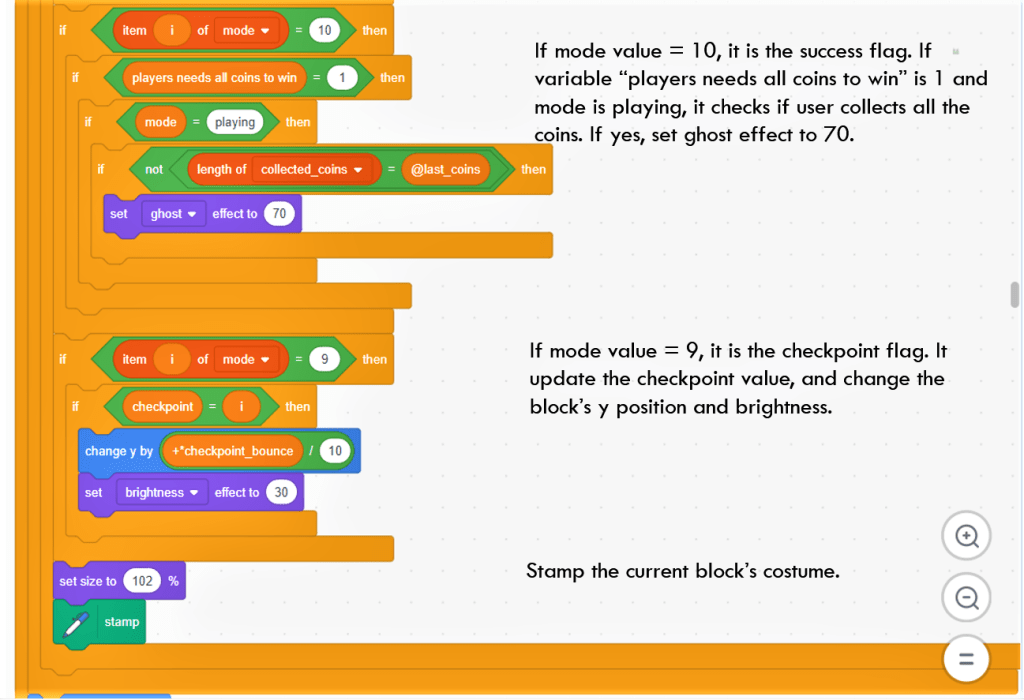
The program continue to “decode” the values of “mode” and “cs” lists to the costume. If mode value is 5, indicating it is a Saw block type. It will make it point in a direction specified by variable “direction of the saw”. This variable will change 1 each time when the “stamp” block is called. Therefore, you will notice that Saw block turns slowly. When mode is equal to 9 or 10, the program also does different operations. You could refer to the note in the below diagram for further information.
The above part of the program handles how to process the costumes of most block types, except ground type. The following part handles the costume of ground block type. The author chosen to separate the handling because ground block types need special steps for rendering.
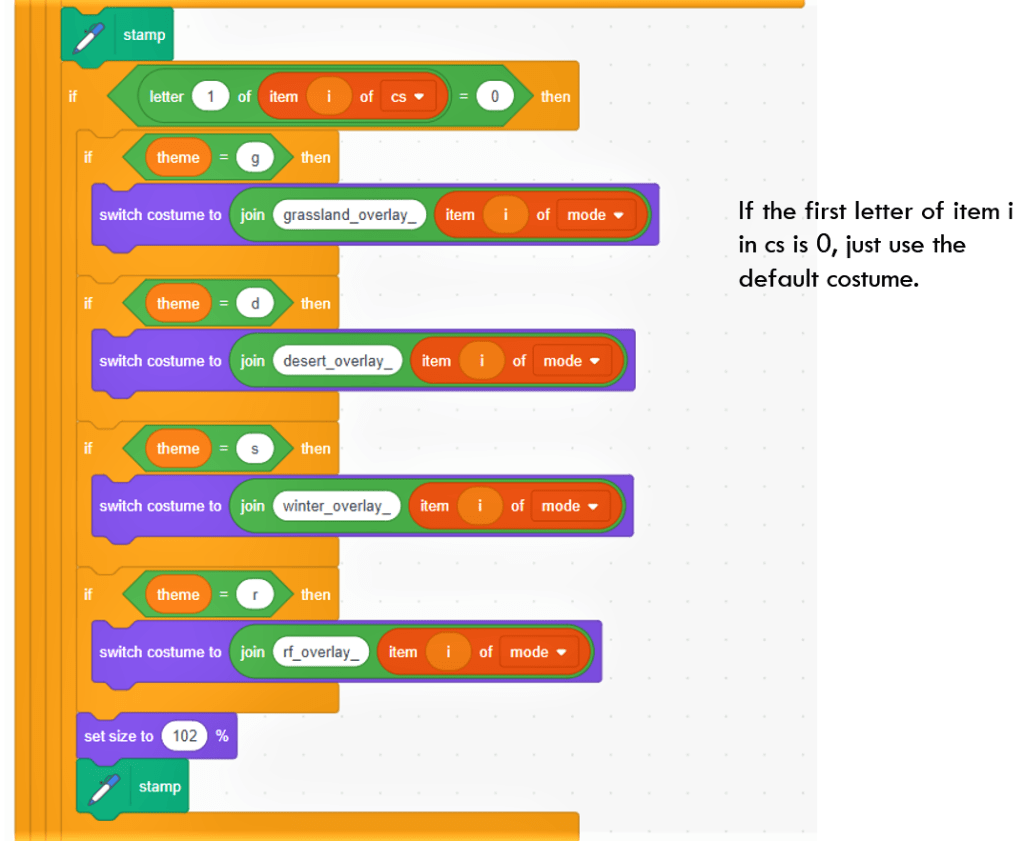
First, if the item value belongs to any of “1”, “11” and “21”, it represents ground block. Here, “1”, “11” or “21” does not represent the ground block costume, but the surface overlay type. The program first uses a generic costume “blank_ground_block”, then calls “Cc (theme)” block to assign a special ground block costume.

After stamping, the program will check the first letter of “cs” item value. if the first letter is 0, it indicates that it is the upmost block and there are no other blocks right above it. The program will switch to “overlay_” type costume and stamp it, so that those ground blocks would have grass, desert, snow overlay. The final result of the overlay effect is shown below.
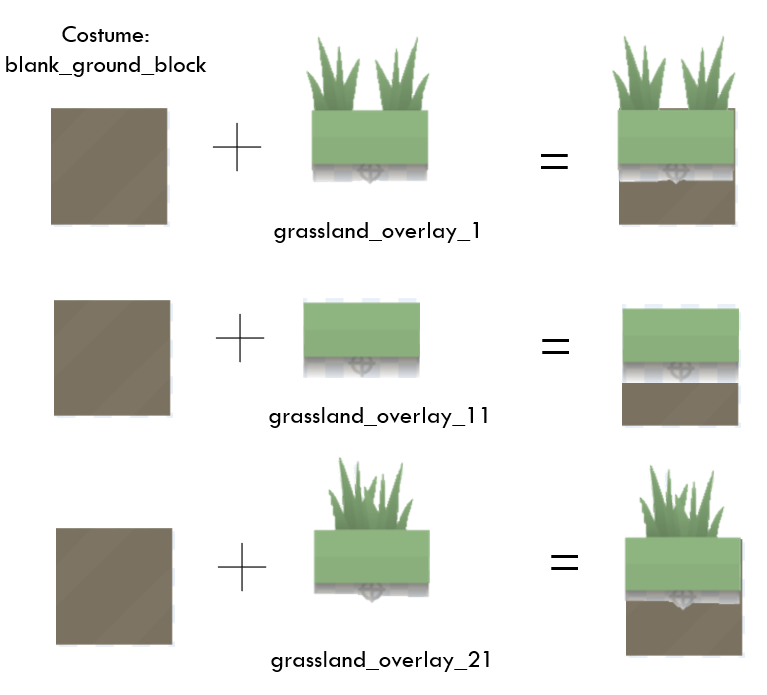
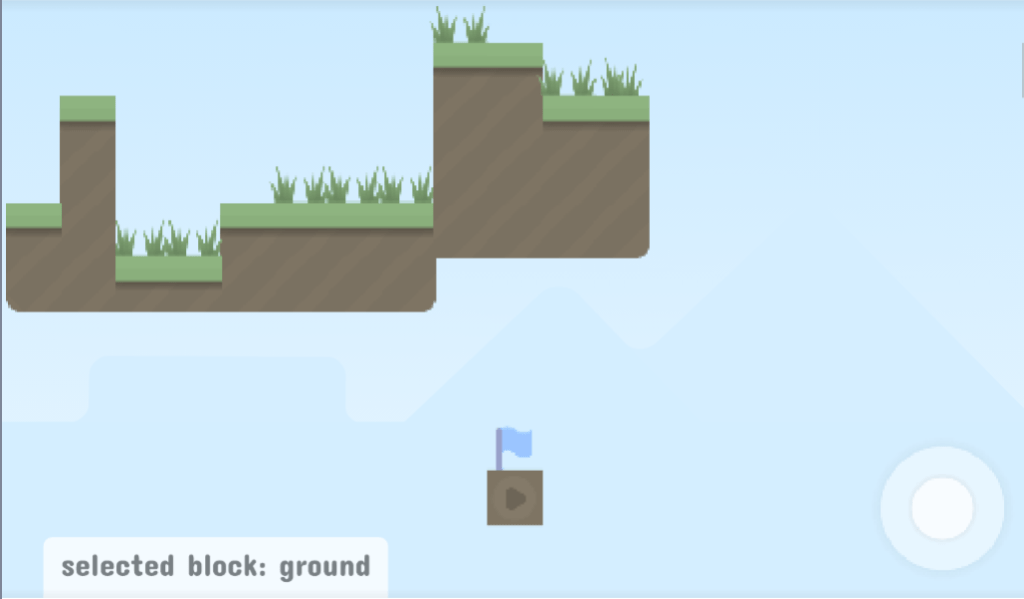
the final ground effect is shown below. To summarize the logic for the ground blocks: for the ground blocks on the lower layer(s), they will use “_1_1”, “_1_2” or “_1_3” costumes, depending on if they are located in the left corner, middle or right corner. While for the upper most layer of ground blocks, they will be added grassland overlay. The choice of grassland overlay is decided by the item value in “mode” list: 01, 11 or 21. The same rule applies when user chooses other themes.
When the “stamp” block runs to this point, it finishes rendering the costumes of all the existing blocks. The next part is to respond to “joystick” sprite or keyboard keys event. I will leave it to the next post for detailed explanation.
That is a really complicated, challenging project. Keep patient and enjoy the coding, have fun!
Note: All the analysis articles are copyright products of http://www.thecodingfun.com. Anyone re-posting them should credit author and original source. Anyone using them for commercial purposes or translating them into other languages should notify TheCodingFun and get confirmation first. All Rights Reserved.

Pingback: Learn Scratch by Analyzing Others’ Project – Platformer Game with Editing Functionality Part 4 – The Coding Fun
Pingback: Learn Scratch by Analyzing Others’ Project – Platformer Game with Editing Functionality Part 3 – The Coding Fun