

Color Sorter model is included into LEGO MindStorms EV3 software. It is a complicated model including more than 100 steps. Even following the instruction, it still takes a skilled LEGO fan around 2 hours to assemble it.

LEGO software contains many interesting models, such as Gyro Boy, Color Sorter, Puppy, etc. but is lack of explanation on why the design is done like this, and what the code means.
In this post series, I will explain the key mechanical structure and explain its sample code for Color Sorter model. The last post of this series will introduce an improved code segment to control this device, so that it could sort out color bricks faster.
Take a look at the real performance of the Color Sorter:
Four Functional Units
The whole model could be separated into four functional units. For detailed step-by-step building instruction, you could refer to LEGO MindStorms EV3 software. I will only focus on introducing the highlights of structure design in this post.

Part 1 – Smart Hub and Color Sensor
This part has no complex design. The key purpose is to design a frame to support the tilted smart hub, so the player could watch the screen clearer. It uses a 5*11 frame to build a base and use a 5*7 frame to make it convenient for connection.

Part 2 – Big Motor Driving
This part consists of one big motor as the output power and a touch sensor.
Touch Sensor
The touch sensor is fixed onto a proper position. It is not supposed to be used by player, but used to set the mounting device to an initial position.

Knob Wheels
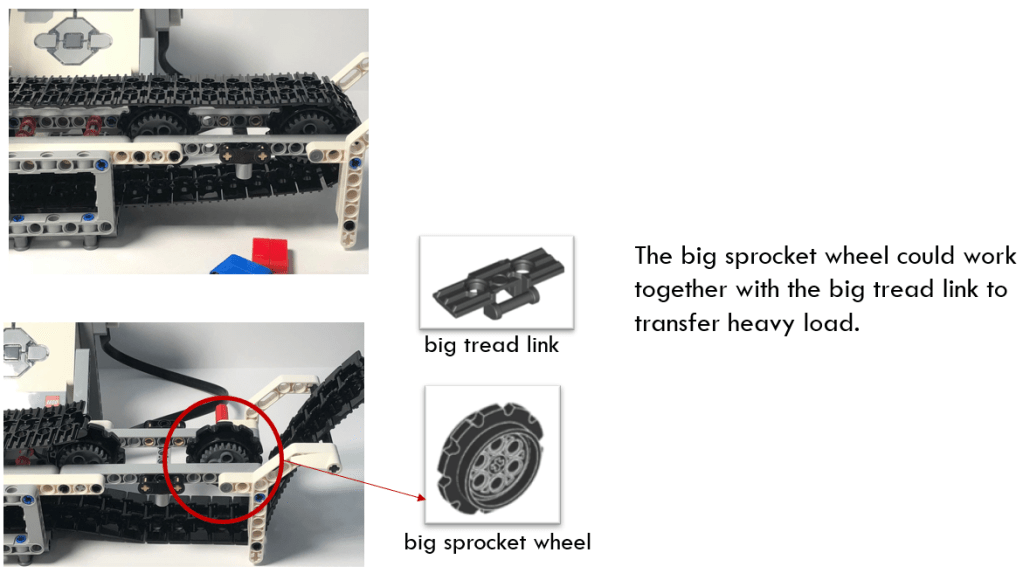
The axis of the big motor is connected to one of the knob wheels. Knob wheels are not gears, but they can mesh with other knob wheels just like bevel gears. Meanwhile, their advantages are that they are much stronger than gears and can handle significantly higher torque. Since driving the sprocket wheels and the whole tread links and mounting device requires high torque, I would say it is more appropriate to use knob wheels, instead of other bigger but more fragile gears.

Connect to Tread Link
Big motor drives the knob wheels and changes the direction of transmission and drives one of the sprocket wheels. There are four sprocket wheels distributed in a line. Other three sprocket wheels are passive wheels which are driven alone by tread link, but they are not useless. They provide support for the whole conveyor belt structure.

Part 3 – Large Tread Link and Sprocket Wheels
Those big sprocket wheel and snap-on tread link could work together. The application for its use is wide and varied, but generally it is used as a tank tread for mobile vehicles, conveyor type belts, or a pulley type system. You don’t need to strain the tread link. Leaving it a bit loose at the bottom could reduce the resistance force when turning.
Connect to Smart Hub
Unit 1, 2 and 3 could be assembled now. I will introduce the last but most complex unit, the mounting device.

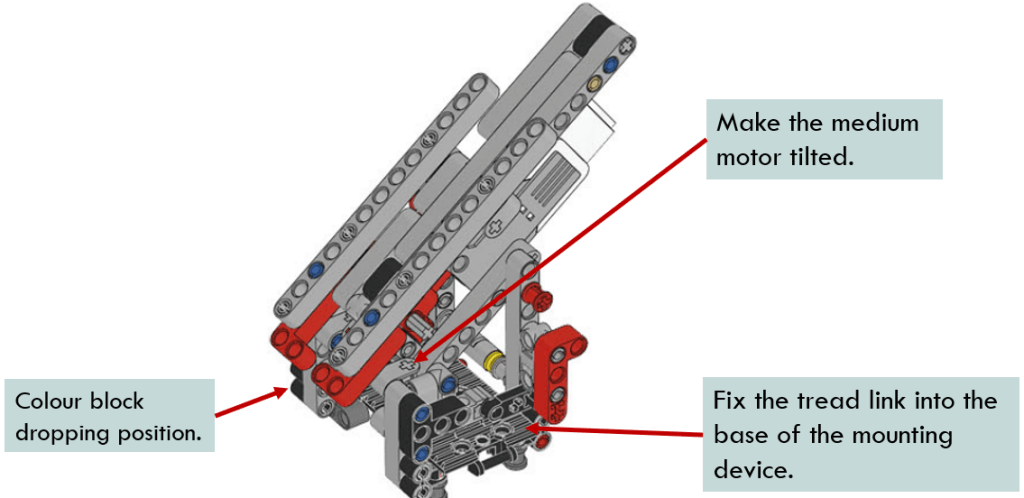
Part 4 – Mounting Device
Personally, I feel that mounting device is the most complex in this model. If you take a look at the step-by-step instruction, there are lots of small parts, connectors used in this unit. Some are used to tilt the medium motor, so that the color blocks could slide down by gravity. Some parts are used to fix tread link into the base of the device, so that the mounting device will move together with the tread link stably.
Last but not the least, there is an unfixed component which will decide the mounting and dismounting of color bricks. I will introduce it in the next section.
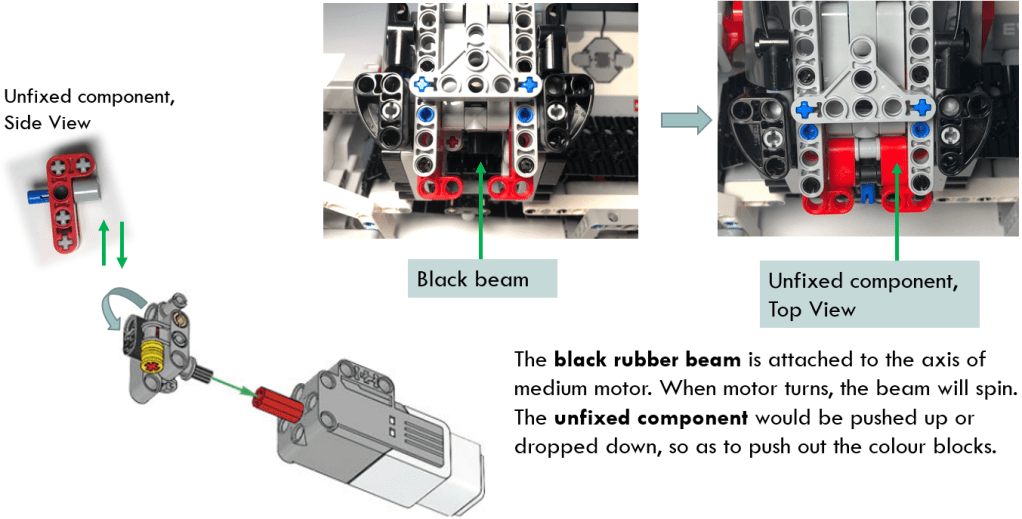
The Unfixed Component
From the below diagram, we could see that there is a black rubber beam connecting to the axis of the medium motor. When medium motor turns, the beam spins also. The unfixed component is put just on top of the black beam, but not fixed to any other blocks. Therefore, when black rubber beam turns to a certain degree (upright position), the unfixed component is pushed up. When black beam is turned to a horizontal position, the unfixed component is dropped down a distance of one stub.
How to Drop a Color Brick
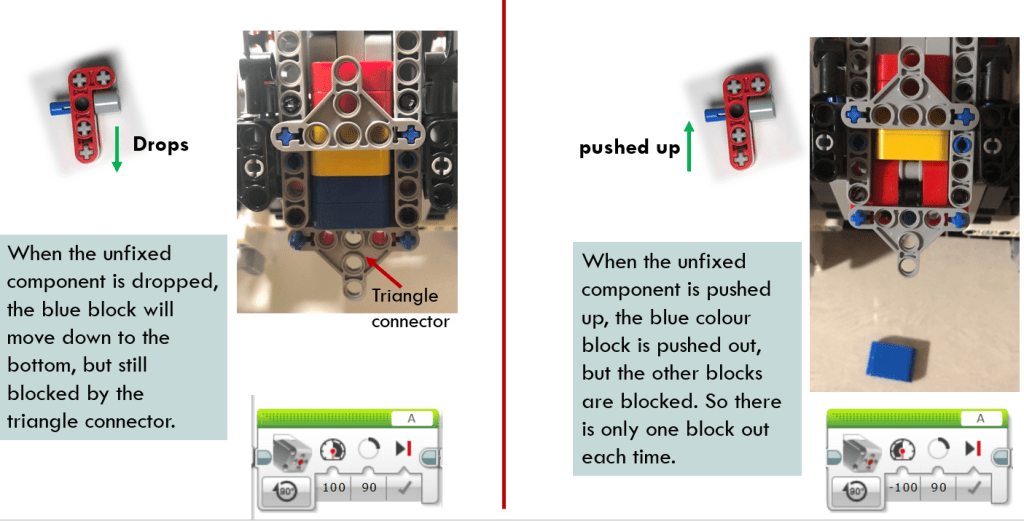
When mounting device needs to drop out one color brick, the program will make the medium motor turn a certain degree (below diagram, left side), so that the black beam turns to horizontal position, and the unfixed component drops down.
The color brick queuing at the bottom will slide down to the original position of the unfixed component, but please note that it is not sliding down at this moment because a triangle connector blocks it.
Very soon, the medium motor turns a certain degree again (below diagram, right side). The black beam spins to upright position and pushes up the unfixed component. The color brick mentioned above is pushed outside and drops out. What is amazing here is that other following bricks are blocked by the unfixed component, so they still stay in the mounting slots. In this way, there is only one color brick dropping out each time. Smart design!
If you are not clear about the drop-push action of the unfixed component, take a look at the below short video where I use finger to simulate the movement of black beam.
That is all for the highlights of mechanical design for Color Sorter. In the next post, I will introduce its code written with LEGO block language. Stay turned and Enjoy the Design and Have Fun!
Note: All the analysis articles are copyright products of http://www.thecodingfun.com. Anyone re-posting them should credit author and original source. Anyone using them for commercial purposes or translating them into other languages should notify TheCodingFun and get confirmation first. All Rights Reserved.

Pingback: LEGO MindStorms EV3 Model Analysis – Color Sorter Part 2 – Coding Courses Designed for Kids