

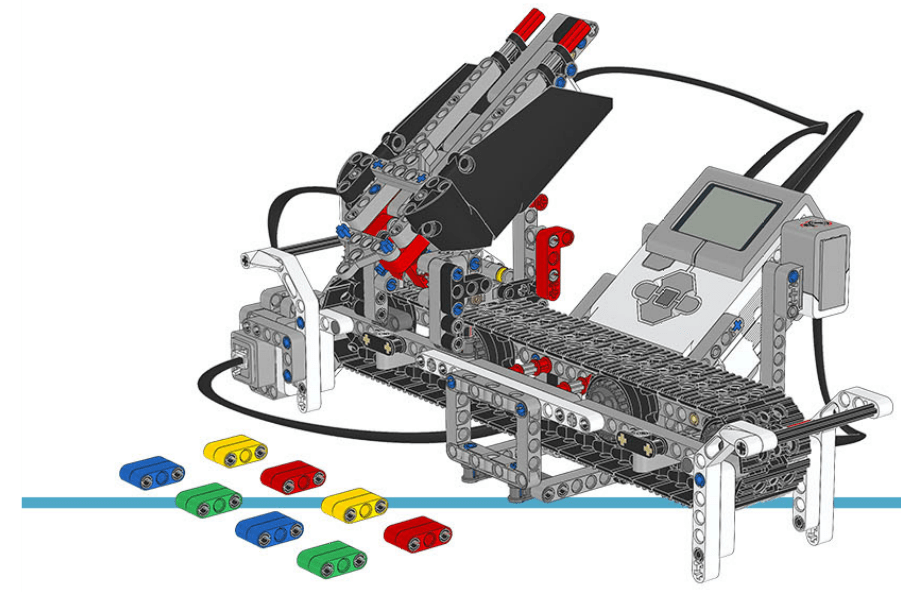
In the last post, I analyzed the mechanical structure of the Color Sorter. In this post, I will focus on analyzing the sample code and explain it in detail. So let’s begin!
Code Line Overview
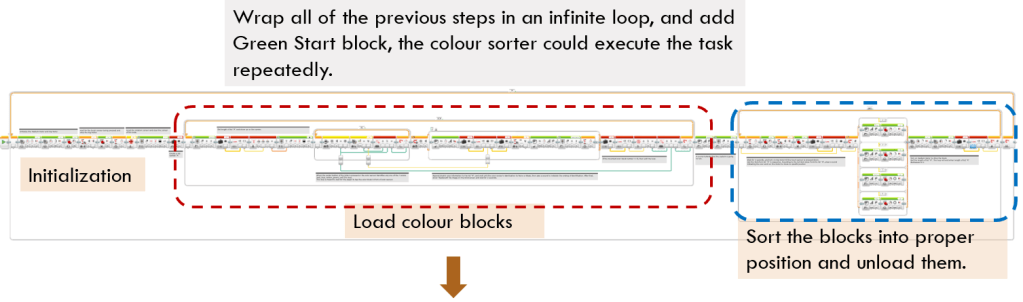
The code line is shown in a straight line, so it stretches very, very long horizontally. Some people do not like this style, feeling that it is troublesome to drag and read the code. I don’t think so. When there are many data wires connecting various blocks, and some loops contains many blocks, straight line style would make those data wires easier to understand. It would also be easier to edit blocks such as inserting or deleting blocks.
For this long code line, let me divide it into three functional segments. The first segment is to initialize the motors and sensors before the work begins. The second segment is the longest one among the three, which is used to mount the color bricks into the mounting device. The last segment is used to move mounting device to proper positions and then dismount the color bricks. Let me explain them one by one.
Segment 1 – Initialization
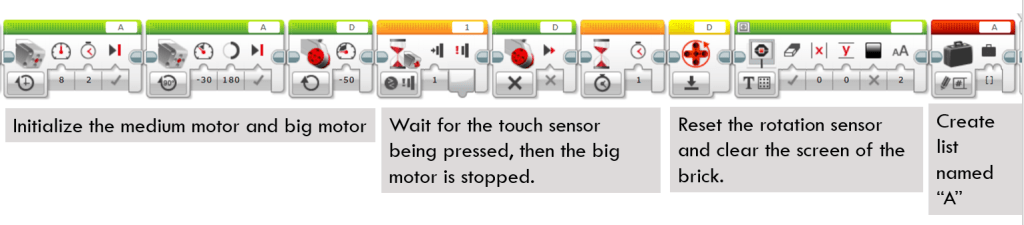
At the beginning, the program initiates the medium motor by making it turn a certain degree to a stall position. At this position, unfixed component is pushed up to prevent dropping of color bricks. If you don’t know what are “unfixed component”, please refer to my first post which introduces the mechanical structure of Color Sorter.
After that, the program turns on big motor till the touch sensor is pressed down by the mounting device in this scenario. The big motor stops. Till t his point, through adjusting medium motor and big motor, the mounting device is moved to the left most end of the conveyor belt, and the unfixed component is pushed up and gets ready to amount the color bricks.
At the end of the initialization segment, the rotation sensor is reset and smart hub screen is cleared. A list “A” is created which will be used to store brick color information.
Segment 2 – Load Color Blocks
This segment is the longest one of the three functional segments. It is wrapped in a big loop called “SCN”. Meanwhile, within this big loop, it contains several small loops and a switch block. It is complex because it needs to consider several conditions, such as what if the player clicks the center button of smart hub to stop mounting, how to make color sensor wait for the tapping from the user, and when to decide the mounting process finishes. Let’s take a close look now.

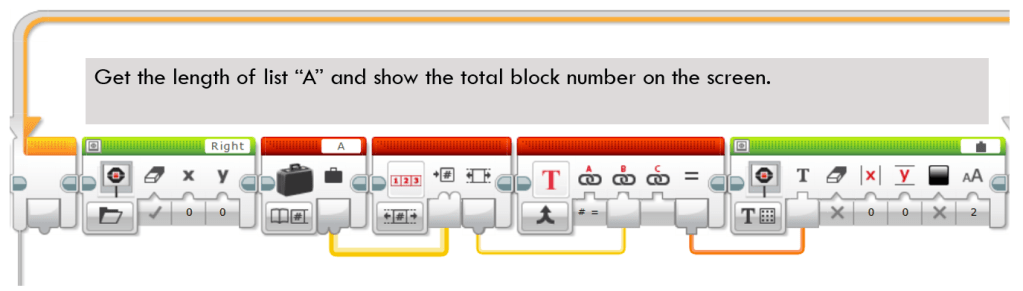
1). Display Color Block Information on Screen
At the beginning of the segment 2, the program clears the brick screen and then shows the length of the list “A” on the screen. It represents the total brick number currently mounted already.
2) Wait for Player to Tap Color Bricks on Color Sensor
The program now enters into a small loop called “BC”. If the player does not click center button, nor the color sensor detects any color bricks, the loop will continue executing till the color sensor detects one color which belongs to any one of four colors: Red, Yellow, Green or Blue, or the center button of the smart hub is pressed, the Logic block will output a value of True to terminate this loop.

3). Store Color Brick Information into List
In this sub-segment, the program first checks the status of center button on the smart hub. If it is in the status of “released” (status = 0), it indicates that the center button is not pressed at all in the previous loop “BC”, in another word, a new color brick is tapped by player in the previous loop “BC”.
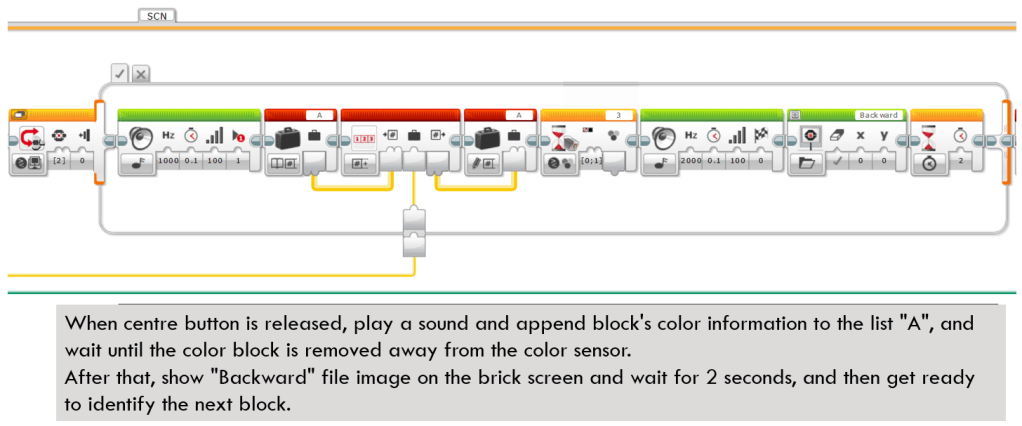
Under this condition, the switch block enters into True branch. The smart hub brick will beep and the program will append the color brick information to the end of list “A”.
After that, the program waits for the color sensor till it again detects “No Color” or Black color, which means that the player has moved the color brick away from the color sensor. The waiting block is very necessary. As we know, the computer runs very fast. Without waiting for the color sensor sensing “No Color” or “Black” color again, the big loop “BC” might have already run several times no matter how fast the player taps the color brick and removes it.
Finally, at the end of this switch block, the program beeps and shows “Backward” image on the screen, and then waits for 1 second. It means that the current color brick has been handled and the program is waiting to scan the next brick.
If the status of the center button is not “released” (status != 0), it means that the center button is pressed in the previous loop “BC”, so the player has done this to stop loading color bricks any more. Under this condition, the program enters into False branch and does nothing. In the following sub-segment, you will see that the program will exit the big loop “BC”.
4) Check If Fully Mounted
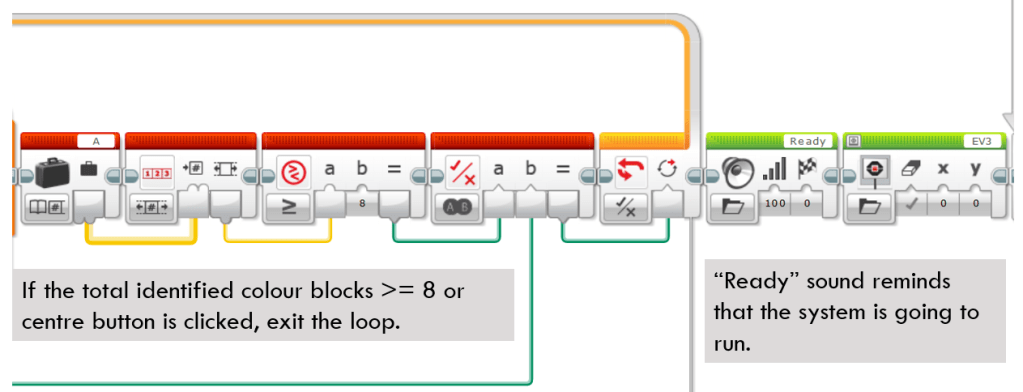
In this code segment, the program checks if the total mounted color blocks => 8 or the center button has been clicked or not. Either condition happens, the block mounting loop “BC” will finish and the program is going to enter into Segment 3. If neither condition meets, the program will enter into the next iteration and wait for scanning the next brick.
Segment 3 – Dismounting
1). Get Ready for Dismounting Color Bricks
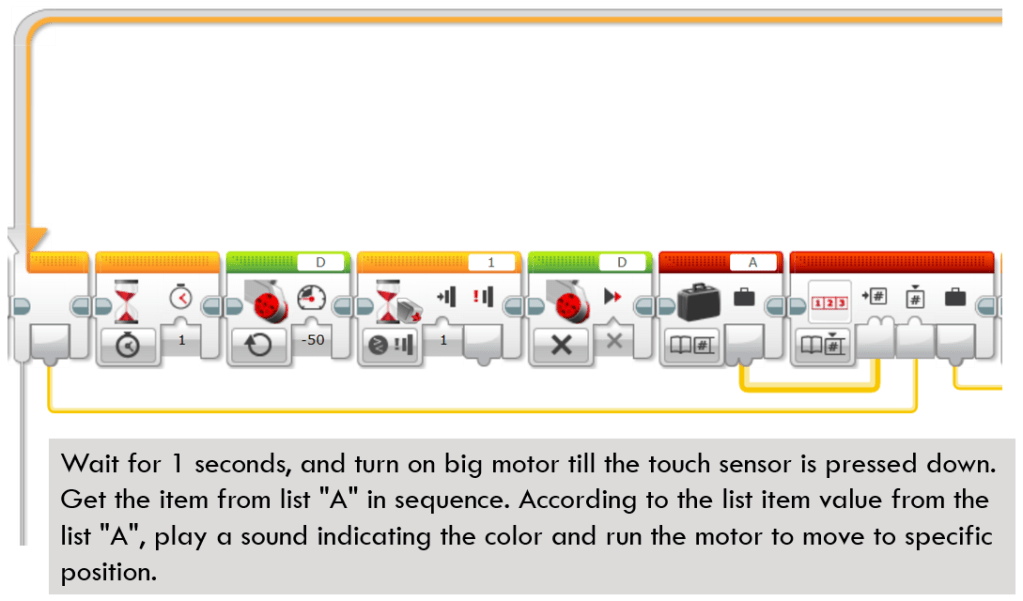
In this segment, the big motor turn a certain degree to ensure that the side of mounting device touches the touch sensor, which is the initial position for mounting device. It then retrieves the item’s value in the list “A” in order. The first item is 0, which has cleverly used the loop index as input. The List “A” retrieves the color code of bricks which represents the color of Red, Yellow, Green or Blue.
2). Move to Proper Position and Dismount the Color Bricks
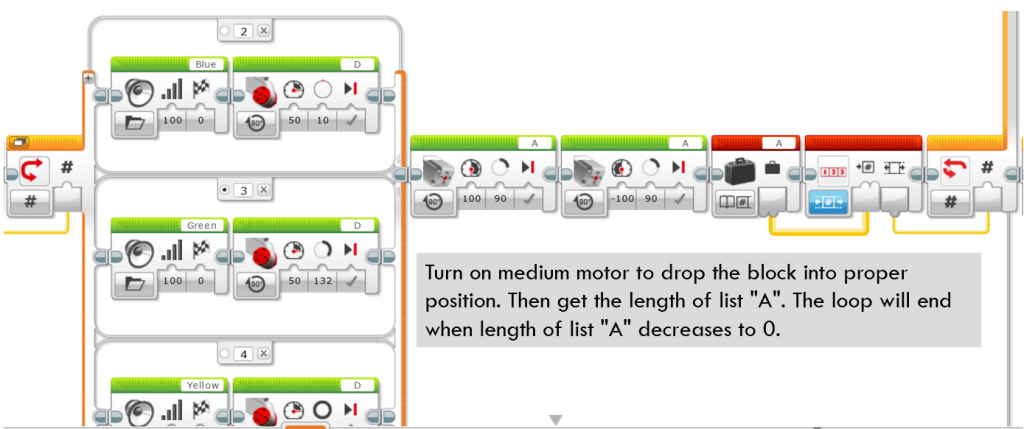
The color code of the list “A” item is then used as input for Switch block and based on the color code, big motor will turn different degrees to bring mounting device into different position.
After that, the medium motor will do its job. It turns a certain degree to drop the unfixed component and soon push it up, so that the first color brick in the queue will be pushed out of the slot and drop out. The mechanism of the unfixed component, black beam and medium motor has been introduced in my first post.
At the end of this segment, the program checks the current loop number. If the length of list “A” is equal to the loop number, it means that all the color bricks have been sorted out, the mission is accomplished!
Please note that the biggest, or ultimate loop “M” is unlimited times, so when the above mission is done, the program will enter into the next iteration – wait for mounting color bricks and then sort them out.
As a LEGO fan, you might notice that each time it drops out a color brick, the mounting device will always move to the initiation position (to the touch sensor) before carrying on the next sorting procedure. Could we simplify this process and improve its sorting efficiency?
In the next post, I will introduce a method to improve its current solution. Stay tuned! and Enjoy the Coding and Have Fun!
P.S. If you want to read the code and analysis in your own environment, you could download the following project zip file.
Note: All the analysis articles are copyright products of http://www.thecodingfun.com. Anyone re-posting them should credit author and original source. Anyone using them for commercial purposes or translating them into other languages should notify TheCodingFun and get confirmation first. All Rights Reserved.

Pingback: LEGO MindStorms EV3 Model Analysis – Color Sorter Part 3 – Coding Courses Designed for Kids