

In previous post, I summarized the key points of platformer game tutorial video uploaded by well known Youtuber. However, some platformer games could even go further. They could allow user to define the ground, obstacles, checkpoints and then save their level setting information to their computer. When the user plays the game, they could start a new level or just import their self-designed environment, further update it and play in their own environment. Pretty cool, right?
You might wonder how to upgrade the platformer game to realize such an effect? Well, here, I would like to analyze such a project. It contains complete functionalities, so its code structure is pretty complicated. Take the example of its core sprites “Hitbox” and “Blocks”, each of them contains more than 800 code blocks.
Therefore, I will just pick out some core code segments and explain their functionalities. Let’s start now!
The project code could be accessed at:
https://scratch.mit.edu/projects/542983287
Game demo:
Visual Effects
When we run this program, we could find some stylish UI elements of the game, such as the pop up buttons, expandable side bar and animated effects. Here I would like to introduce one code segment which realizes the pop-up effect of the buttons.
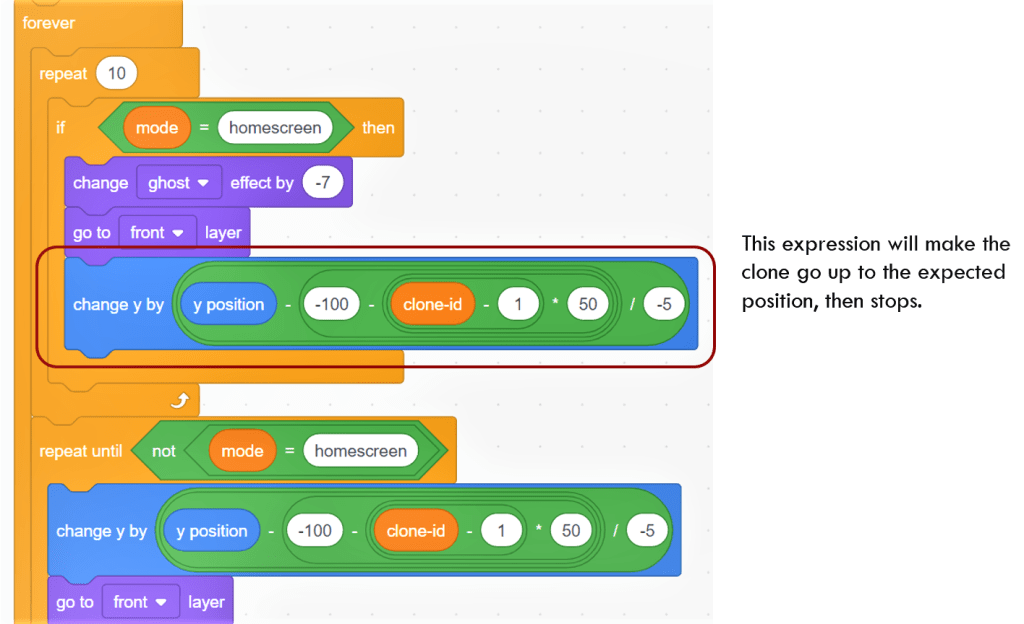
The following code is extracted from “when I start as a clone” code segment, “Homescreen UI” sprite. This sprite creates two clones. Within the forever block, each clone will change its ghost effect by -7, and change y by a various amount in each iteration. Please note the “clone-id” is a local variable (only visible to this sprite). Therefore, the two clone buttons have different values of “clone-id”.
The circled code block indicates that each time, the clone changes y by a various amount. So what will be the final y position of the clone button? Its y position will not change any more when the expression is equal to 0. For example, when clone-id is 0, the clone button’s final y position would be (-100), while the second clone button’s final y position would be (-100 – 50) = -150.
The final visual effect would be like this:
The following code segment shows another example of visual effect. It is extracted from “Thumbnail” sprite. When game is running, it always “reset timer”, so timer value is 0. When user stops the game either by calling “stop all” block or by pressing Stop button, “timer” increases, and it triggers the code segment “when timer > 0”. In the red circled block, the thumbnail image starts from ghost of 100 (fully transparent), then it “change size by (size – 100) / -3” in each iteration. When the expression “(size – 100) / -3” is equal to 0, the size wound not change any more. Therefore, its final size would be 100.

The pop-up effect of the thumbnail image is shown below:
There are many areas in this project which use the similar method to realize visual effect. You could read the code to have a better understanding.
Encoding Level Data and Export
For most of projects, the user could not store their customized data. However, in this project, user could export their environment settings and store that information on the computer. As I mentioned, those customized settings contain ground, coins, obstacles, checkpoints and winner tag.
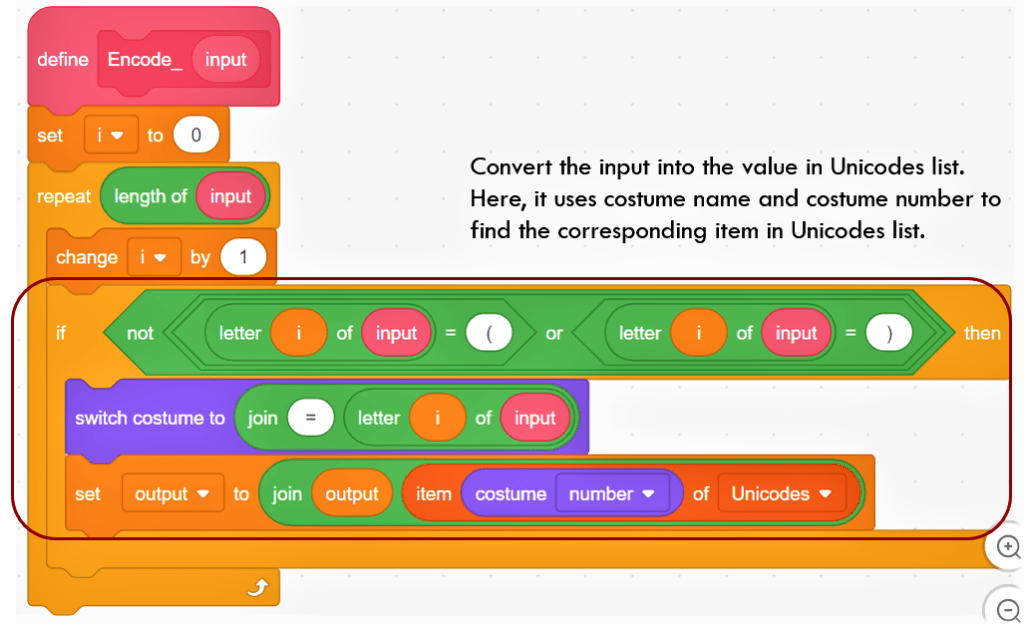
The first step for exporting is to encode the data. This function is fully implemented by several blocks of “Encoder / Decoder” sprite. The first block is “Encode_”. It iterates the “input” string, and encodes the input character by adding character “=”. This could be regarded as the first layer encoding.
It then switches to show a costume which have the same name of the encoded character. The costume number is used to find the corresponding item in the list “Unicodes”. This could be seen as the second layer of encoding. At the end of each iteration, it updates variable “output” by joining the newly added encoded character.
To summarize here, the author uses two-layer encoding. The first layer is to encode the input character into the costume name by adding “=” before it. The second step is to find the corresponding item in list “Unicodes”. Through this two-layer encoding process, the output string would look pretty difficult to decipher. A typical output string could look like this:

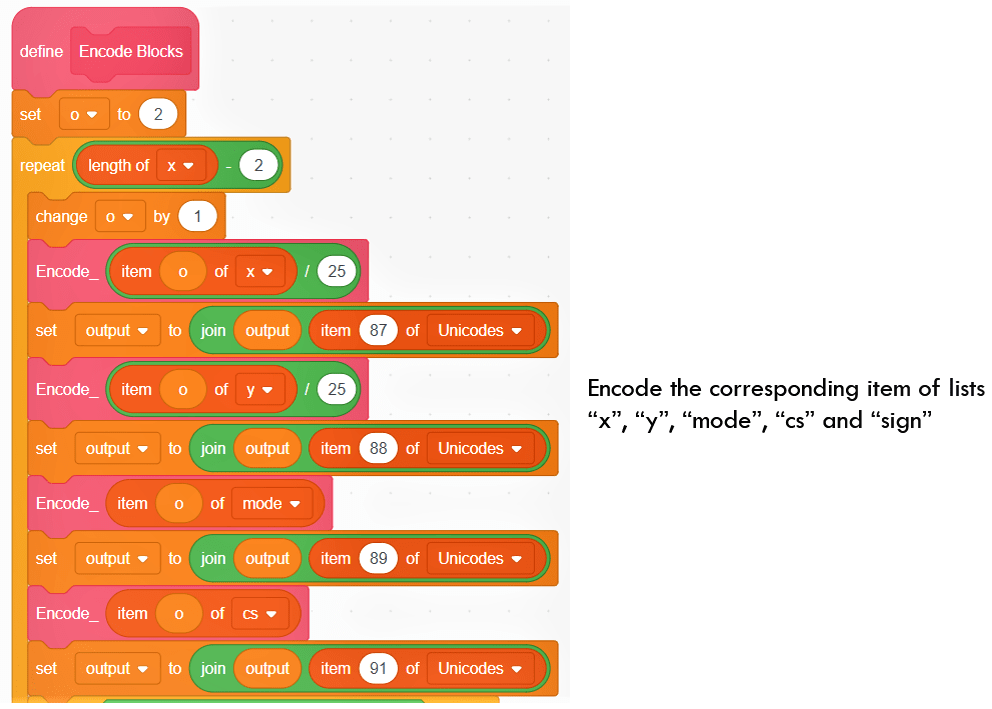
The next block of “Encoder / Decoder” sprite is “Encode Blocks”. It is used to export data of several lists which are all related to the environmental setting. Within this block, the program uses the above block “Encode_” to encode the data of “x”, “y”, “mode”, “cs” and “sign” lists. The “output” string will concatenate each encoded data to form the final result.
Please note that when encoding, items of x and y lists are divided by 25 since x and y coordinates are the multiplier of 25 units. This method could make the encoding content simpler. After encoding each item, the program will attach a special char as separator.
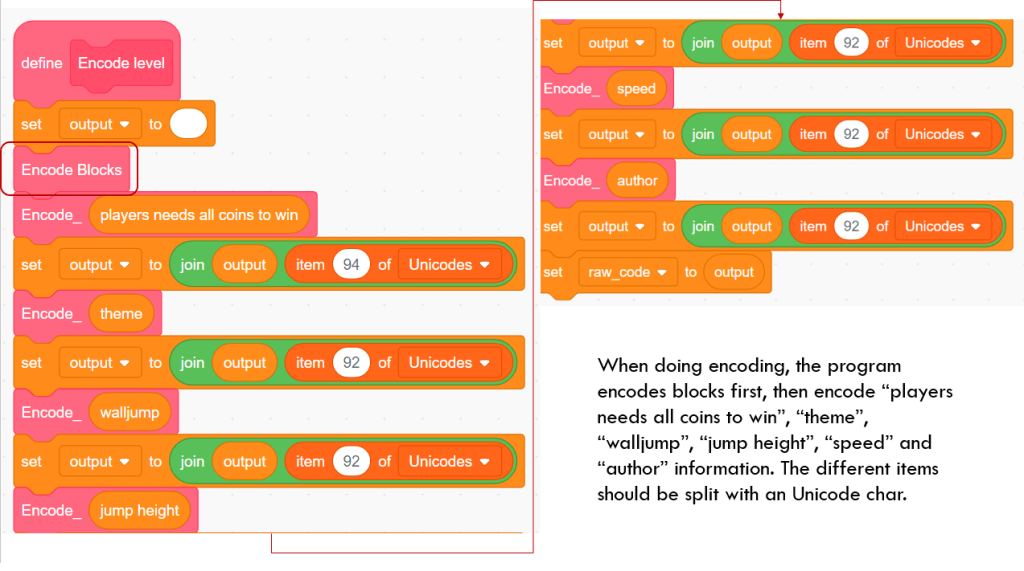
The next block is “Encode level”. It wraps all the encoding procedure. It calls “Encode Blocks” to encode data of “x”, “y”, “mode”, “cs” and “sign” lists. It then encodes several variables which are related to the user settings, such as “players needs all coins to win”, “theme”, “walljump”, “jump height”, “speed”, “author” variables.
The above code segments define how to encode the user related settings, but how and where to invoke those blocks? Block “click” of Sprites “Editor&Play UI” will broadcast “getdta” when clone-id is 2, as shown below. The receiver of message “getdta” will call the above block “Encode level” to encode all the required information.
After getting “output” string through broadcasting “getdta”, the program added four items into the list “Save your level” and show the list on the stage. The program uses “ask … and wait” block to ensure that user knows how to copy the encoded string. Scratch does not provide any functional blocks to interact with the file system. Therefore, once user gets the encoded string, it is his/her responsibility to save the string into a txt file.

The list “Save your level” and its display is shown below.

Two-layer Encoding Process Demonstration
Assuming item #3 of list “x” is “-125”, so how to encode “-125” to “ó5ý”? Based on the previously mentioned blocks “Encode Block” and “Encode_”, the “Encode Block” passes “-5” (-125 / 25 = -5) as input argument to “Encode_”. “Encode_” encodes “-” first. The sign “-” is encoded into “=-” and finds the costume number whose name is also “=-“. The costume number is 78. The program then gets item #78 of “Unicodes” list. The item is ” ó”.
The next step, “Encode_” encodes “5”. It is encoded into “=5” and finds the corresponding costume number is 14. The program then gets item #14 of “Unicodes” list. The item is “5”.
After encoding this item of “x” list, the “Encode_” block will attach item #87 of “Unicodes” list as separator. The item value is “ý”.
The above process explains how to encode number “-125”.
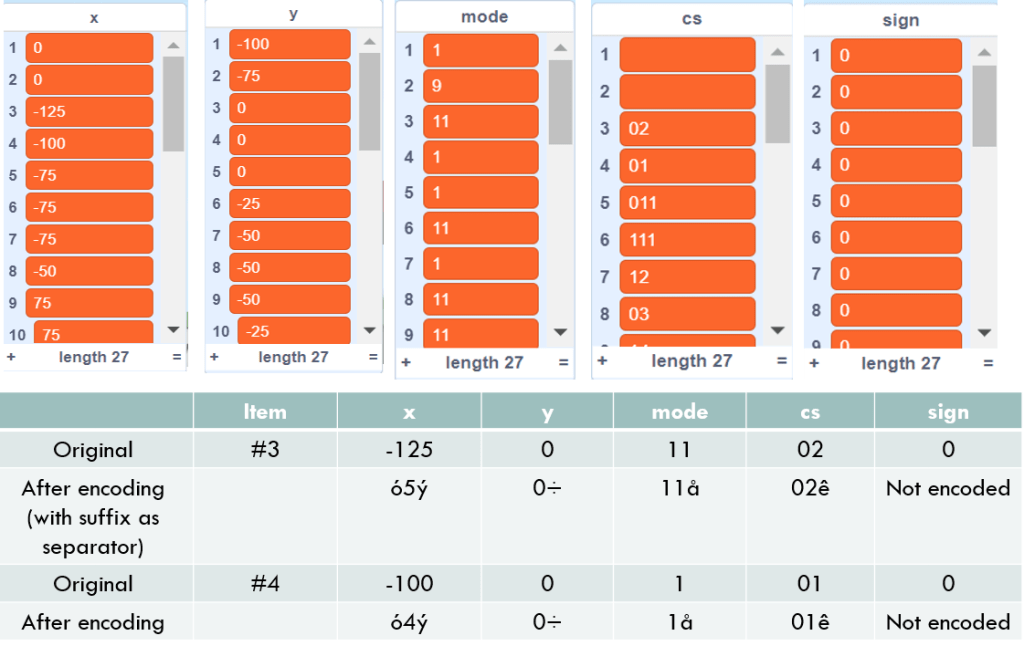
Encoding the item at the same index from lists “x”, “y”, “mode”, “cs” and “sign”, we will get result “ó5ý0÷11å02ê”. Encoding items one by one and concatinating all the data together, we will finally get the output result. The format of the final output could be like this:

Import Existing Level Data
The above code segments cover the functions of exporting the setting. The following part is used to import the stored data. The first step is that we need to have a decoding block. It is defined in “Decode level” block of “Encoder / Decoder” sprite.
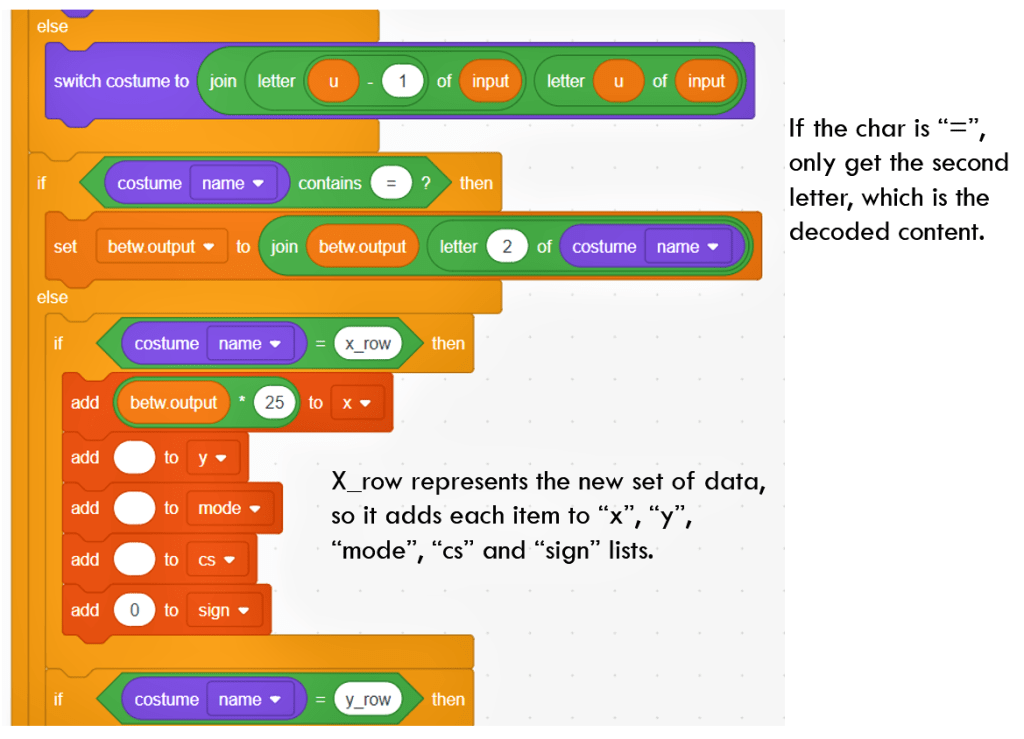
The program first clears all the values of those variables. It then iterates the “input” string. Here the variable “u” acted as an index and changes 1 each time. The decoding process is just a reversed one of the encoding process. What it does is to get the input char and find its index in list “Unicodes”. After that, it gets the costume name whose costume number is equal to item index of “Unicodes” list. This process decodes the second layer.
Based on the costume name, the program will check if the costume name contains “=” sign. if it does, the original letter is just normal ones. Then the program just gets the 2nd letter of costume name to retrieve the original number or letter. However, if costume name does not contain “=”, then it is the separator of lists. The program then assigns the value to list item based on the separator name.

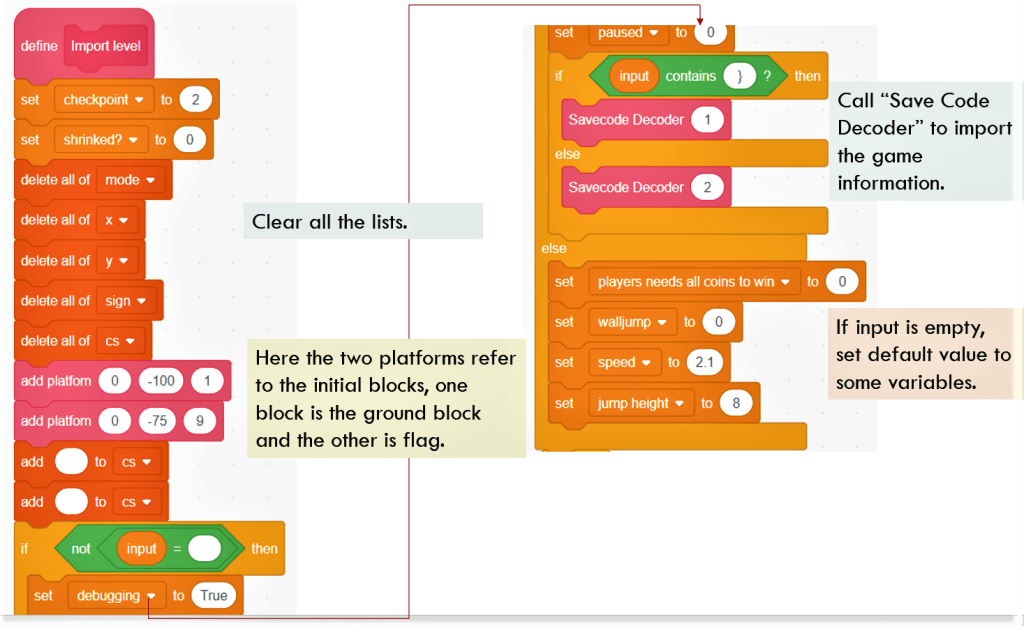
Just as “Encode level”, we need to use a block to call “Decode level”. It is defined in block “Import level” of “Hitbox” sprite . It first sets checkpoint to 2, and deletes all the content in the lists “mode”, “cs”, “x”, “y” and “sign”. Please note that compared to the original version, I add “delete all of cs”, and then add twice of block “add (empty) to cs”. The purpose is to ensure each added item in those lists has consistent index.
“add platform” block will add two default blocks at specificed x and y positions with the mode “1” and “9” respectively.
For the next step, the program will check if the input is empty or not. If the user does not import any code, the program will just use default value of some variables and then finish importing. Otherwise, it calls “Savecode Decoder” block to conduct decoding.
Since the input does not contain “}” at all, the program will always call “Savecode Decoder (2)” block. The latter just broadcasts a message called “decode level”, which then calls the above block “Decode level” of sprite “Encode Decoder”.
In this post, I introduced the key functionalities we could take away from this project -The vivid visual effects and its encoding/decoding functionalities. In the next post, I will introduce how to edit the environmental settings in Editor mode as well as how to identify the blocks in Player mode. Keep tunning and enjoy the coding and have fun!
Note: All the analysis articles are copyright products of http://www.thecodingfun.com. Anyone re-posting them should credit author and original source. Anyone using them for commercial purposes or translating them into other languages should notify TheCodingFun and get confirmation first. All Rights Reserved.

Pingback: Learn Scratch by Analyzing Others’ Project – Platformer Game with Editing Functionality Part 4 – The Coding Fun
Pingback: Learn Scratch by Analyzing Others’ Project – Platformer Game with Editing Functionality Part 2 – The Coding Fun