
If you read my recent posts, you will notice that I have analyzed several shooting games. A typical scenario of a shooting game is that you need to deploy multiple weapons from weapon library and those weapons will shoot out bullets.
There are more than one ways to design weapon dragging and bullet shooting behaviors. In Airplane shooting game, the enemy airplane and enemy bullet are put into the same sprite but use different costume. In Plant and Zombie game, peashooter and pea bullet are separate sprites but they interact through lists.
In today’s post, I would like to introduce a scenario, which could be regarded as an intergrated scenario for the airplane shooting game and Plant & Zombie game. That is, user needs to choose a weapon from library and drag it to a place on stage. After that, the weapon will identify the neareast enemy automatically and target it to shoot bullets.
You could access the original project at this place: https://scratch.mit.edu/projects/112658472
This game is designed with multiple spirtes but I will just pick up two core sprites. Tower01 to Tower11 sprites define all the weapons in the library. Different weapons are unique in their strength and weakness, but the way to implement their functions is similar, so I will just pick up Tower01 sprite for analysis. The other sprite is Enemy, which is the opponent of the weapon sprite. Its interaction with Tower01 sprite is key for us to understand this game.
A demo video is shown below:
Enemy Sprite
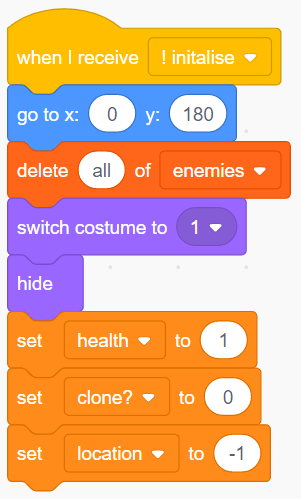
“when I receive !initialise” Code Segment
This is the initialization code segment for the Enemy sprite. It deletes all of items in “enemies” list, and sets initial values for variables “health”, “clone?” and “location”. “enemies” list records the x and y position of each enemy sprite clone, therefore, each enemy clone will occupy two items in this list.
“health” variable is responsible for recording the health status of each enemy clone. “location” variable records the index of created clones. Both of them are local variables, so each enemy clone will keep a unique copy of those variables.
“when I receive Start” Code Segment
“start” message is sent out when user clicks Start button. When Enemy sprite receives this message, it calls “spawn enemy colour” block based on the value of “Wave”. “Wave” variable represents the game level. There are 20 waves in total. If user passes all of those waves, he/she wins the game.
In each wave, the enemy clone’s costume is different. Each time, an enemy clone is created, location variable is changed by 2, so that the clone’s x and y position could be stored in the #location and #(location+1) place of “enemies” list.

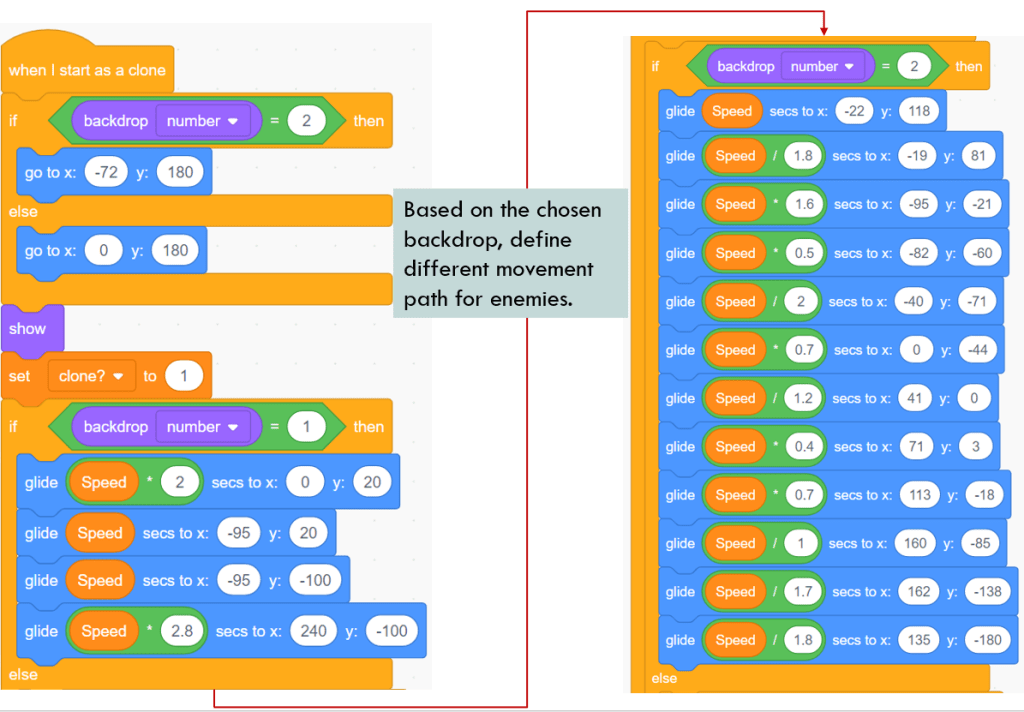
“when I start as a clone” Code Segment
1st parallel segment:
This code segment is responsible for defining the movement path of enemy sprite clone. No matter which map user has chosen, most of routes are not straight, but contain turns or curved path. The program uses several “glide” blocks to defines the running path. Although “glide” block moves the clone straight from starting to ending point, when multiple “glide” blocks connect consecutively, they could simulate a curved route.
Besides the above mentioned curved route, some map offers random route. For example, when backdrop number is 4 (representing map #4), the enemy clone could choose either path of two choices.
I am not going to list the complete code for this segment “when I start as a clone” since the method used to define each route is the same.

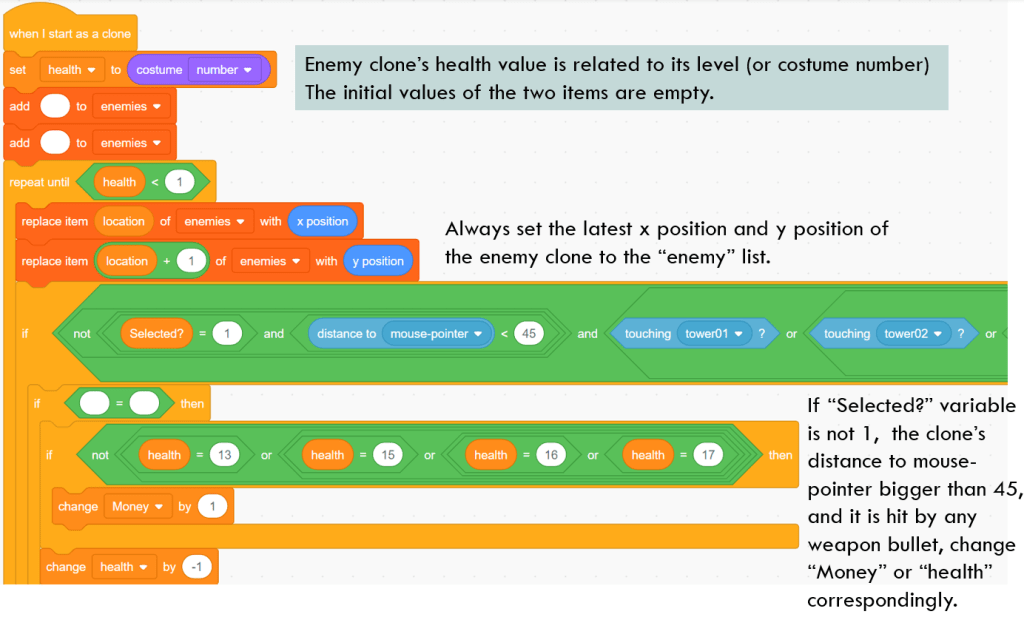
2nd parallel segment:
This parallel segment is responsible for handling the interaction between enemy clone and weapons, “health” value is set at the beginning the program and its initial value is higher when enemy clone’s costume number increases. An enemy clone with a high health value indicates that it is difficult to get eliminated.
In the “repeat until” loop, the x position and y position of the enemy clone is filled into the #(location) and #(location+1) of the “enemies” list. Please note the loop iterates multiple times, and the enemy clones are always gliding. Therefore, the value in the “enemies” list will always track its latest position.
The next code in the loop will check if the enemy clone touches weapon bullet. There are another two conditions needing to be satisfied. One is “selected?” variable equal to 0, and the other is “distance to mouse pointer” not less than 45. When all of those conditions are met, this enemy clone is hit by bullet and its health value gets deducted. When its health value is equal to 0, the enemy clone is deleted and its location value in “enemies” list changes to 9999.

That is all the code of the Enemy sprite. Its main behavior includes gliding and handling the interaction with weapon bullet clones. In the next section, I will introduce one of the weapon sprite: Tower01.
Tower01 Sprite
Tower01 sprite is just one of the 12 weapons. It is located at the 1st column, 1st row in the left side toolbox.
In the initialization code segment “when I receive !initialise”, the program uses 1st costume, which has a normal appearance of Tower01 weapon. The second costume looks strange. It actually shows the appeance of the bullet shot out from this weapon.
Putting weapon and its bullet in one sprite is not uncommon. If you have read my previous post of Airplane shooting Game, you might see that both Enemies sprite and Hosny sprite use this method to design its code.
“when I receive !initialise” Code Segment
In the code segment of “when I receive !initialise”, when the mouse hovers over Tower01 sprite, the program will inform the user weapon’s price and its feature. Please note the use of variable “Selected?” here. When “Selected?” is equal to 0, it indicates that user has not clicked on the weapon. If “Selected?” is 1, meaning that user has clicked and chosen this weapon, the notification information will not show.
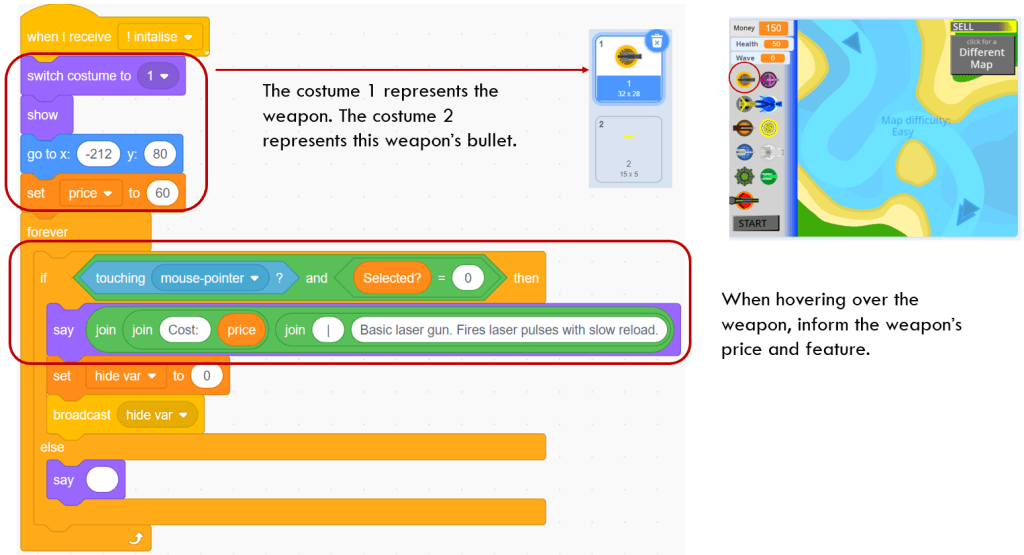
“when this sprite clicked” Code Segment
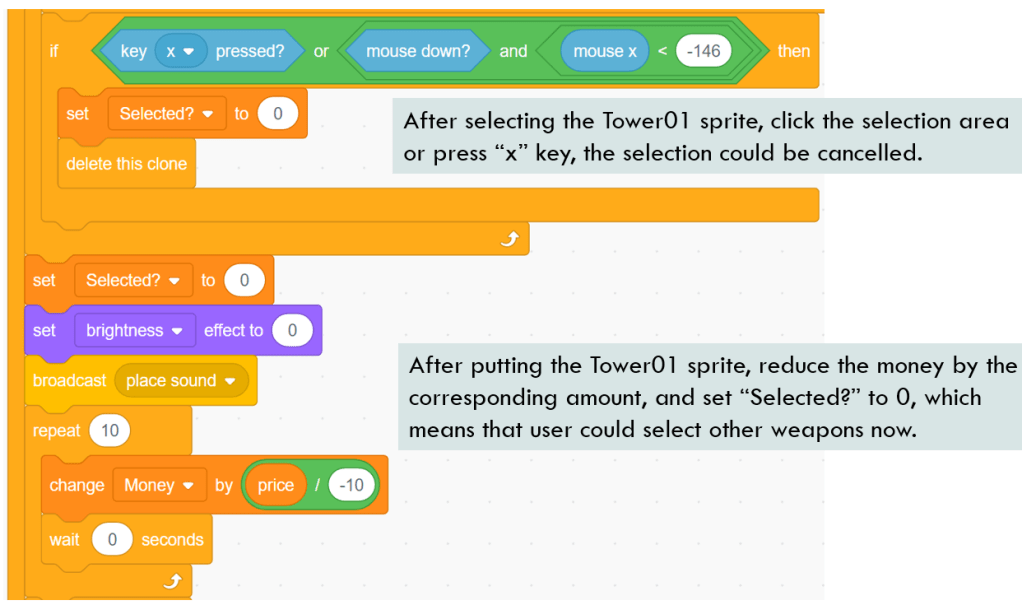
When this sprite is clicked, the program needs to judge if it has enough money to buy this weapon. If money is enough, it will set Selected? to 1, and then create a clone of Tower01 sprite.
“when I start as a clone” Code Segment
This code segment is super long, so I will explain it part by part.
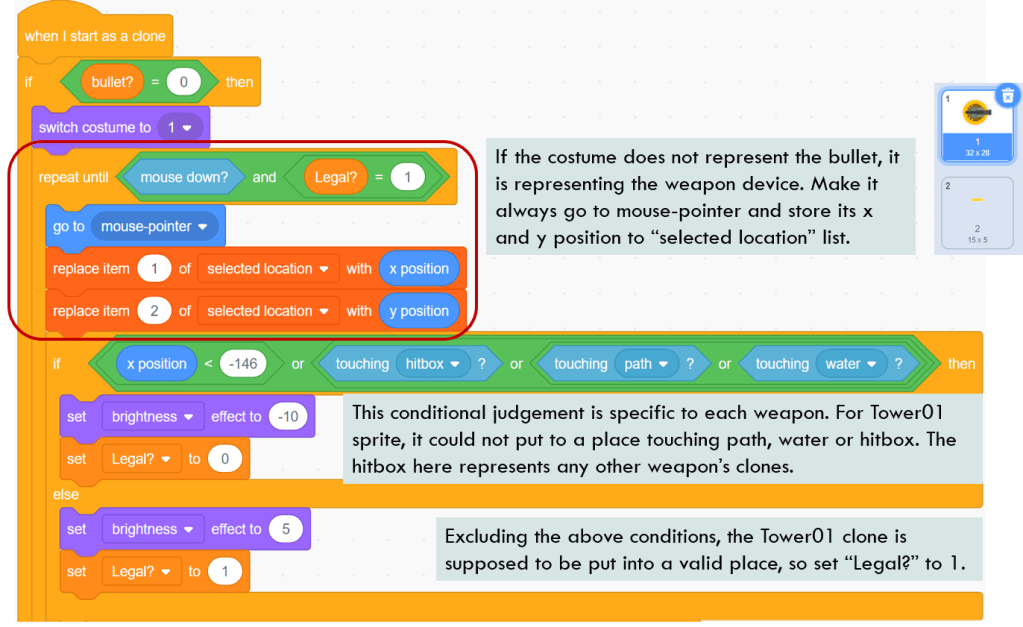
Once Tower01 clone is created, the program will judge the value of “bullet?”. If “bullet?” is equal to 0, it means the clone is not a bullet clone, but a Tower01 weapon clone. The clone always moves with mouse pointer until mouse is clicked and the weapon deploying place is legal.
Please note that for different weapons, the legal places are different. For Tower01 sprite, it could not put to a place touching path, water or hitbox. The hitbox is a transparent circle surrounding each weapon clone. Not allowing to touch hitbox means that the game does not allow two weapon clones to be deployed too close.
Next, after the user selects a weapon, but presses x key or clicks mouse in the toolbox area, the user could cancell the selection. The weapon clone is also deleted. The program will set “Selected?” variable to 0, so that user could continue selecting other weapons.
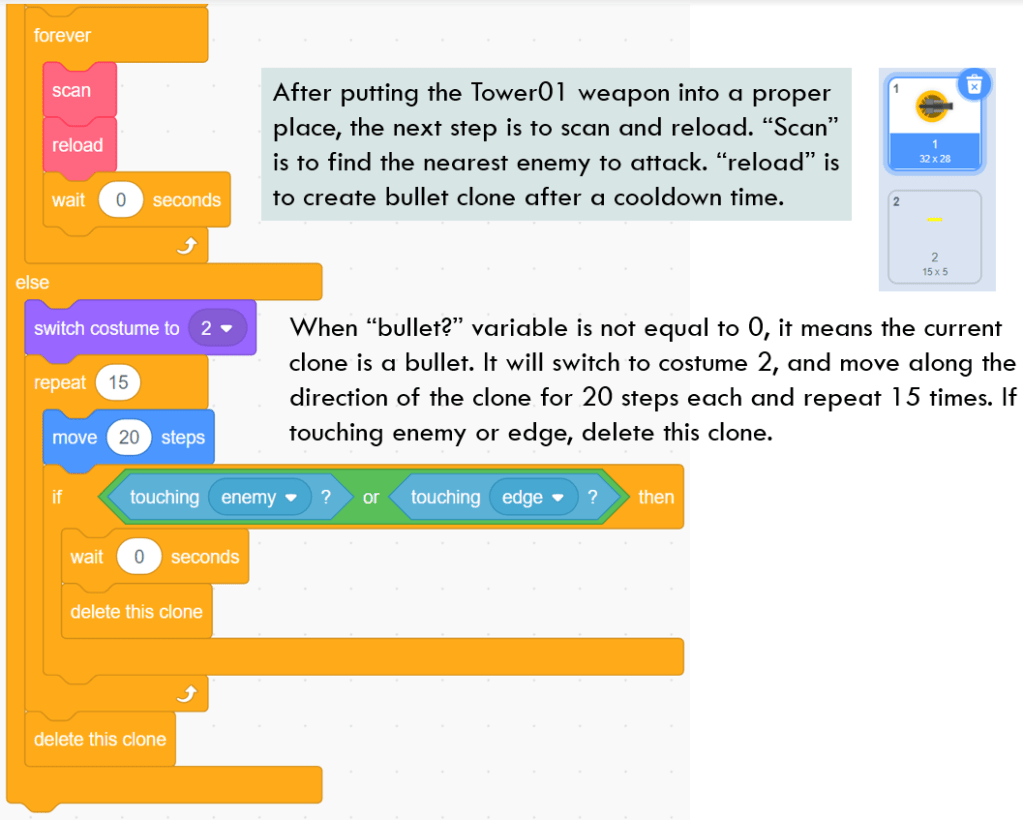
Let’s continue analyzing this segment. After putting the Tower01 weapon to a proper place, the next step is to repeat scaning and reloading. “Scan” is to find the nearest enemy to shoot. “reload” is to create bullet clone after cooling down time.
In “reload” block which I will explain below, it sets “bullet?” variable to 1 and creates weapon clone after cooling. When “bullet?” is 1, the above mentioned “when I start as a clone” segment will switch to run the 2nd channel. The weapon clone will use costume 2, and move along the direction specified in “scan” block for 20 steps each time and repeat 15 times. If touching enemy or edge, delete this clone.
“scan” Block Definition
Remember we mentioned the “enemies” list when introducing Enemy sprite above? This list stores the x and y positions of each enemy clone. Therefore, “length of enemies / 2” returns total amount of enemies clones. The block again calls another block “distance to” to acquire the distance between the Tower01 clone and each enemy.
For Tower01 sprite, when the nearest enemy clone is not far more than 150, it is within the valid shooting range. Tower01 clone will point toward that enemy as the target.

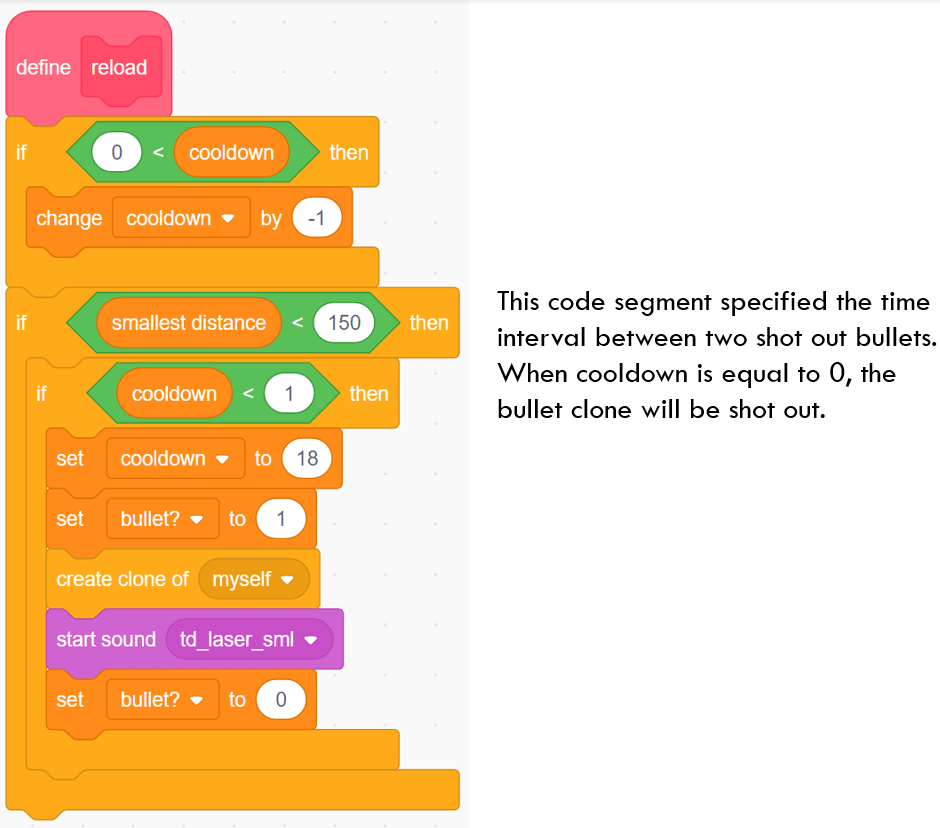
“reload” Block Definition
This block is simple. It repeats until cooldown variable is 0. After that, it sets variable “bullet?” to 1 and creates bullet clone. Finally, it will reset “bullet?”variable to 0. Otherwise, it is too frequent to generate bullet clones.
“distance to” and “point towards” Blocks
The “distance to” block uses sqrt method to find the distance between two points. “point towards” block uses atan method to calculate the angle between two point and 0 direction, which represents the direction of the weapon bullet. Since atan method returns a degree between -PI/2 annd PI/2, while Scratch 3.0 direction ranges from -PI to PI, for some degrees, the atan result should turn 180 degrees to get correct direction.

That is all for the analysis of the two core sprites – Enemy and Tower01. There are other auxilliary but important sprites. I will not analyze them here and leave for readers to understand their design and functionality. Anyway, enjoy the coding and have fun!
Note: All the analysis articles are copyright products of http://www.thecodingfun.com. Anyone re-posting them should credit author and original source. Anyone using them for commercial purposes or translating them into other languages should notify TheCodingFun and get confirmation first. All Rights Reserved.
