

In my previous posts, I focus more on analyzing puzzle games, such as Grids, Sliding Puzzle Game, Tetris etc. It does not mean that I am not interested in the platform games or fighting games. They are always among the most popular games on Scratch official website.
However, since the well-designed platform game and fighting game usually contain lots of sprites and the implementation is complex, it is not easy to analyze them. In today’s post, I would analyze an airplane shooting game which I have simplied based on the original version, so we could concentrate on those core code segments.
You could access the code of the project at: https://scratch.mit.edu/projects/396159798/
If you are more interested in the original project, then you could find it at: https://scratch.mit.edu/projects/393748928.
Although I have simplied the original version, some core sprites still include many code segments. I will divide the whole analysis into three parts. In this first part, I will analyze Player sprite, Bullet sprite and Enemies sprite. Let’s start right now.
Player Sprite
This sprite represents the Player airplane the user is controling. It is not complicated. “when Green Flag clicked” and “when I receive Game Over” code segments are responsible for setting the initial value of Score variable and hide the Player sprite at the beginning and end of the game.
The main code segment for Player sprite is “when I receive Game”. This message indicates the starting of the game. The Player sprite’s direction will always point toward mouse pointer. Its y position keeps the same as that of mouse pointer, while its x position is decided by “Player X” variable.
When Invisible variable is True, this sprite will broadcast “FollowPlayer” message, which will be received by Powerups sprite to apply a shield to the Player sprite.
“when I receive Success” code segment will check Score of the game and compare with the cloud variable “Highscore”. It will update “Highscore” if a new score record is just created.
You might wonder how you could create and use a cloud variable, which allows users to store variables “in the cloud,” or on the server. Please note that if you are a New Scratcher, you will not see the option of “Cloud Variable (created on server)” in New Variable window.
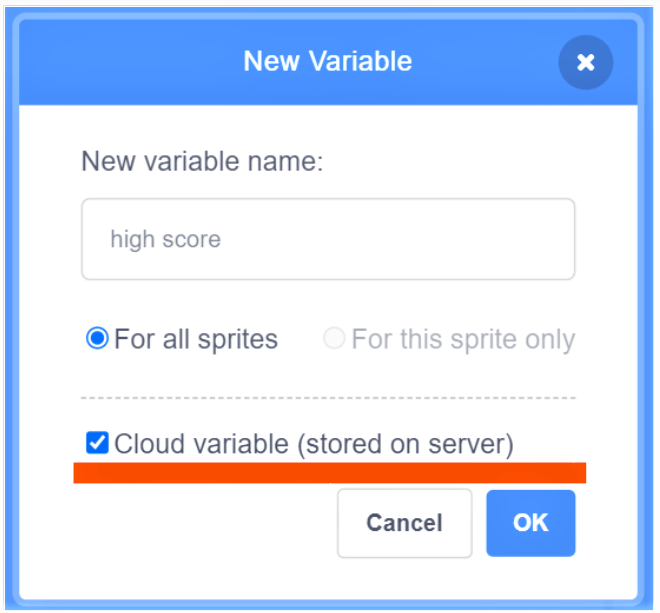
More information about cloud variable, please refer to Scratch Wiki at: https://en.scratch-wiki.info/wiki/Cloud_Data.
Bullet Sprite
Bullet sprite represents those bullets fired out from Player sprite. Its main fucntion is implemented by two code segments. One is “when I receive Game”. It continuously monitors the mouse down status. If the mouse is clicked, the program will create a clone of Bullet sprite.
Please note the block “change Player X by -10”. This block is used to simulate the backward thrust of bullets when they shoot out.

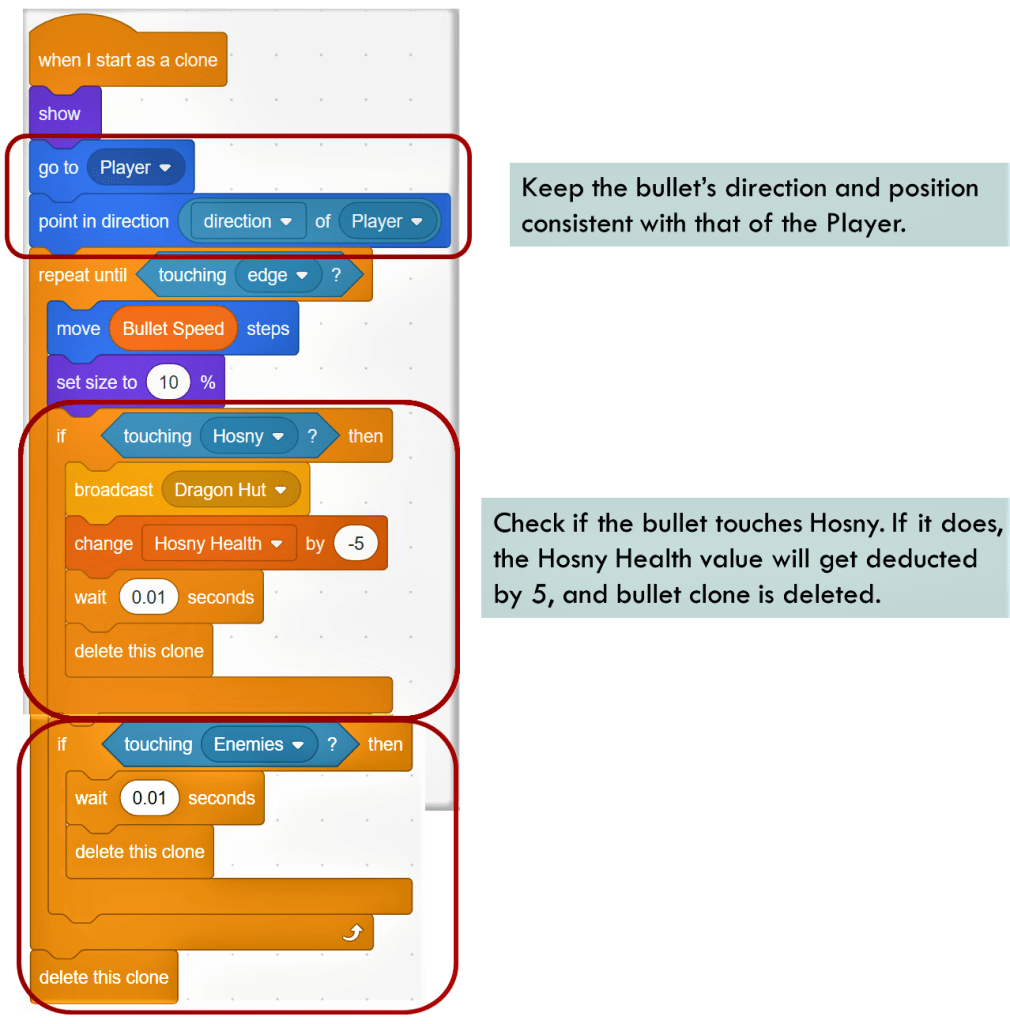
In code segment of “when I start as a clone”, initially the bullet clone will go to Player’s position and keep its direction consistent with that of Player sprite. It will move steps alone this direction until touching edge or Hosny sprite (it is the “boss” of the whole enemy aircrafts. I will analyze it in the next post) or Enemies sprite.
Enemies Sprite
Now, we will take a look at the Enemies sprite. It contains the most code segments compared to other sprites. In order to be easier to understand, I categorize the code into several parts.
In “when Green Flag clicked”, “when I receive Game Over” and “when I receive Success” segments, the code is simple, just specifying when to hide the sprite and delete its clones.

Main Code Segment
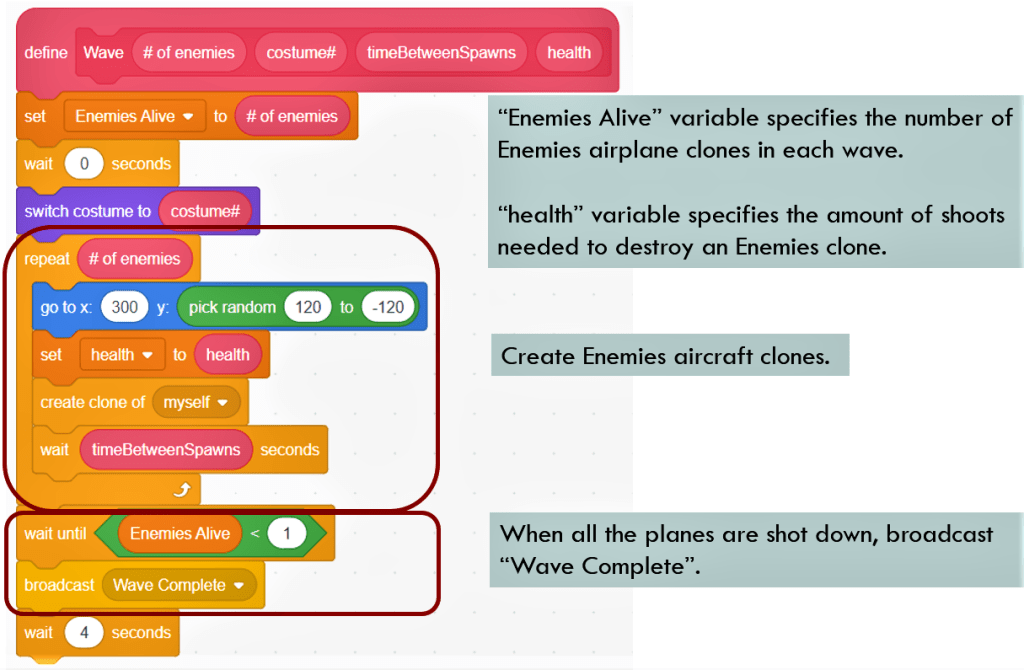
The main segment of Enemies sprite is wrapped in “when I receive Game”. This code segment sets “Difficulty” and “Enemy Shoot Thingy” variables first, then call a self-defined block “Wave” twice. “Difficulty” variable is responsible for setting the movement speed of Enemies aircraft clones, while “Enemy Shoot Thingy” is used to compare with a random value to decide if an Enemies airecraft clone could shoot out bullet or not. The two varaibles would be used in “when I start as a clone” and I will introduce it soon.
In the original project, the game designs three levels, and each level contains several waves of enemy aircraft attack, thus it takes much longer to clear those aircrafts before seeing the final boss “Horey”. In this version, the whole process has been shortened. After two waves of aircraft attacking, user could engage into the final battle with the boss.

The block “Wave” contains some key methods. It wraps the code to create a row of Enemies aircraft clones. Among those input parameters, the first input specifies the number of enemy aircrafts in a batch. The second input specifies the costume of the aircrafts (“Regular” or “Purple”). The third parameter indicates the interval of the enemy airplane appearing and the last input indicates the robustness of the enemy airplane. That is, how many bullets are needed to damage an enemy airplane. Through using those input parameters, this code segment creates a batch of Enemies airplane clones which appear at random position with a random interval. At the end of the code segment, it will wait till all the Enemies airplane clones being destroyed, and then broadcast “Wave Complete” message.
Clones’ Behavior
The following code segments are responsible for defining the behaviours of Enemies airplane clones. In the first parallel code segment of “when I start as a clone”, it changes the brightness of Enemies clone when the clone is hit by bullet.

In the second parallel code segment of “when I start as a clone”, it focuses on defining the movement path of the clones. When the clone’s costume is Regular or Purple, the clone will make the “Basic Movement”, but what makes costume “Purple” different is that the Purple Enemies airplane clone could shoot out bullets. It creates Enemies bullet by calling a self-designed block “Clone_bullet”, which I will introduce soon.
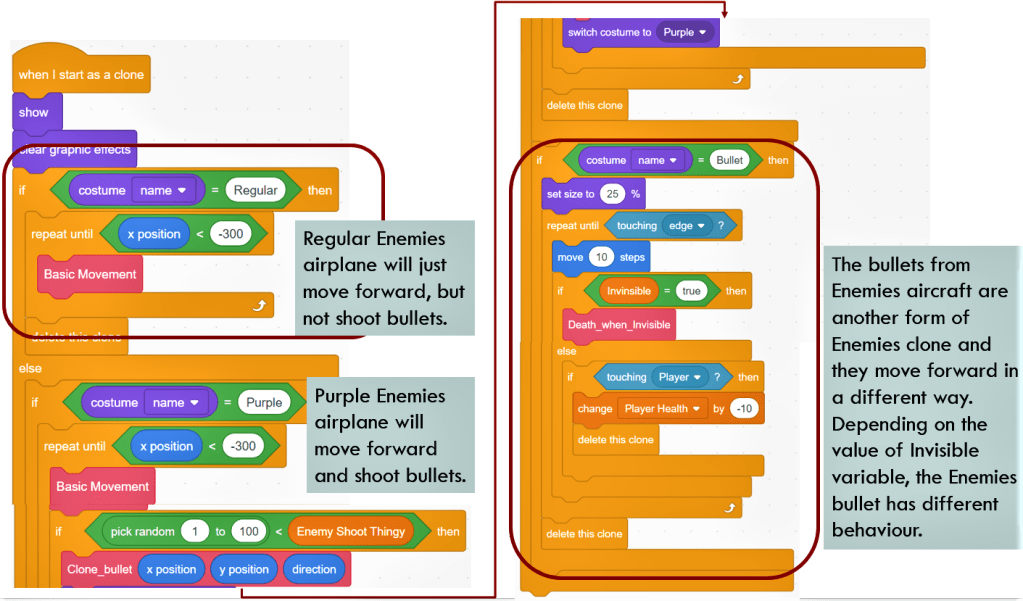
If you take a look at the costume list of Enemies sprite, you will notice that “Bullet” is one of its costumes, which sits side by side with the other two airplane costumes Regular and Purple. Here the author uses a very tricky but smart method to put the bullet and enemy plane costumes together and implement their different functions in a single sprite.
Let me show you how the author makes it.
“Clone_bullet” Block
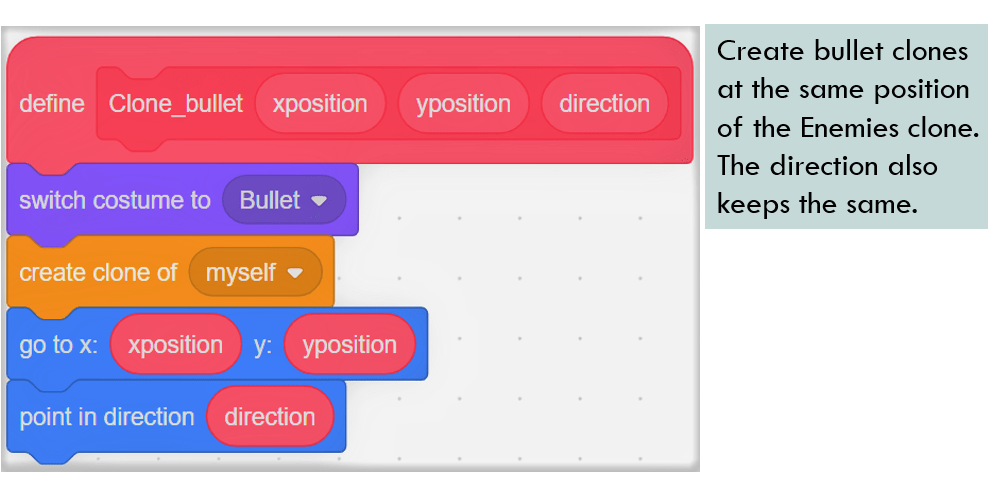
One point I would like to emphasize is that do no confuse the bullets shot out by Player sprite and by Enemies sprite. Bullet sprite represents the bullets fired by Player sprite. For those bullets fired by Enemies airplane clones, they are another form of Enemies clone, which I have shown in the above costume list.
In the above “Clone_bullet” block, it create an Enemies clone by using its costume Bullet. This clone will have the same direction, x position and y position as that of Enemies airplane clone which calls this “Clone_bullet” block. The effect is just like the bullet shot out from that Enemies airplane clone.
Once Enemies bullet clone is created, it will execute the code channel of “if costume name is Bullet” in the above “when I start as a clone” code segment. Unlike Enemies airplane clones, the bullet clones will move alone straight line. It will disappear after touching edge, Player sprite or Powerups sprite. All those behaviours have been defined in the above “when I start as a clone” code segment.
“Basic Movement” Block and “Death_when_invisible” Block
In the above “when I start as a clone” code segment, when Enemies costume is Regular or Purple, the program will call “Basic Movement” block. It defines how Enemies airplane clones move and interact with Player sprite. Unlike those Enemies bullet clones, Enemies airplane clones will not fly straight. They will always point towards Player sprite to simulate a chasing effect. If the Enemies airplane clones touch the bullets shot out from Player sprite, its health value reduces and when health is reduced to zero, the Enemies airplane clone flips over and disappears gradually.
When the Enemies airplane clones touch Player sprite, the game rule is different, depending on if the Player sprite has shield or not. If Invisible is equal to true, it means that Player sprite is protected by shield (a costume of Powerups sprite). Enemies airplane clone is destroyed immediately, and Player sprite keeps intact. When Player sprite is not protected, both Enemies airplane and Player sprite will get hurt. It is reasonable, because in a real world, the crash of two planes will result into both casualties.
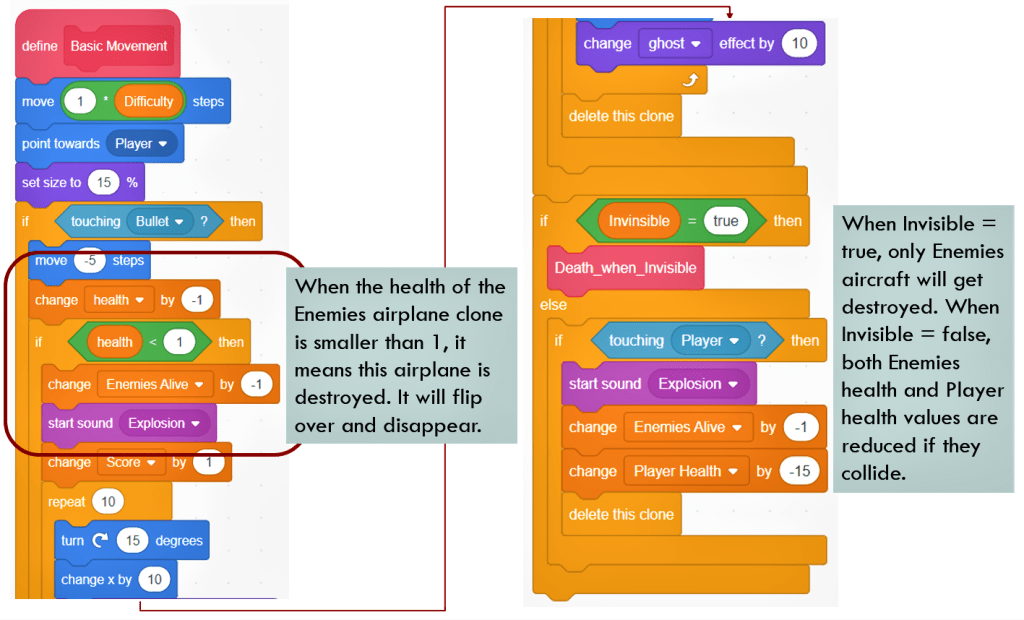
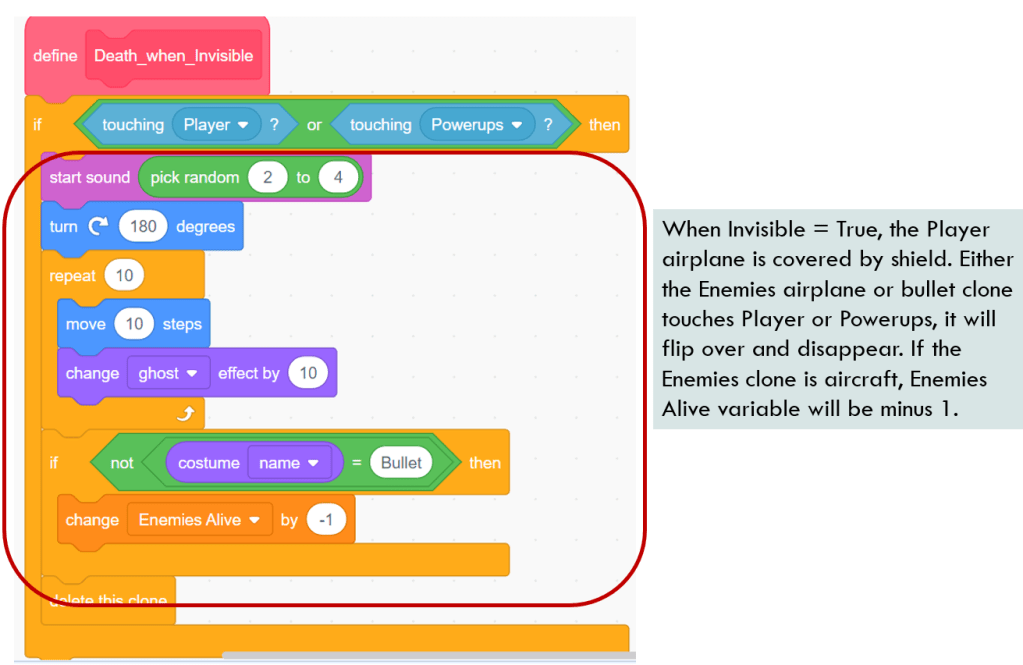
The last code segment I would introduce is the block called “Death_when_invisible”. It defines the behavior when Enemies airplane clone and bullet clone hits the shield. Under this condition, both Enemies airplane clone and bullet clone will be bounced back, flip over and disappear. If it is Enemies airplane clone, “Enemies Alive” variable will be deducted by one.
That is all for the analysis of three core sprites in the air force shooting game. In the next post, I will analyze another core sprite – a giant flying monster, which represents the utmost evil power. Stay tuned and do not forget to enjoy the coding and have fun!
Note: All the analysis articles are copyright products of http://www.thecodingfun.com. Anyone re-posting them should credit author and original source. Anyone using them for commercial purposes or translating them into other languages should notify TheCodingFun and get confirmation first. All Rights Reserved.

Pingback: Learn Scratch by Reading and Analyzing Others’ Project – Tower Defense – The Coding Fun
Pingback: Learn Scratch by Reading and Analyzing Others’ Project – Airplane Shooting Game Part 3 – The Coding Fun
Pingback: Learn Scratch 3.0 – Two Ways to Create Multiple Bullet Clones – The Coding Fun
Pingback: Learn Scratch by Reading and Analyzing Others’ Project – Airplane Shooting Game Part 2 – The Coding Fun