

Did you play Angry Bird game on your phone? It was once popular and easy to get addicted. Now, let’s learn how to implement a simple version by using Scratch 3.0.
The original project could be found at https://scratch.mit.edu/projects/286172798
Since the original project contains some Chinese characters, I replaced them with English names and you could access this version at https://scratch.mit.edu/projects/437461605/.
A game demo is shown below:
Sling Sprite
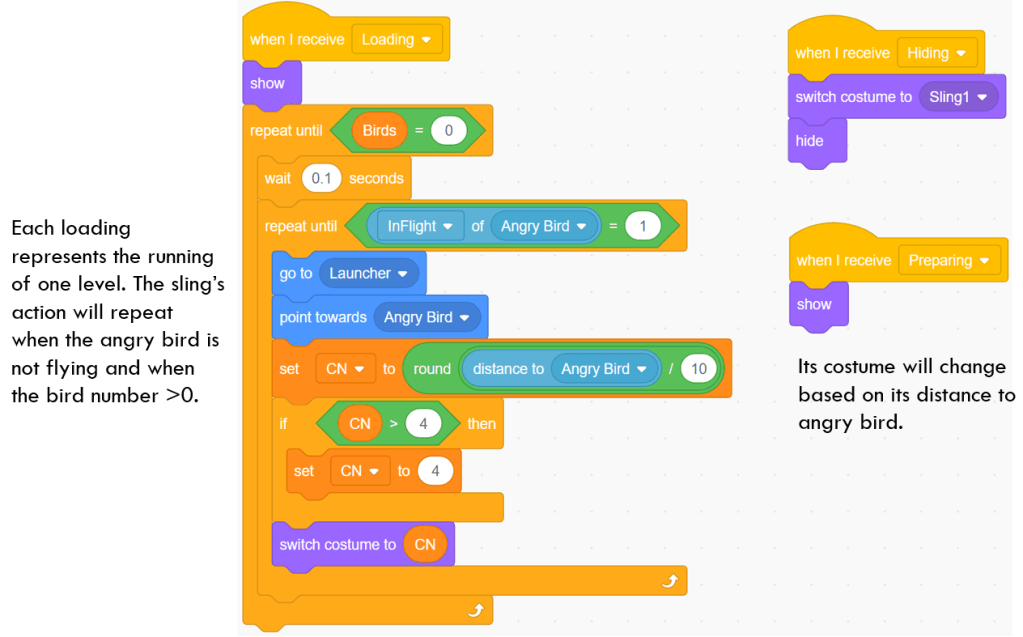
Before I introduce any sprite in the game, I would like to explain some messages and variables used in this project. “Landing” message is broadcasted by Next Level sprite or by Backdrop sprite. This message indicates the start of one level. “Preparing” message and “Shooting” message are broadcasted after each flight of angry bird. All those messages are broadcasted by Angry Bird sprite, and I will introduce them in detail in the later sections of the post. In each level, there are three birds’ lives (represented by Birds variable) that player could use to hit the Pig sprites. “InFlight” variable is used to indicate if Angry Bird is in flying status.
The sling sprite is just what its name says, it connects the Launcher and Angry Bird sprite, and looks like a device to discharge the Angry Bird sprite. Each time after receiving Loading message, when “Birds” variable value is bigger than 0 and InFlight variable is not 1, Sling sprite will always go to Launcher sprite and point towards Angry bird sprite. Here the program does not specify explicitly that Sling sprite is “set rotation style all-round”. The sling sprite could rotate to behave like a sling connecting Angry Bird and Launcher.
The diagram below illustates the position and rotation behavior of the Sling sprite. When it points toward Angry Brid, one end is on the Launcher sprite and the other is pointing toward Angry Bird. Depending on the distance to Angry Bird, Sling sprite uses costumes of different length, so the visual effect is that Sling sprite could elongate itself and always connect Angry Bird with Launcher.

Stick Sprite
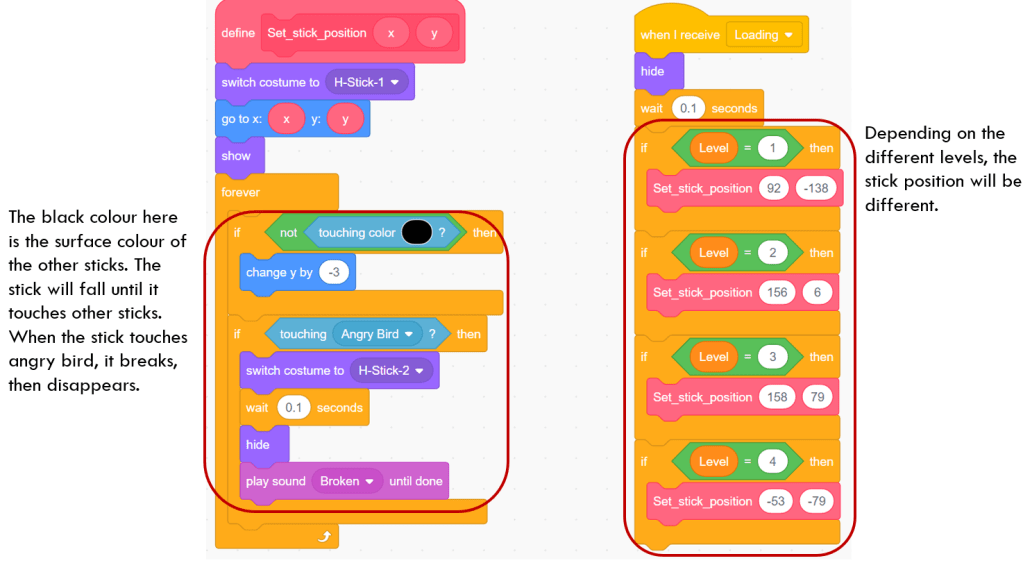
There are 3 vertical sticks in this project, named 1VStick, 2VStick and 3VStick. There are also three horizontal sticks named 1HStick, 2HStick and 3HStick. They have almost the same code structure. The only difference lies in their initial position on the stage. Therefore, I will explain one Stick sprite as an example.
After receiving “Loading” message, the stick will check whether it is touching Black colour. The Black colour is drawn on the surfaces of sticks. If the stick is put horizontally, its cylindrical surface is drawn in Black. However, if the stick is put vertically, its end surfaces are drawn in Black. In this way, horizontal and vertical sticks support each other to form a frame. When a stick could not touch any Black colour, the program assumes that the stick loses support from the underneath. The Stick sprite should change y by -3 continuously until touching other sticks or ground (ground surface is also drawn with Black colour).

In the forever block of “Loading” message, Stick sprite will also check if it touches Angry Bird. If it does, it will change into broken-like costume and then disappear.
Glass Stick Sprite
Glass stick sprite is similar to stick sprite. Since it is always put on the ground, it will not drop any more. In the forever block of “Set_glass_position” segment, it is only responsible for checking the touch of the Angry Bird sprite. Once touching, it breaks and then disappears.
Please note that the end surfaces of the glass sticks are also drawn in black, therefore, they could support other horizontal stick sprites.

Angry Bird Sprite
“when I receive Loading” Code Segment
Now let me introduce the key sprite: Angry Bird. You might wonder how this game could sketch an elegent path for the Angry Bird sprite. Meanwhile, the path seems related to Sling sprite’s stretching degree and Angry Bird’s shooting direction. How to realize this effect? Here is the answer.
After Angry Brid sprite receives Loading message, when the current status is not “InFlight”, it will always go to mouse pointer and point toward Launcher. The block “point toward Launcher” specifies the direction of the Angry Bird while shooting. The father the angry bird is to Launcher, the faster the initial launching velocity. Howerver, this distance has an upper limit. When distance to Launcher is bigger than MaxPullBack variable, the program will move angry bird gradually to Launcher to maintain the maximum distance.
When mouse is released, the program knows that Angry Bird is going to be discharged. It calculates the variables: V, Ang, Vx and Vy.
“V” variable represents the initial velocity, which is decided by the distance between Angry Bird sprite and Launcher.
“Ang” variable represents the direction of the Angry Bird, which influences the result of Vx and Vy, since Vx and Vy use sine and cosine values of “Ang” to decide the velocity in the x and y direction, respectively.
After setting those variables, the program broadcasts “Hiding” message to hide the Sling sprite, and broadcasts “Shooting” message to begin launching the angry bird. I will introduce the “shooting” procedure below.

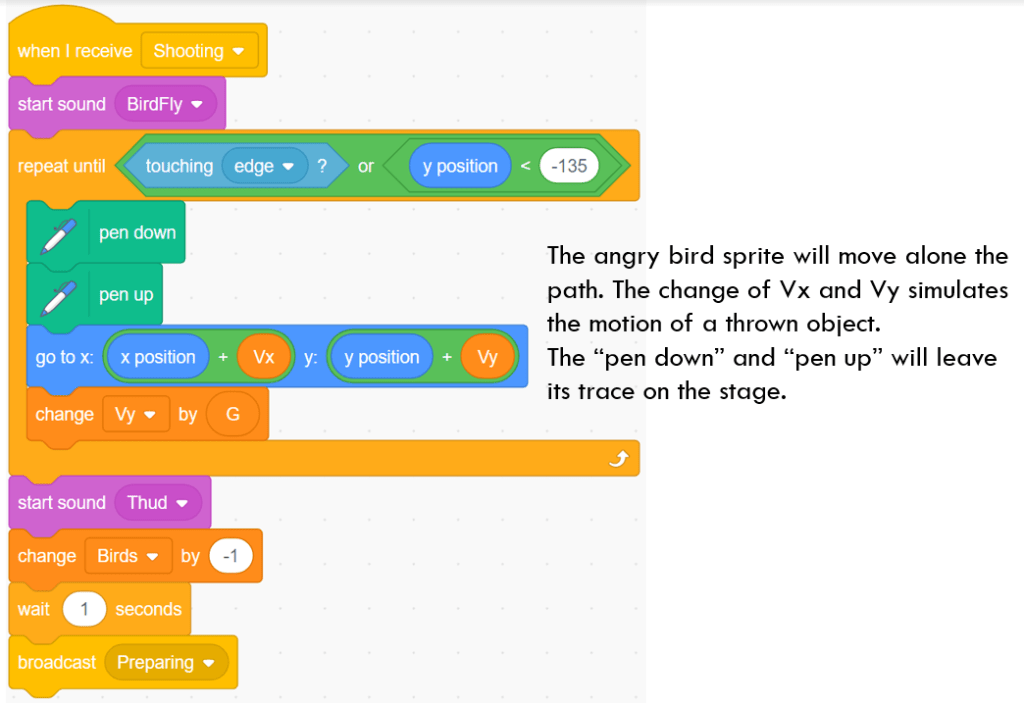
“when I receive Shooting” Code Segment
Once the player releases the mouse, “shooting” message is broadcasted. In the receiver procedure of “Shooting” message, the Angry Bird sprite changes its x and y position by Vx and by Vy in each iteration until it touches the edge or the ground (y position < -135). Meanwhile, the block of “pen down” and “pen up” will record its position as points to show its trajectory in air beautifully.
You might have noticed that in each iteration, Vy changes by G (= – 0.1), which is to simulate the motion of a thrown object under the impact of gravity. The real gravity formula is more complicated than this, however, adding a constant value of G is enough to simulate the path of a thrown object.
2nd Code Segment of “when I receive Landing”,
Please note there is the other parallel code segment of “when I receive Loading”, as shown below. Its purpose is just to set gravity factor to – 0.1 and pen properties. At the end of it, it broadcasts “Preparing” message.
“when I receive Preparing” Code Segment
Preparing message is designed to make angry bird point toward Launcher and move 1 step to it gradually until it touches Launcher. This is just like what its name says, preparing for the shooting.

Next Level Sprite
This sprite is responsible for verifying when to show “Play Again” and when to show “Next Level” buttons. It realizes this functionality by checking the values of Level and Pig. When Level = 5 and Pig = 2, it means that the user is playing the last level and has destroyed two pigs. The program will broadcast “Game Over” message. Personally, I would suggest to change message name from “Game Over” to “Win” since it is an successful ending. When Level = 1 and Pig = 1, it means that the user has cleared the first level. The program will broadcast “next level” message. For other levels, only after destroying 2 pigs, could the program broadcast “next level” message.
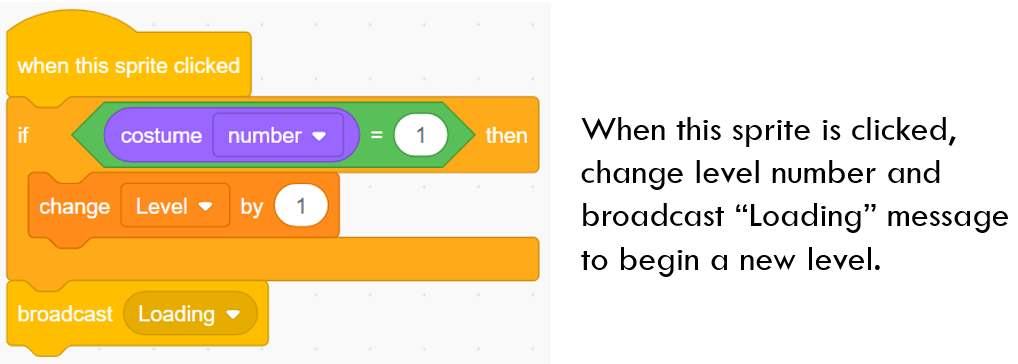
in “when this sprite clicked” code segment, when costume number is 1, it meaning that “next level” costume is used, the program will change Level variable by 1 and broadcast Loading message. Otherwise, it means that user has not cleared the current level, so the costume name is Play Again and the program only broadcasts “Loading” message.

That is all for the analysis of this game. There are a few sprites not covered in this analysis, such as Backdrop sprite, Launcher sprite, etc. Their code is generally simple, so I will just leave them for readers to understand.
The overall structure of the game is not complicated, but we do learn a lot about how to design the trajectory of a thrown object by using sine and cosine functions. We also learn how to use colours to build a stick framework. Last but not the least, it is intesting to know how to design a Sling sprite which could rotate around one end and stretch like a real sling. Hope you like this game and don’t forget to enjoy coding and have fun!
Note: All the analysis articles are copyright products of http://www.thecodingfun.com. Anyone re-posting them should credit author and original source. Anyone using them for commercial purposes or translating them into other languages should notify TheCodingFun and get confirmation first. All Rights Reserved.
