
Today I will analyze another demo project included in LEGO MindStorms software – the Puppy. The model is complex, including 134 steps in total. I will analyze its mechanical structure briefly, and then turn to its code analysis. At the end of the post, I will put forward some areas to improve, in terms of code segment. I will redesign the code to realize the effect mentioned in the below video in the next post, so keep patient and let’s start!
Mechanical Structure
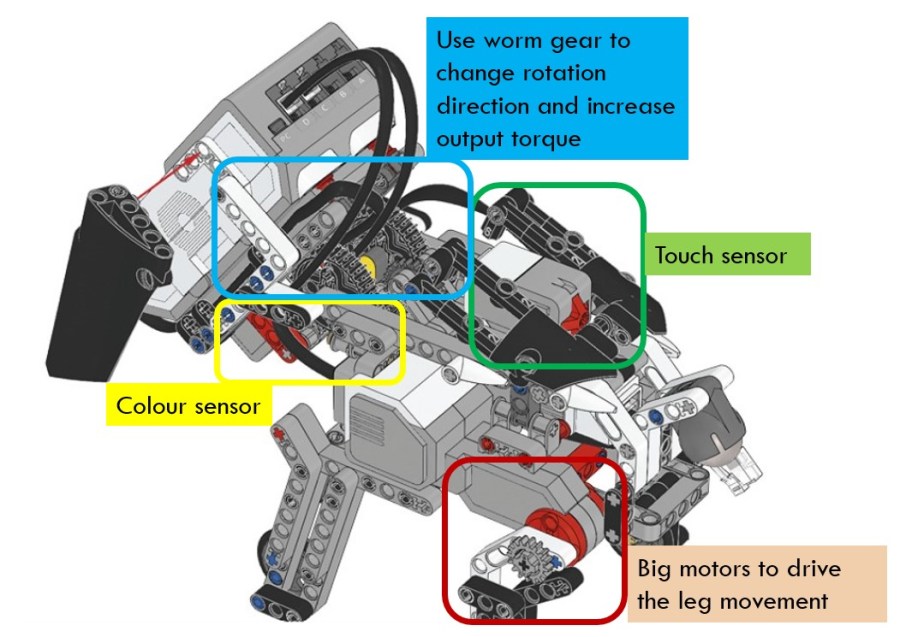
The mechanical structure of the model is not difficult to understand. One highlight is that it looks really like a puppy by using the smart hub as the head and having two ears, designing four legs, and the rear legs being able to sit down and stand up.

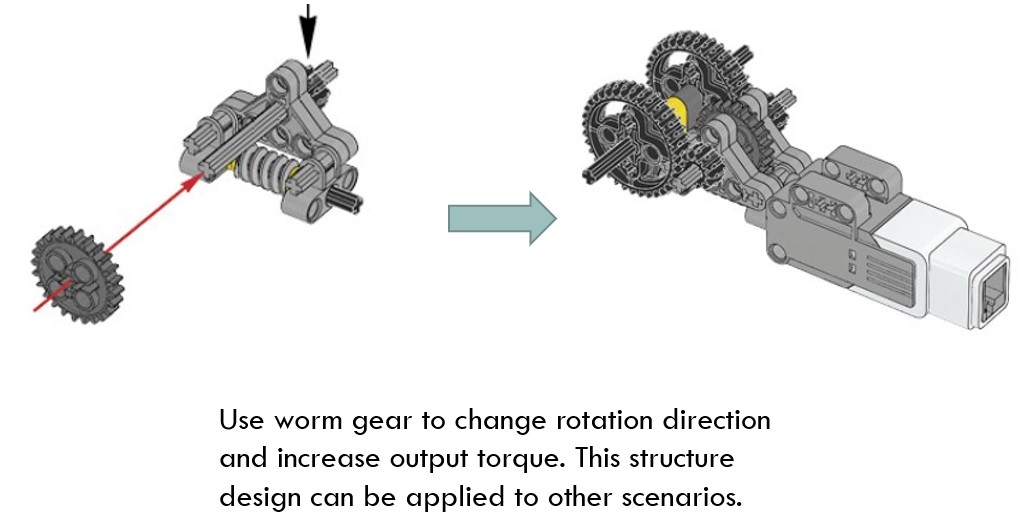
The other highlight is the use of worm wear to change rotation direction and increase output torque. The model is heavy, especially the head which is made of the smart hub. As we know, the advantages of worm gear is that it increases the torque dramatically. Therefore, it is suitable to be used in such a scenario.
Pay attention to the assembly structure of the worm gear and see how it uses various connectors to assembly the worms and gears together. Such a structure could be used in many other scenarios.
Program
Main Code Line
The main code line is shown below. It looks simple because many functions are wrapped in blocks. However, the name of those blocks are not straightforward at all, so even you look inside those blocks carefully, it is not easy to understand their meaning. Here I will give a brief introduction of the code.

The above code section initializes the big motor and medium motor by setting their rotation sensor value to zero in block “DN”. This is to ensure that the puppy sits up as the default gesture. In block “MNRH”, it waits for the player to press down the center button on the brick to start off the program. After that, it displays an image of Sleeping Eyes on the screen in block “IS” and makes the puppy stand up in block “UP”. Finally, it resets all the relevant variables in block “RST”.
Main Code Line (Continue)
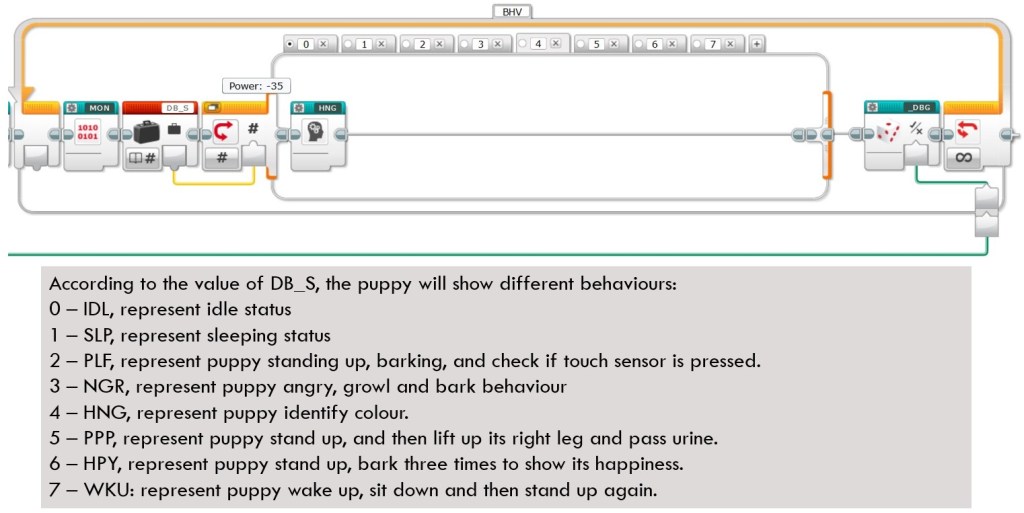
Continue the above main code line. After the above initialization, the program will enter into a forever loop, in which the puppy will have different behaviors. The same as above, it wraps the behavior in different blocks and the block names are nothing short of vague. the functions of each block are listed below as a reference for you.
The execution of block is determined by the value of variable “DB_S”. The value of “DB_S” is not increased or decreased continuously but will be changed in the behavior blocks. Therefore, one behavior of puppy will influence the subsequent behavior. In another word, those behavior blocks are not totally independent, making the analysis especially difficult.
In the following section, I will explore the interior of several blocks. I will not explain in detail since I don’t think many of them good examples for learning. In the next post, I will redefine the whole program and rewrite many blocks.
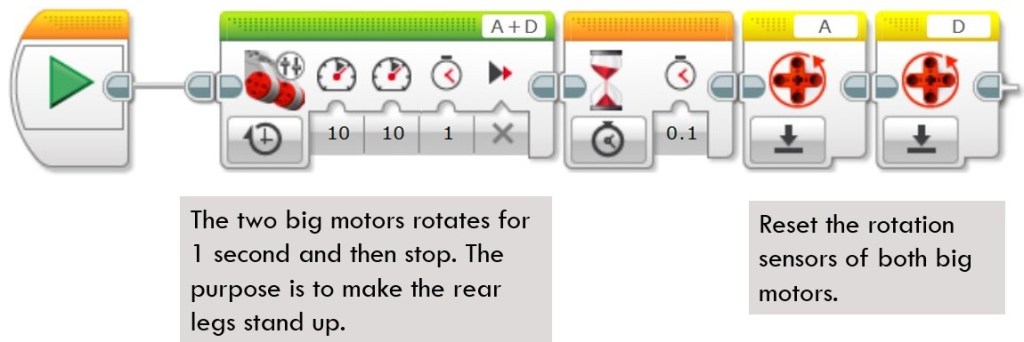
DN Block
This block first uses MoveTank block to rotate two big motors by 1 second, and then resets the rotation sensors of the two big motors to zero. Its purpose is to make the puppy keep a sitting gesture as the initial status.
MNRH Block
This block displays EV3 icon on the screen and lights up the brick button. After that, it waits for players to press Up or Down brick buttons to adjust the angle of puppy head. When center brick button is pressed, it resets the rotation sensor of medium motor and then lights up the brick button in green, indicating that the program is ready for next action.

IS Block
This block is a display block. It depends on a numeric input parameter to display various images on screen.

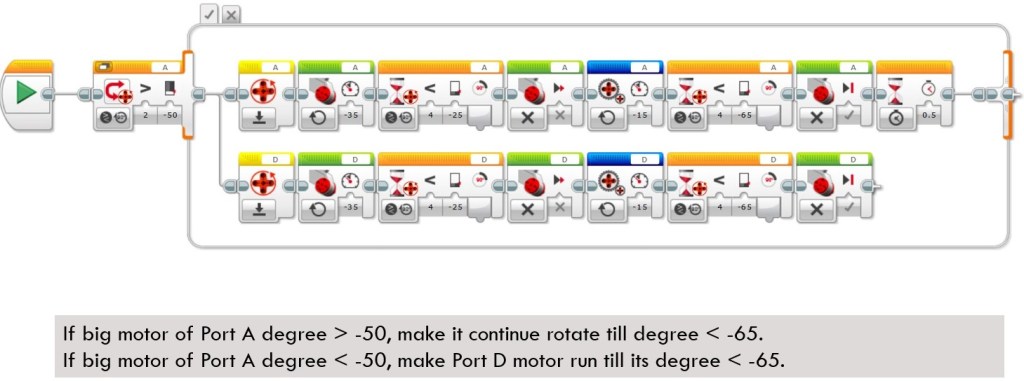
UP Block
This block is supposed to make the rear legs of the puppy stand up. It does not use Move Tank block since in practice, this method could not make the legs stand up successfully each time. The reason might be that the body is too heavy, so sometimes the torque exceeds the load of the motor. To overcome this problem, this block simulates the Move Tank block by using parallel code. Each motor calls Big Motor block to run a small degree of 25 and then switches to use Unregulated Motor block to run another 35 degrees.
The Unregulated Motor block does not include automatic motor control, like the normal Medium Motor block and the Large Motor block. This means that no automatic regulation on motor power will be included. The specified Power Input is what is used to control the motor. Power Control will compensate for any resistance or slippage that the motor encounters. Power control will also try to compensate for battery levels, when possible. Because of the features of Unregulated Motor blocks, the puppy could stand up stably each time.
Areas to Improve

The above points summarize some areas where the program could improve. There are other good points, but I will address those issues first in the next post. Before this post finishes, let me show you what the puppy could do after I update its program. Take a look at the below video and don’t forget to enjoy the coding and have fun!

Pingback: Is it a good alternative to use Microsoft MakeCode to program LEGO MindStorms EV3? – Coding Courses Designed for Kids
Pingback: LEGO MindStorms EV3 Model Analysis – Puppy Part 2 – Coding Courses Designed for Kids