
In my previous post, I once analyzed an interesting game – Grids the Puzzle Game. The author uses lists to store the data, update data and check data, which is a good example of list usage. In this post, I will explain another way to implement the same functionality and then compare the difference of the two solutions.
This project could be seen at: https://scratch.mit.edu/projects/416321403/. Please note that it is a remixed project since the original project is too difficult to understand.
There are two core sprites in this project – Level Select sprite and Game sprite. All of other sprites are auxiliary, either for enhancing visual effect or providing information. Level Select sprite has the same functionality as Levels sprite in the Grids the Puzzle Game. It allows the user to choose which level of game he/she would like to play. The main difference lies in the Game sprite. It handles all the logic when the user plays a game. The same functionality is implemented by two sprites – Grids sprite and Player sprite in Grids the Puzzle Game.
In this post, I will concentrate on the Game sprite and then compare the implementation method with that of Grids the Puzzle Game.
“When I receive level select” and “when Start clicked” Code Segments
These two code segments are simple and straightforward. When Green Flag is clicked, the program sets the Level variable to 0 and sets Object Types variable to 4. Actually within the whole project, Object Types variable has always been 4.
In the code segment of “when I receive level select”, the program sets “Tiles blocked” variable to 20, which represents the overall number of tiles in the game. Those tiles are arranged in a matrix of 4 rows by 5 columns.
When the Game sprite receives “level select” message, the game is not yet started, or game over due to touching the red tile, or beating the current level. Under all of those conditions, the program will delete the clones of Game sprite.

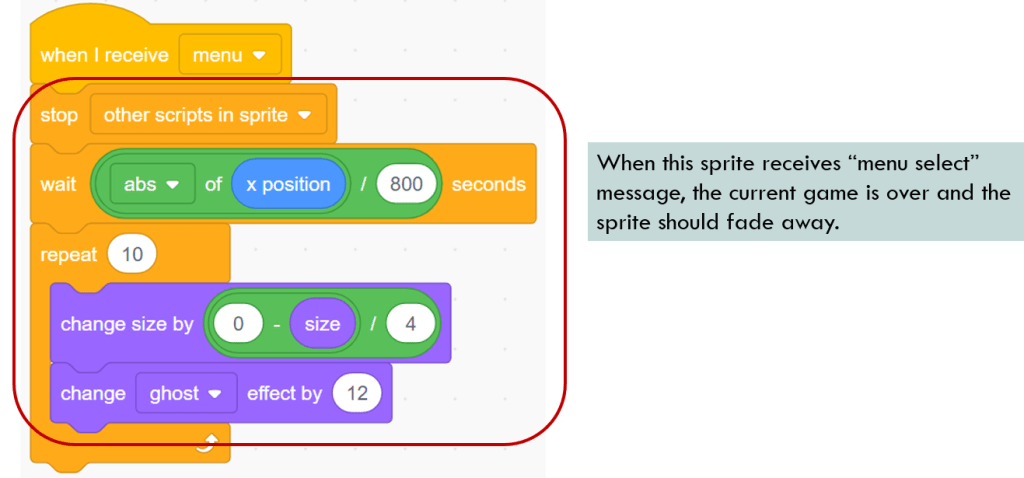
“when I receive menu” Code Segment
When the user clicks Menu sprite on the screen, Game sprite receives the message of “menu”. The Game sprite will stop running all of other code segments and then make itself fade away and finally disappear.

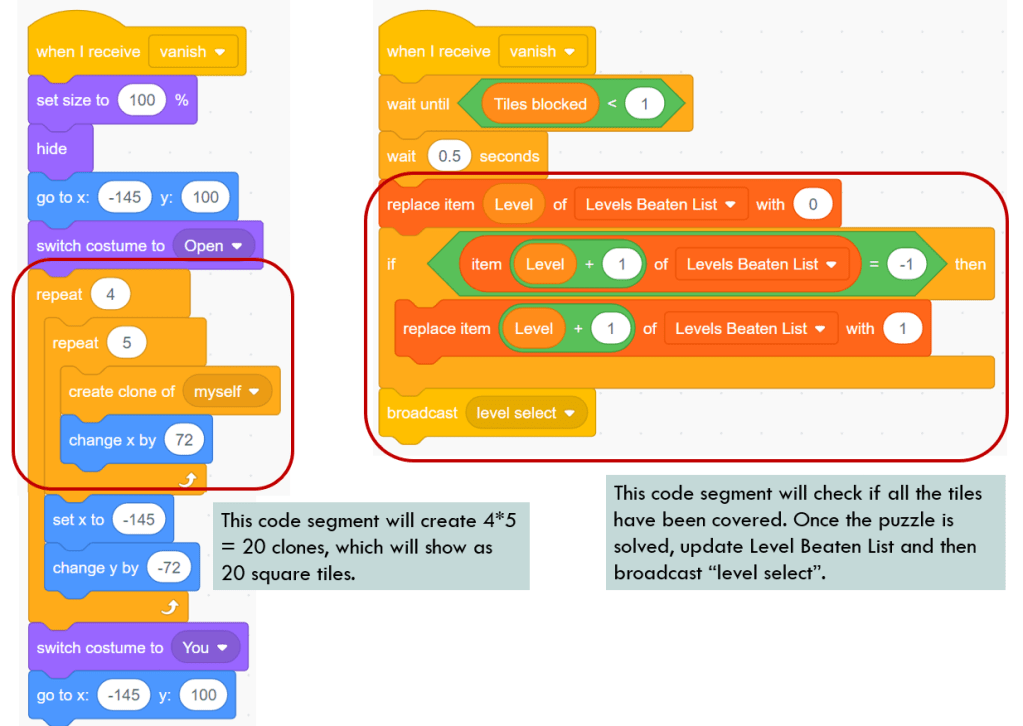
“when I receive vanish” Code Segments
When the user clicks on any level number, Level Select sprite will broadcast “vanish” message, which indicates the beginning of the game. A more accurate name for this message should be like “game_begin” or something similar.
In the above code segment, the program gets the data from Levels Beaten List. The following is the structure of this list.
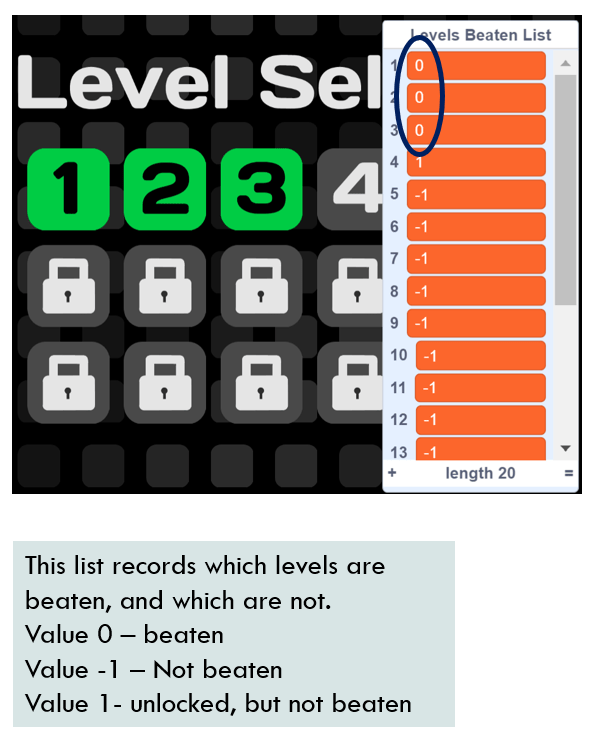
This list stores 15 items, corresponding to the 15 levels of game. If the level is beaten, its value is 0. If the value is not beaten, but unlocked, its value is 1. If the value is not beaten yet, its value is -1.
1st parallel code segment:
There are three parallel code segments of “when I receive vanish”. In the first parallel segment, the program will create 20 clones of Game Sprite which are aligned as 4 rows by 5 columns. All of those clones use Open costume, which is shown as Gray color.
2nd parallel code segment:
In the second segment, the program waits until variable “Tiles blocked” becomes smaller than 1, which indicates that this level is beaten. The item representing the current level in Level Beaten list changes from -1 to 0, and then the next level is unlocked by setting its value to 1. The last step in this segment is to broadcast “level select” message to allow user pick another level on Level Select page.

3rd parallel code segment:
The third segment is key to this Game sprite. Please note that in the 1st segment, after creating the 20 clones, the Game sprite will resume its costume to “You”, whose costume number is equal to 6. At the beginning of the third segment, the program will judge if the costume number is 6 or not. All the actions only take place when costume number is equal to 6. Therefore, the code in the third parallel segment is only targeted to the Game sprite, not to any of its clones (because clones’ costume number is not equal to 6).
So what is the purpose of the third parallel segment? It mainly responses to the pressing of Up, Down, Left and Right arrow keys. The program will judge if the Game sprite could move alone the direction where the key indicates. For example, if the Game sprite is located in the 1st row (variable “Row of Player” = 1), it could not move up. If the Game sprite is located in the 5th column, it could not move to the right.
The author uses Move variable to represent the four moving directions. Please note that in this code segment, the program does not check if the tile which the Game sprite moves to is valid or not. This verification is done in “when I start as clone” code segment, which I will introduce in the below section.
Please also note the existence of “Action?” variable. Its initial value is “F”. When any arrow key is pressed and the movement is valid, this variable “Action?” will change to T. What is the purpose of this variable? Again, I will introduce it in the below code segment of “when I start as a clone”.

The following diagram is to further illustrate what is valid movement of Game sprite based on the logic mentioned above. In the 1st diagram, the Game sprite could move toward right or downward, while in the 2nd diagram, the Game sprite could move in all of the four directions. Please note that in this code segment of “when I receive vanish”, it will not judge if the destination tile is empty, occupied or red tile. This type of judgement will be done in “when I start as a clone” code segment.

“Spawnpoints” List
There is another list called “Spawnpoints”. This list stores 30 items which correspond to 15 levels, so each pair of items corresponds to one level. The pair of items records the initial column and row position of the Game sprite. For example, the below sample diagram shows the image of Level 8. The corresponding items in “Spawnpoints” list are item #15 and #16, The initial position of the Game sprite is located at row 4 and column 1, where the green tile locates.
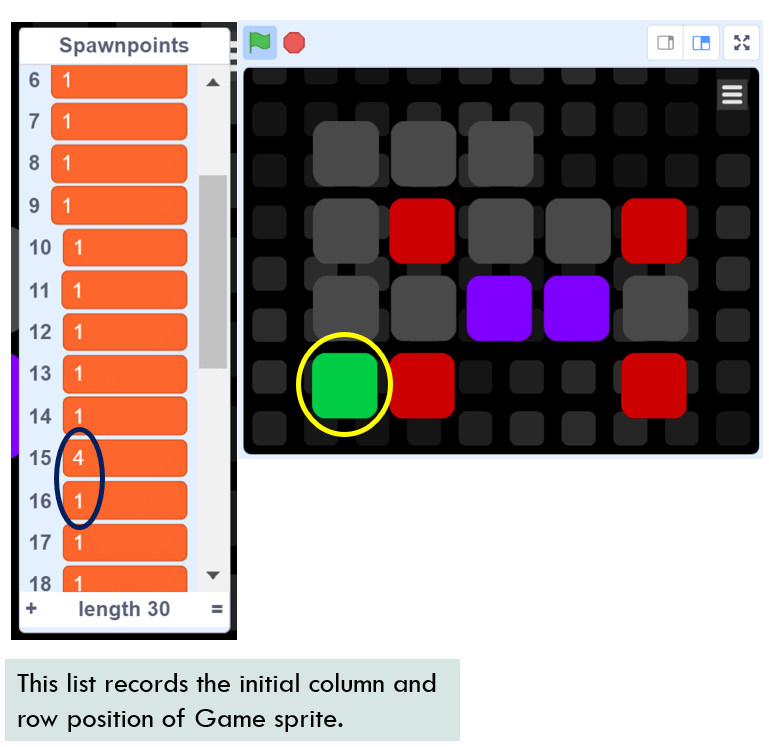
When the user chooses one level from Level Select page, Level Select sprite will set “Row of Player” and “Column of Player” variables through getting the values from Spawnpoints list. So it is mentioned here just for your reference.
“when I start as a clone” Code Segments
Finally, I will explain the two parallel code segments of “when I start as a clone”. In the first segment, the clones will choose their costumes based on the values stored in Levels list.
First Code Segment:
In this code segment, each clone will choose their costume based on the stored value in Levels list. If its costume number is 2 (representing the empty position) or 4 (representing the red tile), decrease “Tiles blocked” variable by 1. If the tile clone’s position is equal to the initial position of Game sprite, set this tile clone’s costume to Fill.

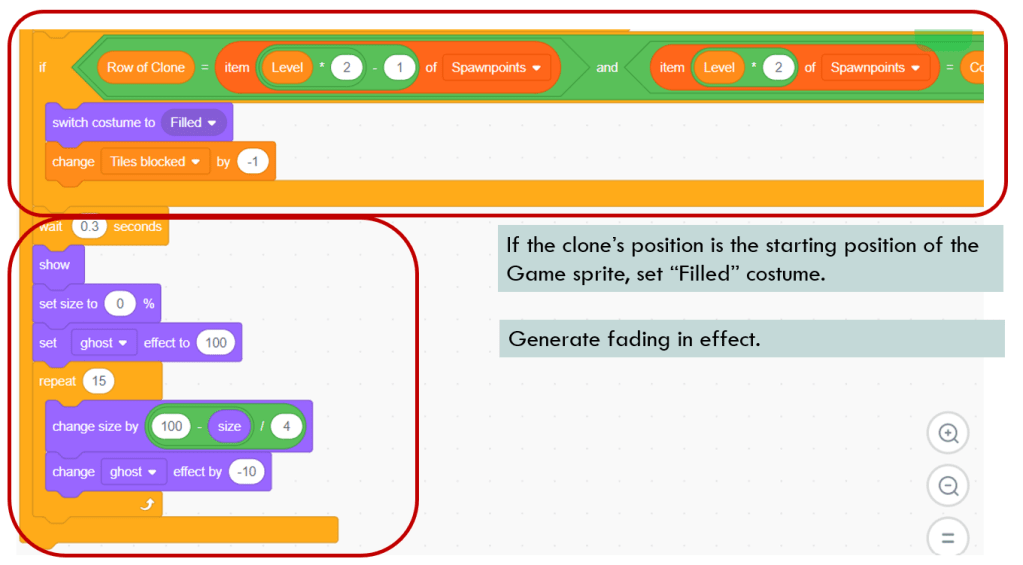
Explanation of Levels list
This list stores each tile’s costume information. Those costumes are what the tiles will use when the game level is initiated. If the tile’s costume changes from Open (gray color) to Filled (green color), or from Double (purple color) to Open, the data in the Levels list is not affected.
For example, the following diagram shows the initial status of Level 8 game. Its value is stored in item 8 of Levels list. The string consists of 20 letters which represent the 20 tiles’ costume values. The first letter represents the tile #1, and it uses costume #1 of the Game sprite – the Open costume. The 4th letter represents the 4th tile, which is located in row 1, column 4. Its value is 1, representing that it uses costume #2 – the transparent costume.

You would notice that the letter value in Levels list does not match the costume index. Letter “2” represents the costume #3, letter “3” represents the costume #4, and so on. When setting the costume to each clone, the program has considered this displacement issue and made adjustment, but it really confuses the readers. A better way is to update the whole Levels list values, but it involves a bit workload, so I just keep this problem as it is.
Second Code Segment:
The first segment sets the initial costume for each clone, while in the second parallel segment, each clone will check its status and decide its own status update. Technically, segment 1 and 2 could be combined together, but it will form a super long code segment, so the remixed project uses two parallel code segments.
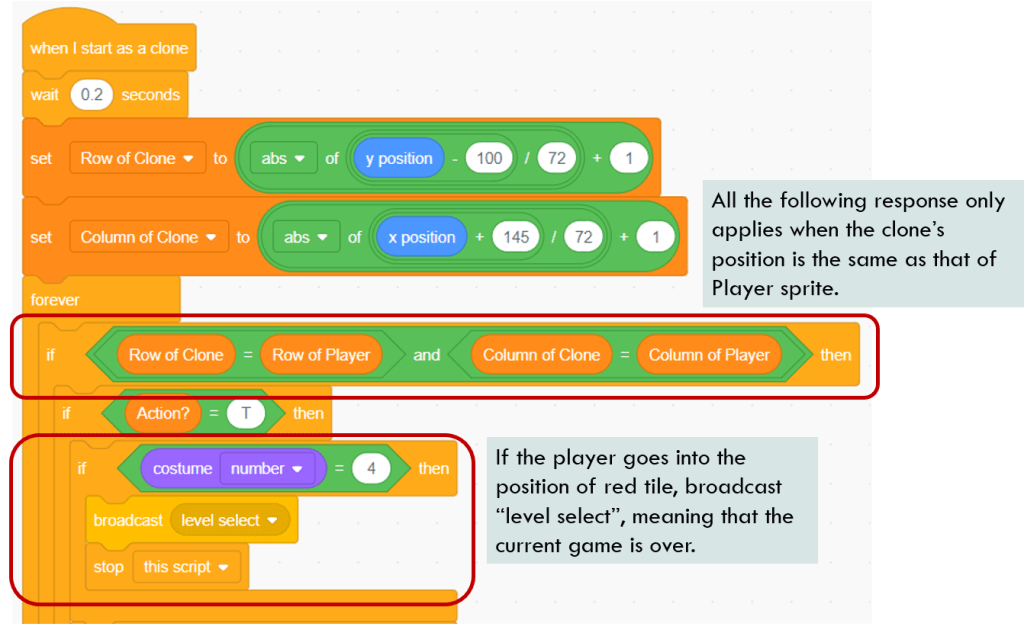

Again, I would like to emphasize the use of local variables. Please note that “Row of Clone” and “Column of Clone” are local variables. While the embedded “x position” and “y position” variables are also local variables. In my previous post, I have mentioned that one important feature of local variable is that it could keep a different copy for each cloned ones. Therefore, in this code segment, “Row of Clone” and “Column of Clone” values are different for each clone.
When a clone’s position (“Row of Clone” and “Column of Clone”) matches the Game sprite’s position (“Row of Player” and “Column of Player”), it means that the Game sprite moves to this clone’s position. Remember that in the above “when I receive vanish” code segment, the program does not check if the Game Sprite moves to the position of purple tile, empty tile or red tile. The checking is done in the “when I start as a clone” code segment, which is right here. Let’s see how the program verifies the validity of the movement.
When the clone’s costume number is 4, it means that Game sprite moves to the red tile and game is over. It broadcasts “level select” and stops the running of this code segment.
When the costume number is 3, the Game sprite moves to purple tile. Purple tile has to be passed twice to get cleared, so the move is valid, but the purple tile will switch to Open costume and “tiles blocked” will not decrease.
When the costume number is 2, it means that the Game sprite moves to an empty position. When the costume number is 5, it means that the Game sprite moves to a filled tile. Under both conditions, the Game sprite should restore to its previous condition by calling Cancel_move block.
“Cancel_move” Block Definition
So how the Game sprite return to its previous position? Remember that when I explained “when I receive vanish” code segment, each time an arrow key is pressed, the program will set a value to Move variable. In “Cancel_move” block, the program just reverses the change of “Row of Player” or “Column of Player” variables by referring to Move variable.

Explanation of “Action?” Variable
In one code segment of “when I receive vanish”, I mentioned the usage of “Action?” variable. Let me repeat its usage here. Each time an arrow key is pressed and Game sprite could move in the direction specified by the arrow key, “Action?” is set to “T”. Meanwhile, in “when I start as a clone” code segment, when clone’s position matches that of Game sprite, the program will check if “Action?” is T before doing any action. At the end of the loop iteration, the program will set “Action?” to “F” immediately.
This variable “Action?” ensures that each time “Cancel_move” is called, the Game sprite will restore its previous position just once. Without setting “action?”, after the Game sprite returns to its previous tile’s position, since the previous tile has been filed, based on the current code logic, the program will run another round of “Cancel_move” and make the Game sprite move to a wrong position.
That is all for the analysis of Game sprite in this project. In the next section, I will compare the difference between this project and the previous Grids the Puzzle game.
Comparison between the Two Projects
Basically the two projects are similar. Both of them use clone method to create multiple grids and align them in a matrix. The main difference lies in the implementation of how to control the movement.
In the Grids the Puzzle game, it uses two sprites to control the running of the game. Grids sprite is responsible for the display of tiles. Player sprite controls the position of active tile. While in Fills the Puzzle game, it uses Game sprite to display the grids, and uses two variables “Row of Player” and “Column of Player” to represent the position of active tile.
Another difference lies in the usage of list. In the Grids the Puzzle game, it uses “TilesCovered” list to store all the covered tiles and empty positions. Every time the arrow key is pressed, the Player sprite will check if the destination tile is within “TilesCovered” list. If it is, the Player sprite will not move forward at all. On contract, in this project, there is no list to store covered tiles. It uses “Tiles blocked” to represent the number of uncovered tiles, but does not record the index of each covered tile.
Due to the lack of “TilesCovered” list in this project, when the arrow key is pressed, the “Row of Player” and “Column of Player” will move to the destination tile without considering if the tile is invalid or empty. Then in the code segment of “when I start as a clone”, each clone will be responsible for checking the validity of movement. If the tile clone uses Red costume (will result into game over) or Solid costume (it is an empty tile), it represents an invalid movement. The program will restore “Row of Player” and “Column of Player” to their previous values.
So which method is better? Personally, I prefer the solution in Grids the Puzzle game. It is a good idea to store the covered tile index in a list and then dynamically manage this list. Before each movement, the program checks if it is valid. The whole logic is clean and clear.
The implementation in this project is also innovative. Although it does not use much of list functionality, it uses local variables to store each clone’s position. When the active tile’s position matches that of the clone, the program allows each clone to decide whether to change its costume color (from Open costume to Filled costume, or from Double costume to Open costume) or to declare the game over (when the current clone’s costume is Red).
Which implementation method do you prefer? All roads lead to Rome. Anyway, enjoy the coding and have fun!
Note: All the analysis articles are copyright products of http://www.thecodingfun.com. Anyone re-posting them should credit author and original source. Anyone using them for commercial purposes or translating them into other languages should notify TheCodingFun and get confirmation first. All Rights Reserved.

You must be logged in to post a comment.