

In previous posts, I introduced some sample projects from Pygame installation folder. Besides Pygame, Turtle and Tkinter modules are also popular for Python learning beginners. Tkinter package is a standard Python interface to Tk GUI toolkit. It could design window and different widgets, such as button, textbox, label, canvas and handle the interaction with user through mouse buttons and keypress. While turtle library is based on tkinter package and enables users to create pictures and shapes by providing them with a virtual canvas.
In this post, I would like to introduce a project which utilizes both tkinter and turtle modules together to allow user draw on the canvas freely. So let’s start!

At line 1 to line 3, the program imports all the necesary modules or classes, including tkinter module, RawTurtle and TurtleScreen classes. Please note that ScrolledCanvas is not used in this project, although it is imported.
From line 4 to line 11, the program defines several simple functions. They are the event handlers of three buttons, respectively. Please note that those event handlers are triggered by “command” attribute of the button, so there is no input argument “event” for those functions.
At line 13, the program defines event handler “resize”. This event handler gets triggered whenever window is resized. When window is resized, canvas size gets updated, too. The program then gets the width and height of the canvas by calling canvas.winfo_width() and canvas.winfo_height() methods. It calls “canvas.configure” method to specify the display region of the canvas.
When a canvas object is created, assuming canvas width is w, and canvas height as h, its top-left corner coordinate is (-w/2, -h/2), the bottom-right corner is (w/2, h/2), so coordinate (0, 0) is located in the center place of the display region. When the window is resized, the canvas is also resized. You could set “canvas.configure” to display a different region when resizing.
In this demo code, at line 16, after canvas is resized (assuming new width of w1, new height of h1), its top-left corner coordinate will keep unchanged as (- zero_x, -zero_y), and its bottom-right corner coordinate becomes (-zero_x + w, -zero_y + h). Under this condition, the existing shapes will not move because the canvas just extends, not moving. However, you could also set “canvas.configure” to display a different region to simulate canvas moving. Under that condition, the existing shapes or images might adjust their position.
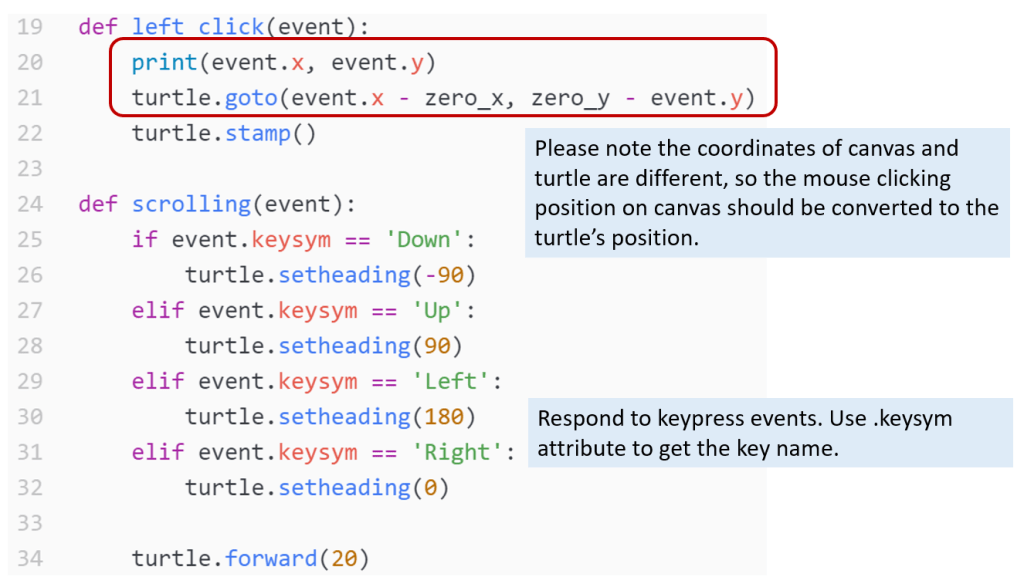

From line 24 to line 34, the program defines event handler “scrolling”. Its event argument retrieves event.keysym to indicate which key is pressed.

From line 37 to 47, the program defines three event handlers. They are responsible for the behaviours when right mouse button is pressed down or moves. When event handler “drag_start” is triggered by right mouse pressing, it sets global variable b_dragging to True, indicating the start of dragging behaviour. When b_dragging is True, the turtle object will follow mouse and draw freestyle curved lines.
Here I would like to emphasize the rule of Python on global variable. When we get the value of global variable in the function, we do not need to explicitly state the global variable, it is OK to just use it directly, like what line 42 is doing. However, if we are changing the value of global variable in a function, we need to explicitly state it, like line 38 and line 39. Otherwise, Python will take “b_dragging” as a local variable of the function and its value change will not affect its value used in other places.
When widget binds to mouse clicking or keypress events, event handler has an input argument “event”. Depending on the event type, this input argument contains different information. If it is a mouse button related event, event.x and event.y could return the x and y coordinate of the mouse at the time of the event, relative to the upper left corner of the widget. “event.num” attribute returns mouse button number (1, 2, or 3). If the event type is keypress related, key.sysnym attribute returns the key’s string name.
You could click those links to know more about event attribute and key name information.
Till now, all the previous code handles the event handlers. The following code is the main code segment. It defines the widgets and binds the event to event handler. Let’s start.

From line 50 to line 57, the program defines some global variables and initailizes their values. Here, both zero_x and zero_y are set to 150. This number represents the center of the canvas display region.
The code from 64 to line 66 is responsible for connecting turtle object with tkinter object. Python turtle operates in two modes, standalone and embedded in a larger tkinter program. Instead of Turtle and Screen, when using turtle embedded, we should work with RawTurtle, TurtleScreen and Canvas. That is why you notice that we do not need to import turtle module at the beginning of the file, but import RawTurtle and TurtleScreen.
From line 68 to line 78, the program defines Frame widget “frm_buttons”, which contains three Button widgets btn_clear, btn_start_draw and btn_end_draw. At line 77 and 78, the program puts frame widget and canvas widget into the grid so that the whole application displays in a neat layout.

From line 80 to 85, the program uses bind method to bind events to the widgets.
<Button-1> event occurs whenver the left mouse button is pressed while the mouse is over the widget. “<Button-3>” event occurs whennver the right mouse button is pressed while the mouse is over the widget. While “<B3-Motion>” event occurs when mouse is moving. “<ButtonRelease-3>” event occurs when right mouse button is released. Through combines “<Button-3>”, “<B3-Motion>” and “<ButtonRelease-3>” events, we could control the turtle object to move with mouse button and draw freestyle curved lines.
At line 85, the program defines event “<Configure>”. This event will be triggered whenever the size of the widget changes. Its event handler “resize” is defined from line 13 to 16, which I have explained above.
If you want to know how to define event in tkinter, the following web page provides detailed information: https://www.python-course.eu/tkinter_events_binds.php

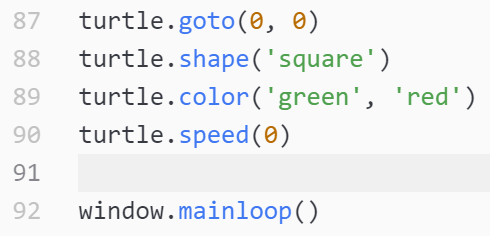
The last part from line 87 to 92 is easy to understand. It calls several functions of turtle object (created at line 66) to set its position, shape, color and movement speed.
That is all for this tkinter and turtle integration program. Hope it is helpful for you to understand tkinter and turtle working mechanism. Don’t forget to enjoy the coding and have fun!
Note: All the analysis articles are copyright products of http://www.thecodingfun.com. Anyone re-posting them should credit author and original source. Anyone using them for commercial purposes or translating them into other languages should notify TheCodingFun and get confirmation first. All Rights Reserved.

Pingback: Analyze Python Project – Integrate Tkinter and Turtle and Respond to Mouse and Keypress – HarrietSpace