

Today I will analyze a puzzle game again. Similar to the above analyzed project “2048”, this one’s highlight lies in its methodology to store data and judge whether a move is valid or not.
You could take a look at the game in the below video. The original project link is located at: https://scratch.mit.edu/projects/244200772
The projects have multiple sprites. Some are core sprites which shoulder the responsibility of implementing the core functions, such as Grids sprite, Player sprite and Levels sprite. Besides them, there are multiple auxiliary sprites which exist to enhance the visual effects or make the game more user-friendly.
In this post series, I will focus on analyzing three core sprites one by one. Those supporting sprites are just left there to analyze by yourself.
Grid sprite
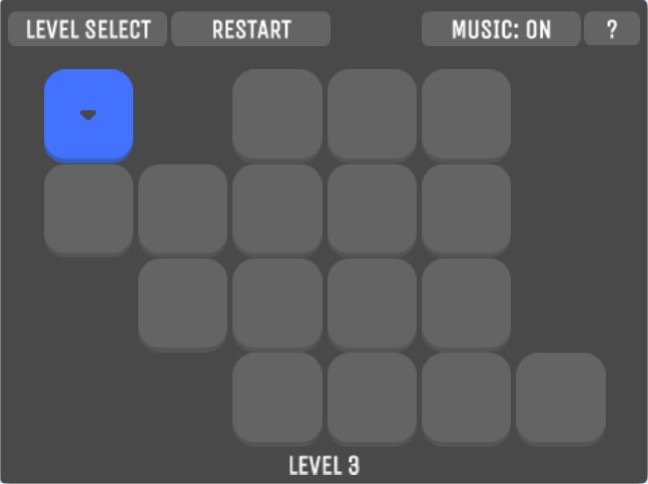
I will analyze the Grid sprite first. Grid is like the game board which we see on the stage. It consists of 6*4 = 24 rounded rectangles. Some positions seem not occupied, as shown below, but actually there is still a grid occupying that place, but the author just makes it the same color as the background black, so we could not see them. The purpose of this is to ensure that there are always 24 grids. Later on, you will notice why it is important to always keep a constant number of grids.
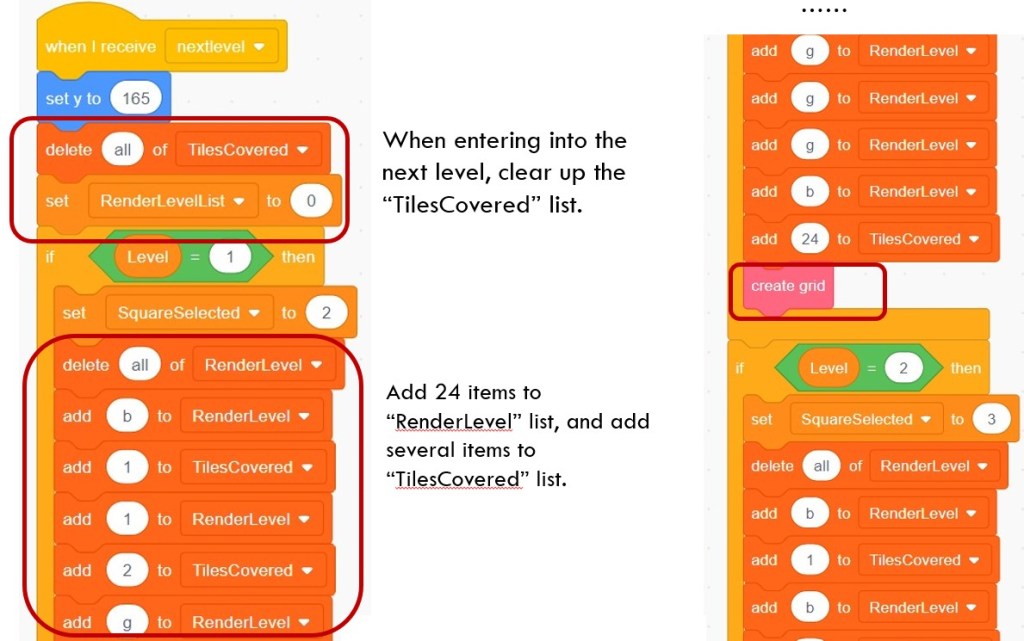
When I receive “nextlevel” Code Segment
This code segment will run after the player chooses a level. It first deletes all the items in TilesCovered list, which stores all of covered tiles (or another word: grid) index. It also deletes all of the items in RenderLevel list. After that, depending on which level is running, it sets the starting tile index (by setting “SquareSelected” variable) and then adds a new batch of 24 items to RenderLevel list.
You might notice that the added item contains different values, such as “b”, “1”, “2”, “g”, etc. which represents the costume name of the grid and I will demonstrate the layout of grid in the below section. After constructing the RenderLevel list and TilesCovered list, the program will call “create grid” block to create 24 clones of grid by referencing the values of RenderLevel list.
Layout of Grids & “RenderLevel” List
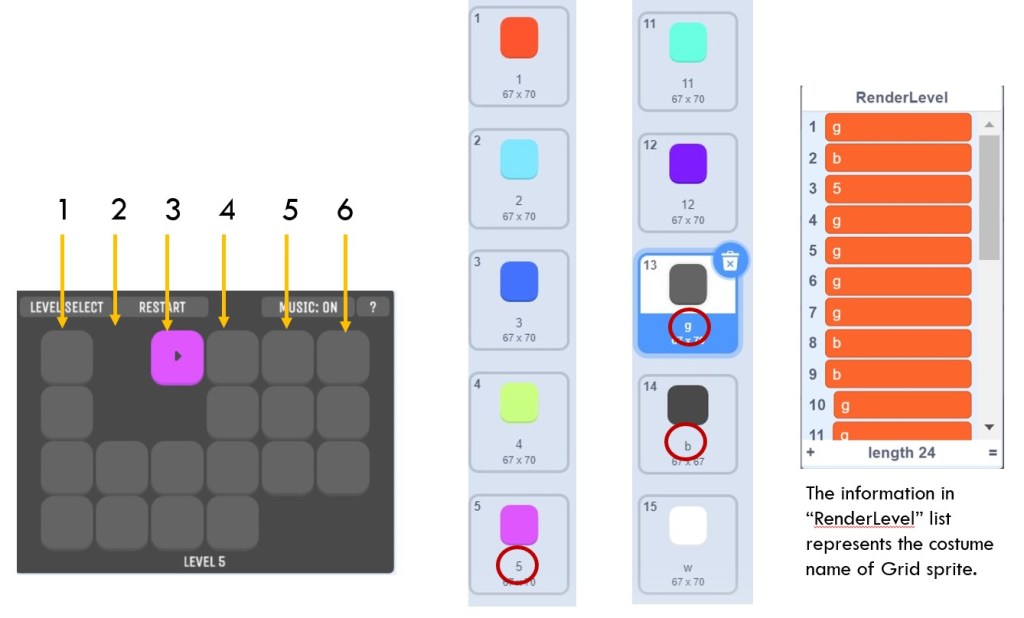
The grid structure is a matrix of 4 rows by 6 columns. The indexing sequence is shown below. When adding items to “RenderLevel” list, the item value represents the costume name of the Grid sprite.
Take the example of the Level 5 grids structure. The 1st item is “g”, representing the color of gray. The 2nd item is “b”, representing the color of black, which is the same as background color, so the grid is totally invisible. The 3rd items is “5”, representing the color of cyan, which is the level 5’s color of covered tiles.
Structure of “TilesCovered” List
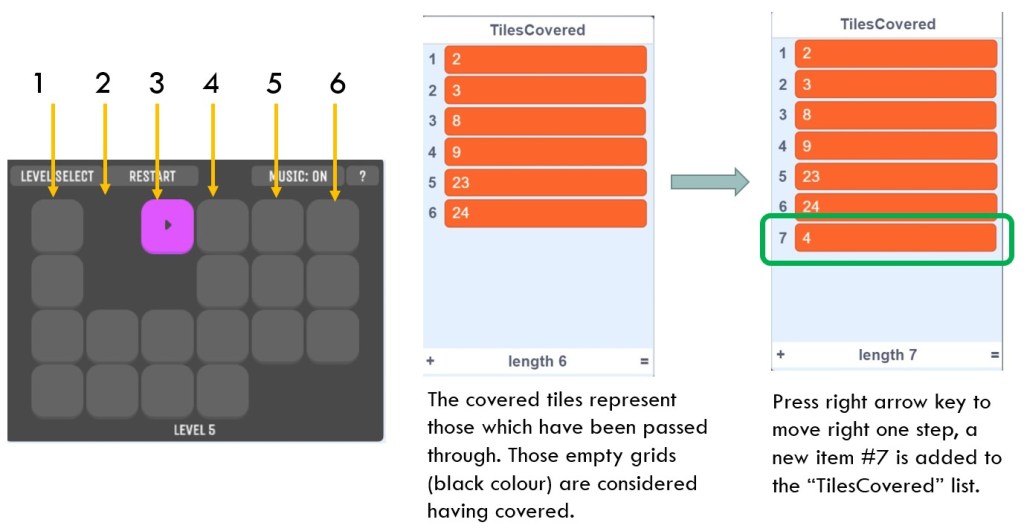
Unlike “TenderLevel” list which is always filled of 24 items, the initial item number and value of TilesCovered list is different level by level.
Still take the example of Level 5. The initial list of “TilesCovered” contains 6 items, representing the index of grids which are in black or in cyan color.
Whenver the player goes into a new grid, a new item will be added to “TilesCovered” list. Since the rule of the game is that no grid could be passed more than once, the “TilesCovered” list will be used to judge if one grid position has been passed before. This judgement is implemented in the following “when I start as a clone” block.
“create grid” Block
In the “create grid” block, the program creates 24 clones of grid sprite and sets the costume of each grid clone based on the value of “RenderLevel” list.

“when I start as a clone” Code Segment
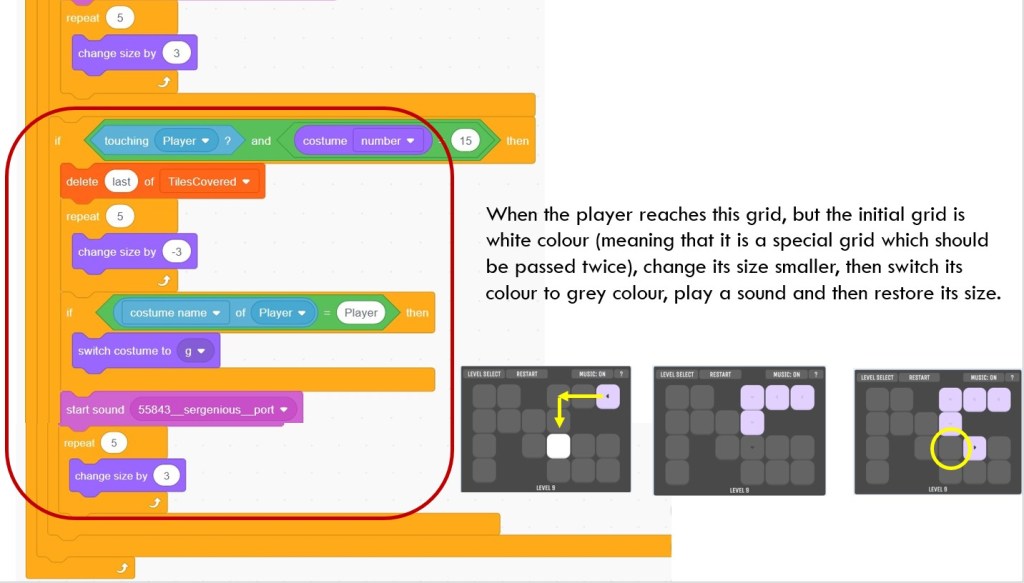
This code segment will respond to the pressing of Up (or w), Down (or s), Left (or a) and Right (or d) arrow keys. When the player reaches one grid clone, and the grid is still in gray color (which means that it is not occupied before). When meeting both of the conditions, the movement toward this grid is valid. The grid clone will then change its size a little bit to simulate a pressing down effect and play a sound.
The code segment will also consider the white grids which are required to pass twice. When the grid clone touches the player and the grid color is white, the grid clone will change color to grey, and meanwhile, mark itself as unoccupied in the “TilesCovered” list. In this way, it is just like other uncovered grid clone to wait for passing in the following steps.

Continue…
When I receive “start” Code Segment
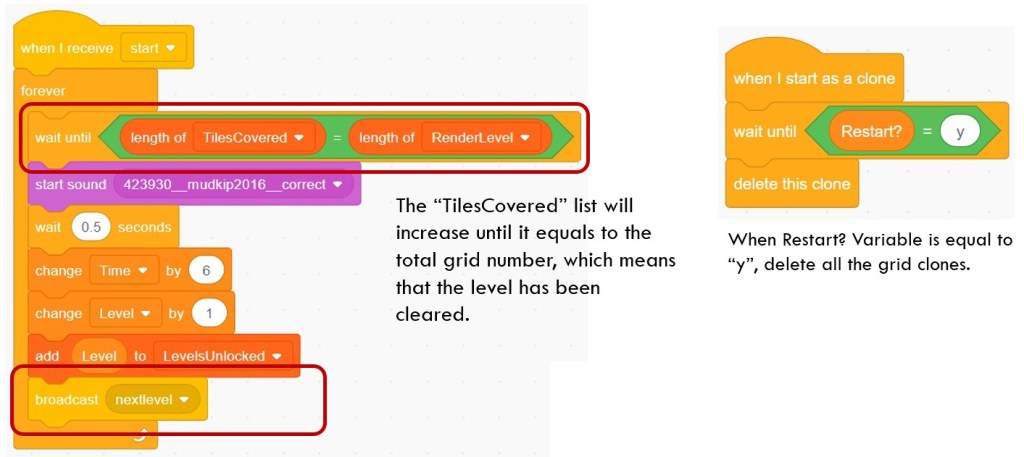
The message of “start” is broadcast by Levels sprite. When Grids sprite receives this message, It will wait until the length of TilesCovered and RenderLevel lists becomes the same. As mentioned above, RenderLevel list is always 24 in length once it is constructed, but length of TilesCovered list changes. When length of TilesCovered list reaches 24, meaning that all the grids have been covered and this level is cleared. The program will then play a sound, level up and then broadcast “nextlevel” message, so that a new level’s grid matrix will begin constructing.
That is all for the key blocks of the Grid sprite. Keep tuning in our posts for the analysis of Player sprite and Level sprite. Most of all, don’t forget to enjoy the coding and have fun!
Note: All the analysis articles are copyright products of http://www.thecodingfun.com. Anyone re-posting them should credit author and original source. Anyone using them for commercial purposes or translating them into other languages should notify TheCodingFun and get confirmation first. All Rights Reserved.

Pingback: Learn Scratch by Reading and Analyzing Others’ Project – Airplane Shooting Game – The Coding Fun