
Do you like playing the sliding puzzle? That is one of my my favorite at young age and I am actually very good at it. In the Scratch website, there are several sliding puzzles designed very well, and the following is one of them.
Many sliding puzzles require to rearrange a picture or align the numbers in sequence, but the one I am going to introduce is unique. The player needs to move those tiles so that they could align from the dark to the light tone. Let me show you how to play it and I will also share one tip in the video.
The code could be found here: https://scratch.mit.edu/projects/286981293
How does the author design this game? let’s begin our exploration journey now.
There are four sprites in this projects. Among them, two sprites, Purple Puzzle sprite and Screen Shot sprite, are super simple. They just display the static images at the beginning of the game. I will introduce them first in this post, and then introduce the other two sprites. Pen the main sprite covers most of the functionality of the game, and I will leave it to the last.
Purple Puzzle Sprite
This sprite is very simple. When the start flag is clicked, it will display in the center of the stage. When it receives message of “start”, it will glide down out of the stage and then fade away.
Please note the event procedure “when Start clicked” and “when I receive start” are different. “when Start clicked” happens when the player clicks the green flag. “when I receive start” event is broadcast by “Choose Number” sprite after the player clicks any of the level numbers.
Screen Shot Sprite
This sprite is also simple. It shows a screen shot image on the stage for just 0.1 second and then hides itself. The event procedure “when c key pressed” is not used.
Choose Number Sprite
This sprite will use different costumes to create three clones of itself. The numbers represent difficulty level of the game. Please note that the program does not adjust the clone position, but why could the clones show in a row without overlapping with each other? It is because that the three costumes are already positioned differently in terms of horizontal location in the Costume Editor.
Another way to implement the same effect is to use “move to x: (x position) y: (y position)” before “create clone of (myself)”.

In the event procedure of “when I start as a clone”, the clone will check if it touches the mouse pointer. If the mouse pointer just hovers over a clone, set the costume name to “NUM TILES” value, which could be 8, 15, 24. It then broadcasts “init tiles” message, which will be received by Pen sprite.

Pen Sprite
This sprite shoulders the majority of the functionality. I will explain its code segments one by one.
When I receive “init tiles”
In the above section, Choose Number sprite clone will broadcast “when I receive init tiles” message when the mouse hovers over it. This message is received by Pen sprite and the following is the code.
In this code segment, the program fills in the “tile order” list with NUM TILES items. NUM TILES variables are already set to 8, 15 or 24 by the Choose Number sprite. The item values are incremental from 1. The last item in the “tile order” list is 0, which represents the empty position in the tile grids.
When I receive “start”
when a level number is pressed, Choose Number sprite will broadcast message “start”. After receiving this message “start”, Pen sprite will shuffle multiple times, so that all the tiles are messed up randomly. The visual effect is shown in the below video.
shuffle (swaps) times
Please note that before calling shuffle (swaps) times, the “tile order” list has been filled with items aligned in sequence. What “shuffle” block does is to mess up the tiles fully . It calls another two blocks “find swap options” and “move to open spot” to realize shuffle operation. Let’s move on to check the two block definitions.
“find swap options” Block Definition
Before introducing this block, let me show you which tile could be moved to the empty position. If the empty position is located in the middle of the grids as shown below, the four tiles surrounding it could move. However, if the empty position is on the 1st row, three tiles (tiles to the left, right and below) could move.
In an extreme scenario, if the empty position moves to the corner, for example, the top-right corner, then there are only two tiles being able to move (tiles to the left and below it).
The block “find swap options” should consider all of those scenarios and then fill the “swap options” list with those candidate. Please note that “swap options” list stores the candidate tile’s position, note the tile’s value. Tile’s position represents which row and column the tile is located at, while tile’s value represents the rendered color tone.
continue…
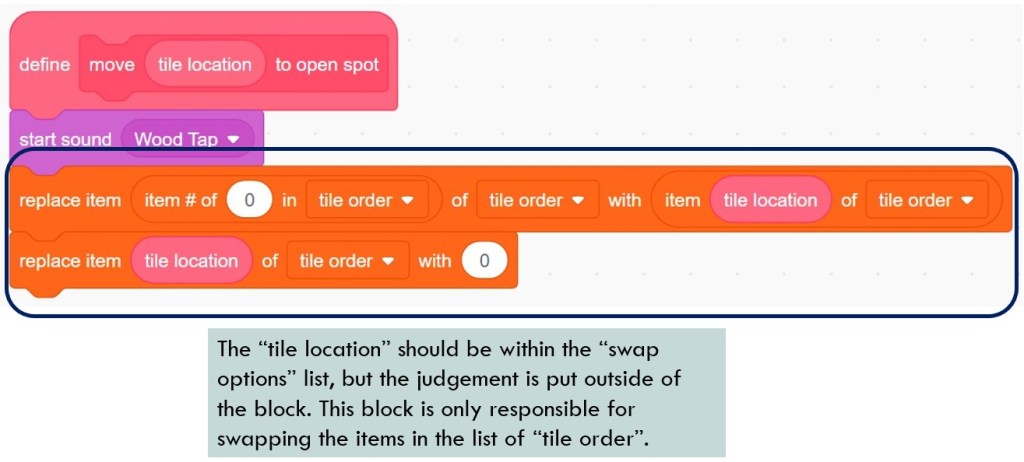
“move to open spot” Block Definition
This short block just swaps the position of two items in the “tile order” list. Firstly, the item at “tile location” moves to the position where item value 0 (represent empty position) is located. After that, the item at “tile location” is replaced by value 0.
Till now, the code of Pen sprite all focuses on operating “tile order” list, including initiating it, finding the swap candidates and filling in “swap options” list, and swapping two items in “tile order” list. How will these changes reflect on the stage? What is the main code segment of Pen sprite to encapsulate all the key operations? I will leave this to the next post. Stay tuned!
and finally, Don’t forget to enjoy the coding and have fun!
Note: All the analysis articles are copyright products of http://www.thecodingfun.com. Anyone re-posting them should credit author and original source. Anyone using them for commercial purposes or translating them into other languages should notify TheCodingFun and get confirmation first. All Rights Reserved.

Pingback: Learn Scratch by Reading and Analyzing Others’ Project – Airplane Shooting Game – The Coding Fun
Like!! Thank you for publishing this awesome article.
LikeLike
Pingback: Learn Scratch by Reading and Analyzing Others’ Project – A Sliding Puzzle Game – Part 2 – Coding Courses Designed for Kids