

In the previous two posts, I analyzed how the game designer initiated the game area and then rendered the tiles by using “render grid” block. In this post, I will introduce “update falling piece” block, which is a big block because it calls several other important blocks.
Here let us recall how the main code segment writes.

“update falling piece” Block
When the piece is falling, the player can change its direction by pressing up arrow key, or change its horizontal position by pressing left or right arrow keys. If the player presses space key, the falling piece will accelerate dropping down to the existing tiles.
As I introduced earlier, the tiles in the game areas are drawn by pen functionality. So whenever the key(s) are pressed, the piece shape or position information is updated and it needs redrawing itself, that is what the block “update falling piece” is doing.

In the above block, the program checks if the space key is pressed or not. When “item(4) of key hold frames” is equal to 0, space key is pressed. The program will then make the falling piece drop down fast by “change piece y by 1” repeatedly. However, it is not enough. Each time its vertical position (piece y) changes by 1, it will call “check if piece is valid” block, which is already explained in the post 1. It is used to check if the falling piece’s tile position overlaps with the existing tiles. If not overlap, then the falling piece’s current position is valid (isvalid? = true), The change of “piece y” position continues until isvalid? = false.
When “isvalid?” variable becomes false, “piece y” will change by -1 to avoid overlapping with existing tiles. The program will then call “store piece to grid” block to put falling piece’s position into “grid” list, which I will introduce below.
Please note that space arrow key’s pressing has higher priority. If space key is pressed, other keys’ pressing will be ignored in that loop temporarily. If space key is not pressed, the program will check other arrow keys.


No matter it is left arrow key or right arrow key, the purpose is to change the falling piece left or right by x position. Each time changing x position, the program will call “check if piece is valid” to verify if the falling piece overlaps with other existing tiles.
When up arrow key is pressed, the program calls “rotate” function to rotate the falling piece. I will introduce this block later.
The above code segment could improve in one aspect. The behavior of down arrow key is actually the same as that of space key. The author should have merged their code in one segment to keep the code more concise.
“rotate piece” Block
In the above “update falling piece” block, it calls “rotate piece” block when Up key is pressed. Each time Up key is pressed, the falling piece will rotate 90 degree close-wise. The function looks very straight forward, but the implementation of “rotate piece” block looks complicated.
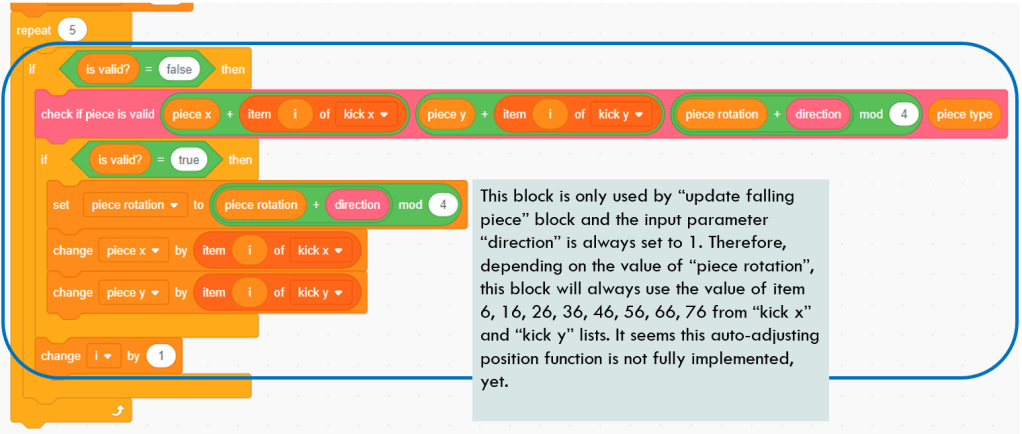
There are two long lists named “kick x” and “kick y”. Each list contains 80 items. The program sets the value of variable “i” based on the current “piece rotation” and “piece type”.

After setting variable “i”, it will retrieve the item (i) from “kick x” and “kick y” lists, which represents the offset x and y value from the current piece’s x and y position. The offset value would always start at 0, and then fluctuate within -2, -1, 0, 1 or 2.
After reading the code carefully, I assume that the code designer tries to introduce an auto-adjusting mechanism. When the program rotates the falling piece, it will first check if the rotation is valid or not by calling “check if piece is valid” block. If the rotation will not interfere with the existing pieces, it is valid and “is valid?” variable is set to true. The program will update “piece rotation” and then exit the loop (the loop will repeat 5 times when “is valid?” is False).
If the rotation interferes with the existing pieces, the program does not reject the rotation simply. It will try to adjust the base point of falling piece through the offset value. Such an adjustment will repeat until “is valid?” turns True or iteration times exceed 5.
However, this auto-adjusting functionality seems not fully working. when the pieces are going to fall to the bottom, there are rare chances that the current position is not valid, while the auto-adjusted position is valid. Therefore, this block could just remove the adjustment portion to become much simpler.
“store piece to grid” Block


“store piece to grid” block is used to store the falling piece’s information into “grid” list. It is called after “update falling piece” block. At this moment, the falling piece’s position has been settle down and it is no longer the falling piece any more, so as part of existing tiles, its information should be stored into “grid” list.
The above algorithm looks complicated. in a nutshell, the method it uses is to find the four falling tiles’ row information first (item 1, 2, 3 and 4 of piece tiles y) and then update that row of “grid” list by using tiles column and type information (item 1, 2, 3 and 4 of piece tiles x, and type input).
“find filled rows” Block

After the “grid” list information is updated, the above block “find filled rows” will traverse the whole grid rows to see if any row(s) are filled (that means, no letter ‘0’ in that row). If there are filled row(s), add that row’s index into a list called “filled rows” and then pass the work to the next block “clear filled rows” block.
“clear filled rows” Block
This block deletes the filled row(s) from “grid” list. Each time it deletes one row, it inserts an empty row at the head of “grid” list, so that “grid” list will always keep its 22 rows. Please note that the new empty row should be inserted at the row 1, instead of at the original position of the deleted row.
The second part of the block will update score variable based on level and cleared row number. variable “lines cleared” is updated, too, which is used to calculate the level variable in main segment.
Now after the falling piece has dropped down, filled rows are cleared and “grid” list is updated, the code will loop again (see main code segment), render the game area. All those actions take pace continuously and promptly, so that player could enjoy the fast responding Tetris game.
Till now, almost all of key blocks have been analyzed. Hope it is clear enough to understand this Tetris tutorial. As I mentioned, its interface is still mundane. If you have interest, remix it and let more players see it!
Enjoy the coding and have fun!
Note: All the analysis articles are copyright products of http://www.thecodingfun.com. Anyone re-posting them should credit author and original source. Anyone using them for commercial purposes or translating them into other languages should notify TheCodingFun and get confirmation first. All Rights Reserved.

Like!! Great article post.Really thank you! Really Cool.
LikeLike