

This is the Part 3 of BeatCube! project analysis, and also the last part. I hope that you still have the patience to read this. I will analyze the player sprite in this part. Its costume is a blue cube and it can move by using arrow keys or WASD keys.
As usual, I will analyze the key code segments based on their functions.
Move the player cube
This code segment implements the major function of the player sprite. It is a bit long so that I have to separate it into three parts and then analyze one by one.
Part 1 is much easy to understand. It specifies the initial status, such as its costume, size, x and y position and clear graphic effects.

in part 2, the segment is wrapped in the forever block. Since the program is running very fast, any keystroke can be identified by the loop block. When any of the arrow keys or AWSD keys is pressed down, the player cube will glide to a new position.
Here the author uses a complicated formula to calculate gliding speed. It writes like: (speed *( -1) + 4) * 0.1. I did not research thoroughly why the gliding speed is so fantastic. Anyway, it is a value related to a speed variable, and this variable can be specified in another auxiliary code segment. Here, I will not list it out.
What I am interested in is how the author moves the player cube, so that it could fall right on the cube base accurately. Although the player cube and cube base have different size, their movement on x and y position should keep consistent.
In the Land sprite, we have seen that the cube base is aligned as a matrix by using GridPoint (CloneID, 5, size*0.001). “size” is a variable within Look category. Make “size” variable show on the stage and its value is 100. In the definition of GridPoint, each cube base is aligned against the previous one by changing x position of 26* (space +1) = 26* (size*0.001+1) = 26*1.1. The similar function applies to the change of y position, 16*(space + 1) = 16*(size*0.001 + 1) = 16*1.1.
For Player sprite, as shown in the above code segment, each step its x position moves by 26*1.1, and y position moves by 16*1.1. Perfect! the author designs the movement in this way so that the player cube could always align to each cube base accurately.

In part 3, I notice that before verifying death status, the sprite switches its costume to “Trail2”, and then switches back to Red2 costume after verification. Since the program runs very fast, our eyes actually could not catch the switching of the costumes. So is it necessary to switch costumes? Yes, let me explain why it is.
When Player sprite uses Red2 costume, it shows as a cube. When its upper surface touches the neighboring cube, it will generate false death message, like the below image showing. However, if it switches its costume to “Trail2”, a 2-dimensional shape, if it touches the red color, it means falling on the red cube. There is no false positive message problem.

Create player sprite’s trails
Another feature of the player sprite is that when it is moving, its trail will appear on the stage for a few seconds. So how to realize this effect?

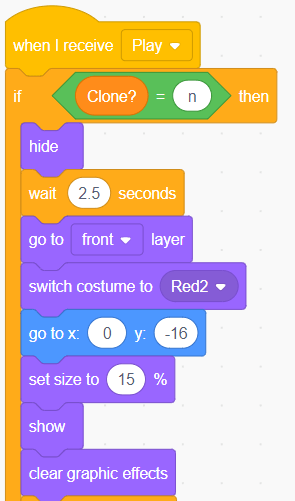
First, in a code segment of “When I receive Play”, the program creates clone every 2 seconds.

Then, in the code segment of “When I start as a clone”, the clone’s costume changes to Trail2, and then fade away gradually by using ghost effect. After that, the clone is deleted. Although the program creates clone at an interval of 2 seconds, the clone disappears after a short period, therefore, it generates a short trail effect.
Here the program uses a concept of the position of cloned sprite. Unless specified, the cloned sprite will have the same x and y position as the original sprite at the moment of clone. when the sprite keeps moving, the clone stays in the position the moment it is created, leaving a trail effect for the sprite.
If the player sprite receives Death message
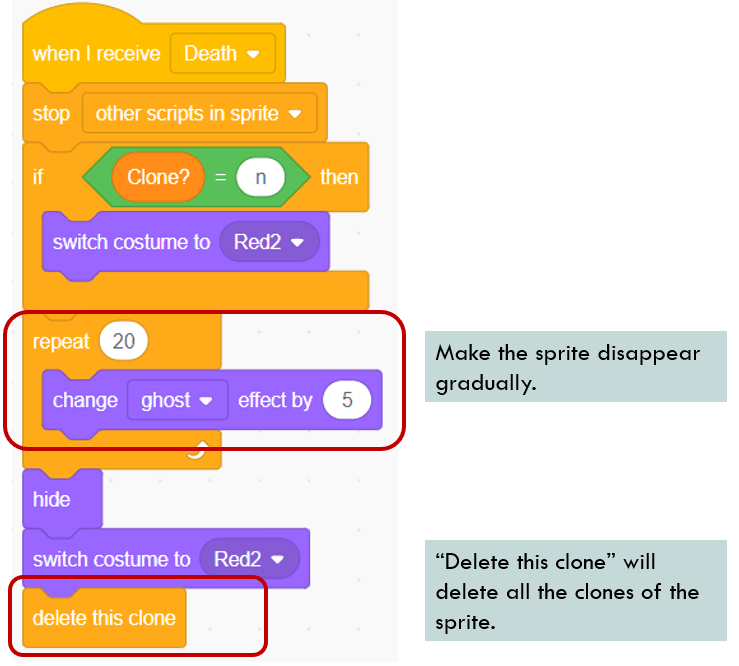
when the Player sprite receives death message, the player cube will fade away gradually by using ghost effect. After that, it will delete this clone. Please note that since “delete this clone” block is put outside of “When I start as a clone”, calling this block will delete all of clones of this sprite.
Although there are other auxiliary code segments in the player sprite, the above segments contain the major functions of this sprite. Through this analysis, I believe you have already known how to create a 3-dimensional matrix and create a trail effect for your sprites.
Enjoy coding and have fun!
Note: All the analysis articles are copyright products of http://www.thecodingfun.com. Anyone re-posting them should credit author and original source. Anyone using them for commercial purposes or translating them into other languages should notify TheCodingFun and get confirmation first. All Rights Reserved.

Like!! I blog frequently and I really thank you for your content. The article has truly peaked my interest.
LikeLike
Hallo its fantastic piece of writing on the topic of cultureand entirely defined, keep it up all the time. gracias
LikeLike