


Land Sprite’s Code
In this post, I will continue analyzing game BeatCube! I will focus on analyzing Land sprite. It is a key sprite for this game. The main functionality of this sprite is to create cube matrix, align it at proper position and update its value at an interval.
Uniqueness of the Design
There are two types of cube matrix used in this game. One is 3*3 cube matrix when the menu is showing, and the other is 5*5 cube matrix when the user is playing the game.
The author uses a list called “Cubes” to store costume information for each cube. Meanwhile, he uses a variable called “Key” to store the costume information, The Cubes list will always read the costume information from Key. For example, if Key’s value is “122253462”, representing a 3*3 cube matrix, the item values of Cubes list will be 1, 2, 2, 2, 5, 3, 4, 6, 2 respectively.
So what does those numbers mean? Not mysterious, they are representing the costume name of the Cube. Different costume shows different color.

I was wondering why the author uses “Key” variable instead of updating value of Cubes list directly. Later on, I realized that the author wanted to create an interface through which he can input any cube color combination with just one line of code through a variable, then he might create multiple level games with various difficulty. On the contrary, if the game updates Cubes list directly, each time it needs to write 25 lines of code!
The above is the advantage of using the variable and list combination. There are also disadvantages. There are many code segments designed to convert information between Cubes list and Key variable. Since Scratch does not provide functions related to parsing of string, there are lots of code segments related to filling, searching or replacing certain letters in the variable “Key”.
Generally, I will not recommend the code style for this project, especially for the Land sprite. There are lots of redundancy code not used, yet. I guess that the author leaves it there for future development.
In the following section, I will introduce some key code segments of Land sprite and categorize them based on their functionality.
Cube Creation and Update Functions
There are two code segments related to Cubes list creation and value filling.
- Cubes (Number, Key) block: it creates clone of Cube and fills in the Cubes list with Key’s value
- ChangeLayoutKey (Key, Number) block: it fills in the Cubes list with Key’s value
We notice that the above two functions are similar. The difference is that the first one will create cube clones, and then use Key’s value to fill in the Cubes list. While the second block just fills in the Cubes list without creating clones. In another word, the first block is a creation function, and the second is an updated one. Within my opinion, the author definitely could merge the two blocks together, making the code more concise.


Key’s Parsing Functions
There are several functions related to the parsing of variable Key. I list several important ones:
- Switch All (Find, Replace, Key) block: replace a number (“Find” input) in Key with another number (“Replace” input).
- RandomKey (Size, Type) block: Fill in the Key variable with a randomly selected numbers.
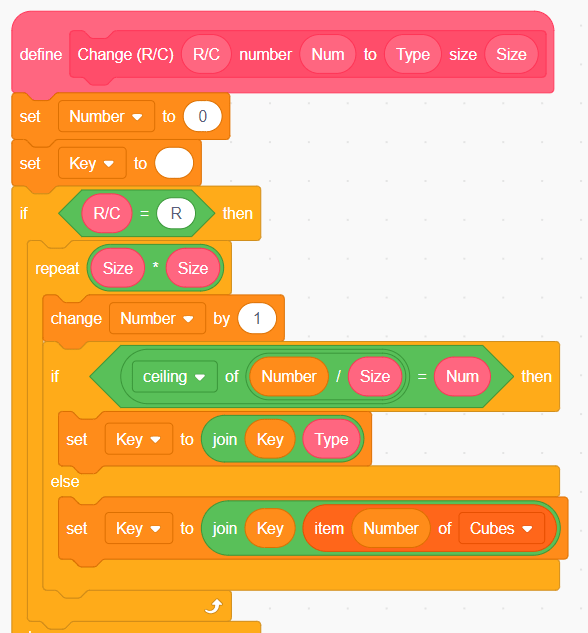
- Change R/C (R/C, Num, Type, Size) block: change all the item in a row/column(“R/C” input) with a specified number (“Type” input) . How many items are included in a row/column is specified by Size.

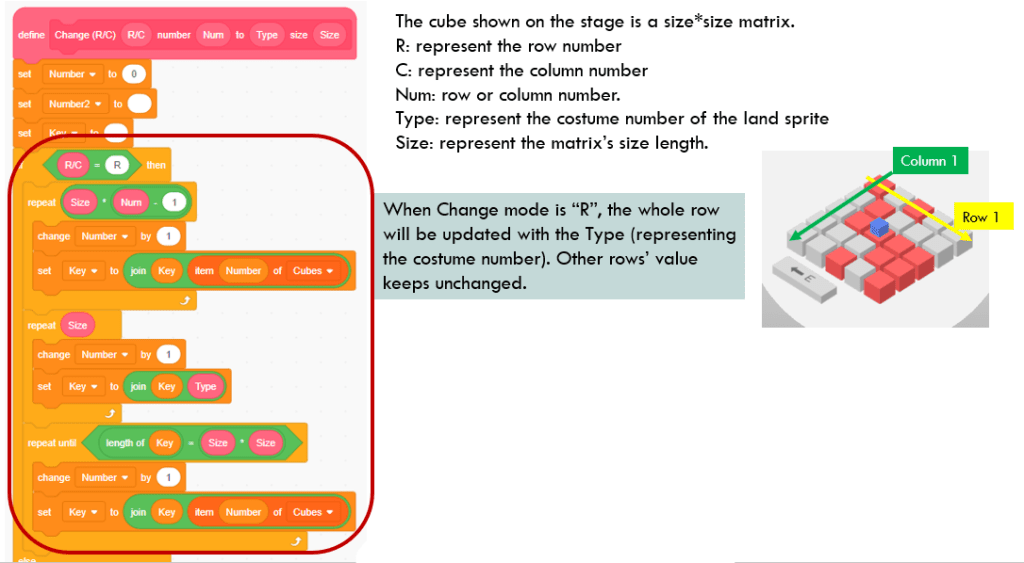
Now let me comment on the Change (R/C) block. First, I will say that the code is not so readable. To say the fact, I read several times and then realize that R/C refers to row or column, Num refers to the index of Row/column, Type means the costume index and Size means the matrix’s size.
The author wants to increase the flexibility of the code. He wants to change the cube costume by row or by column. When R/C input is “R”, the whole row will be updated. Other row’s value will keep unchanged.
When updating the row’s value, the author separates the Key’s value into 3 parts. For example, assuming the matrix is 5*5, so the size = 5 and assuming that the 3rd row’s item value needs to update. For the first two rows containing 2 (rows) * 5 (size) = 10 items, it loops 10 times to parse the original values. For the third rows, it loops 5 times (because size = 5) to parse the updated value, and for the left items, it parses the original value.
It is not necessary to separate the Key into three parts and then parse them separately. Just let the code loops size * size (e.g. 5*5=25) times and use ceiling property to get the row number of current item. If the row number is equal to Num, update its value, otherwise, just keep the original value.
Here, ceiling property is corresponding to round up to a whole number.
For example, if we want to change all the items in row 3. Their indexes are 11 to 15. For index = 11, Ceiling of (11/5) = 3. It means this item should be updated. For index = 15, Ceiling of (15/5) = 3, and it also needs updating.
If an item’s index is 10, ceiling of (10/5) = 2. The item is located at row 2 and will keep the original value. The same rule applies to index 16, ceiling of (16/5) = 4 and it is located on row 4 and keeps the original value.
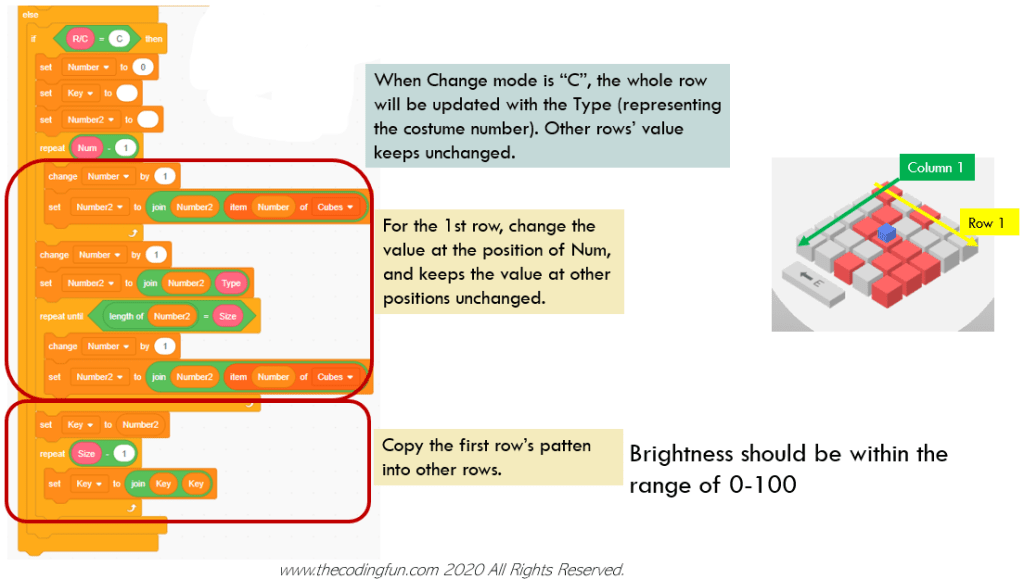
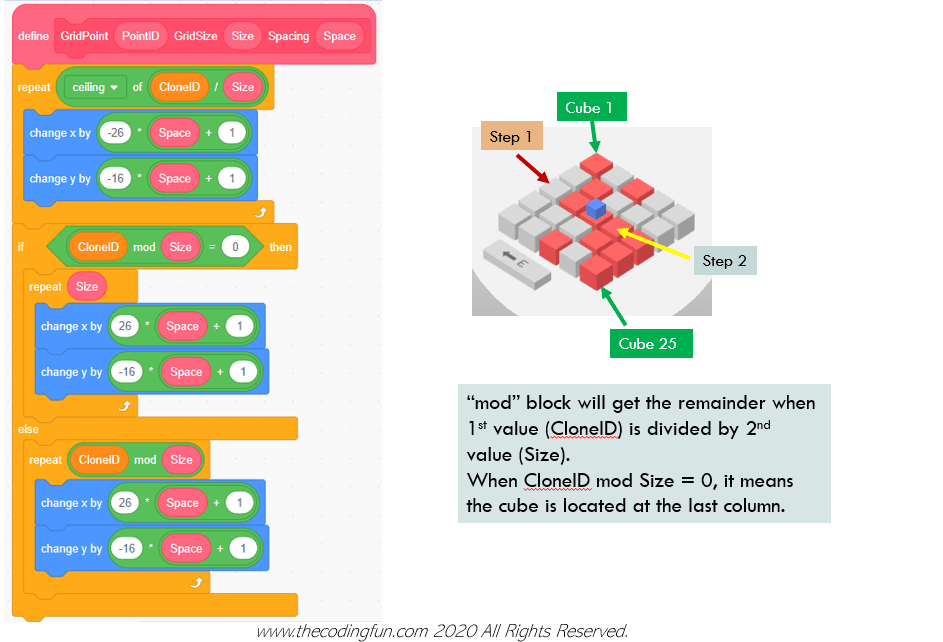
When R/C input is “C”, the game will update the value for a column and keep all the other columns’ value unchanged. However, based on the author’s design, other columns’ value will also be updated. Meanwhile, the code design is too complicated. Therefore, I updated this part of code by using mod function.
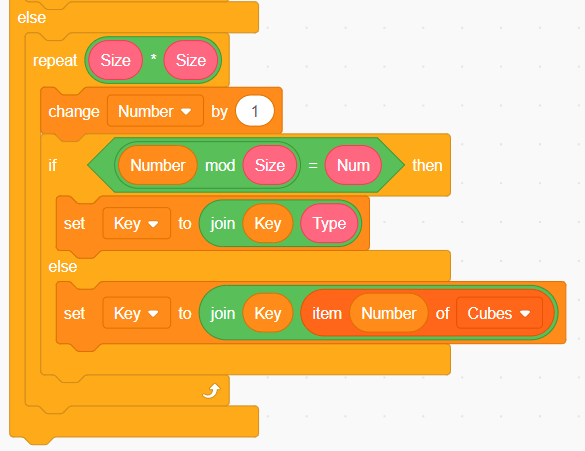
Mod function gets the remainder of division. For example, assuming the matrix’s size is 5 and we want to update all the items at column 3. If an item’s index = 8, 8 mod 5 = 3, so the item is located at column 3 and needs updating value. If an item’s index = 10, 10 mod 5 = 0, so the item is located at column 5 (not column 0!) not equal to 3, so it keeps original value. Now the code looks much concise.
Align Cubes Neatly on the Stage
When the game creates the cube base, it creates 25 clones of the cubes. In the event “when I start as a clone”, it put the clone at a proper place and always gets its value from Cubes list. This is better compared to create 25 separate sprites.

So what is the accurate position for the cube clones to be put? The author designs a block GridPoint (PointID, Size, Space) to realize it. Although the first input is not used at all. It is a bit complicated since the cube is not aligned horizontally or vertically. It is aligned kind of 3-dimensional effect with an angle of 45 degree.
Here, we again need to emphasize the row and column position. Assuming that an item’s index = 10, and size = 5, then ceiling of (10 / 5) = 2, it means that the cube is on row 2. In step 1, the code will change x and y twice to find the location of cubes in row 2.
In step 2, the code will loop 1 to 5 times (depending on the column index of the cube) to find the location. Continuing the above case, since index 10 item is located at column 5, the code will loop 5 times to adjust x and y position to find its accurate position.
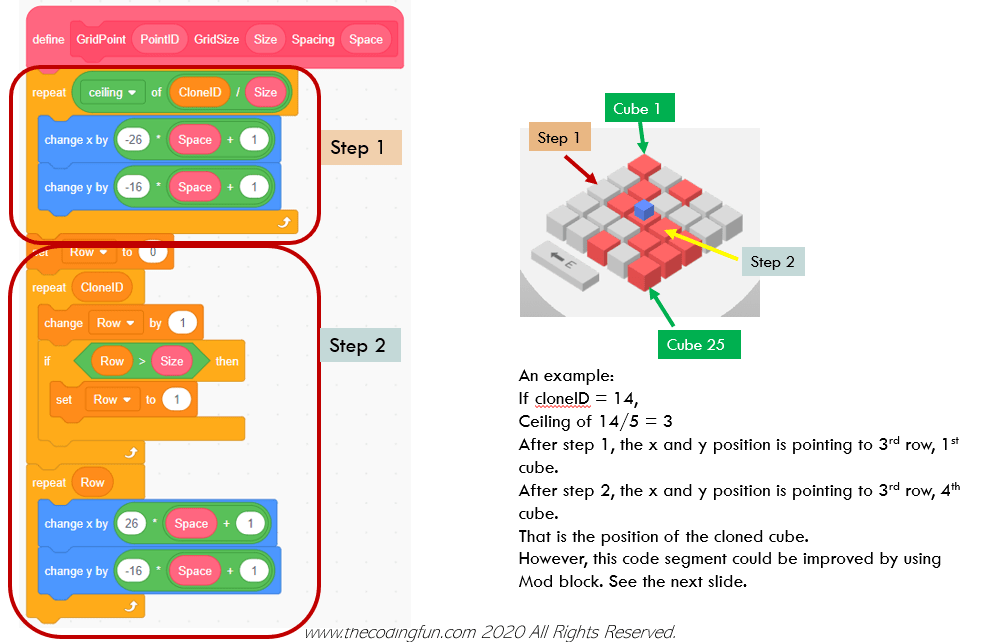
However, I would say the code writing is not so straightforward for step 2. It is also confusing to use a variable called “Row” to get the column index of the cube. So I update this code segment again. See the code below. Again, I use mod method. Still using item index = 10 as an example. Since (10 mod 5) = 0, it means that it is located at column 5 (not column 0!), therefore, the code needs to repeat 5 times (specified by Size) to change x and y to find its accurate position.
If an item’s index is 9, (9 mod 5) = 4, it needs to repeat 4 times to find accurate position.
The updated version for this code segment is shown below.
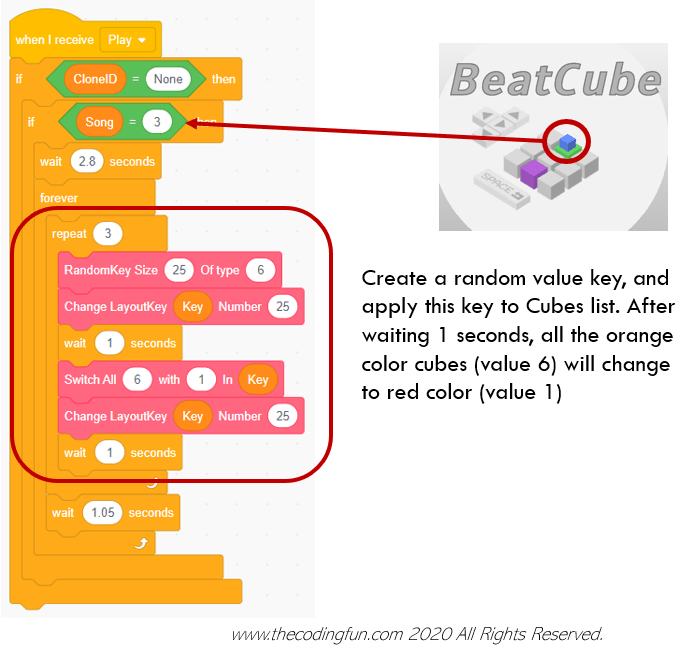
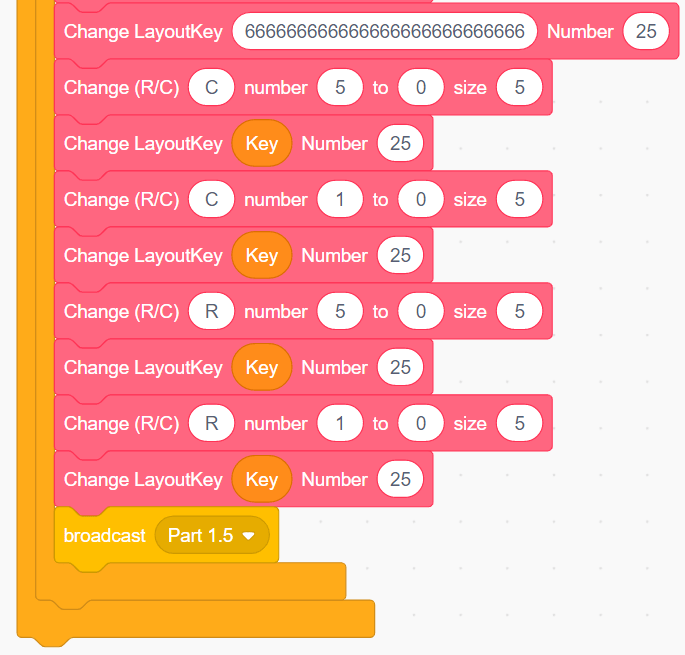
Two Play Choices
After designing the above functions, now we can assembly them together to form a continuous changing cube base. It seems that the author has not finished the project development. Currently there are two play options. For option #1, the game creates random key, fills the Cubes list with the key. After waiting for 1 second, all the orange color cubes will be switched to red color.
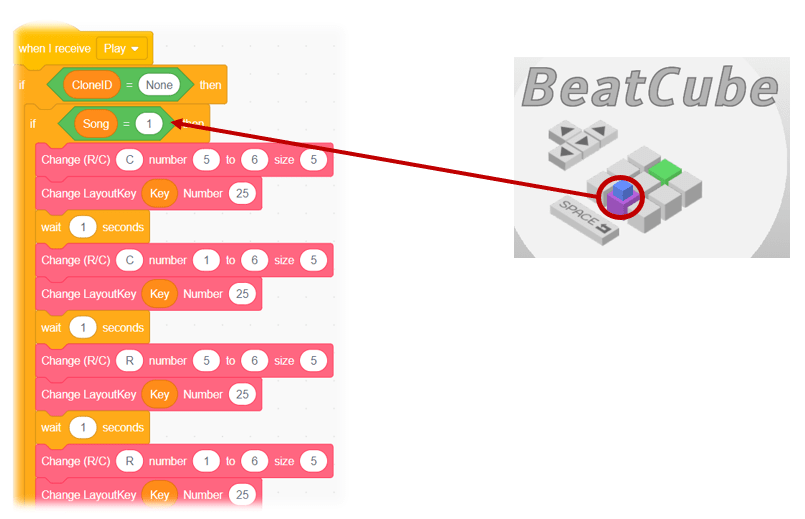
For option #2, the game customizes the values of rows and columns. In ChangeLayoutKey block, it sometimes specifies key value directly. Therefore, the game designer could better control the game difficulty.
The above analysis just picks up the important code segments for Land sprite. There are other auxiliary code and playing options not listed here. Anyway, there are good points and also some place not written so well. Through reading and analyzing others’ project, we could absorb their good ideas and learn how to write better projects by ourselves.
In the next post, I will analyze another key sprite of this project: the player. Keep tuning and enjoy the coding!

Hey These are actually fantastic ideas in regarding blogging. You have touched some pleasant things here. Any way keep up wrinting. grazie
LikeLike