

Scratch definitely is a 2D platform. You could adjust x pos and y pos of your sprites but there is no way to control z depth. However, nothing could obstruct the curiosity of Scratchers. There are many projects showing 3D effects in Scratch. You could search Scratch Wiki articles which introduce some methods on how to render 3D objects in Scratch.
Quote from Scratch Wiki:
“Three-Dimensional or 3D can refer to “something having three dimensions e.g. width, length, and depth or x, y, and z.” Scratch does not provide tools for displaying, creating, or manipulating 3D graphics; however, Scratch does provide blocks for 2D (x,y) sprite movement, sprite resizing, pen drawing, math functions, lists and more. Many (if not all) 3D methods can be recreated with Scratch blocks.”
https://en.scratch-wiki.info/wiki/Three-Dimensional_Projects
In this post, I will not introduce the real 3D object projection method, since that involves more complex code and algorithm. That might be the next step in future. Here I will analyze a project realizing a 3D View Landscape. When you run the project, you could use Left or Right Arrow keys to scroll the stage to show you a 3D view landscape, kind of like when you look out of the window from a train. So, let’s start!
You could open the project at: https://scratch.mit.edu/projects/344760839
Backdrop’s Code
This project is not a game. The author has mentioned that he just wanted to test if the 3D view method could work. What you could do is to press Left or Right arrow keys to scroll the stage.
scrollx is an important variable. Later on, you will see that almost every sprite uses this variable to position itself. scrollx variable will change value whenever your press Left and Right arrow keys. Those changes will immediately be sensed by the sprites on each layer.
The author created a limited length of landscape. Therefore, you could see that scrollx is set to a range from -1765 to 1579. If you continue pressing arrow keys but scrollx exceeds the range, the landscape will not scroll.


Layers in the 3D Landscape
Unlike other 2D projects which usually have less layers. Together with backdrop, this 3D landscape project contains at least 15 layers. Each layer contains sprites standing in different distance from the viewpoint. You could image the viewpoint as a window of the train. The common knowledge when you look out of the window from a train includes:
- Nearer objects are bigger
- Nearer objects are moving faster
- For the objects of the same size, the farther the objects are, the slower they are moving and the smaller their sizes are.
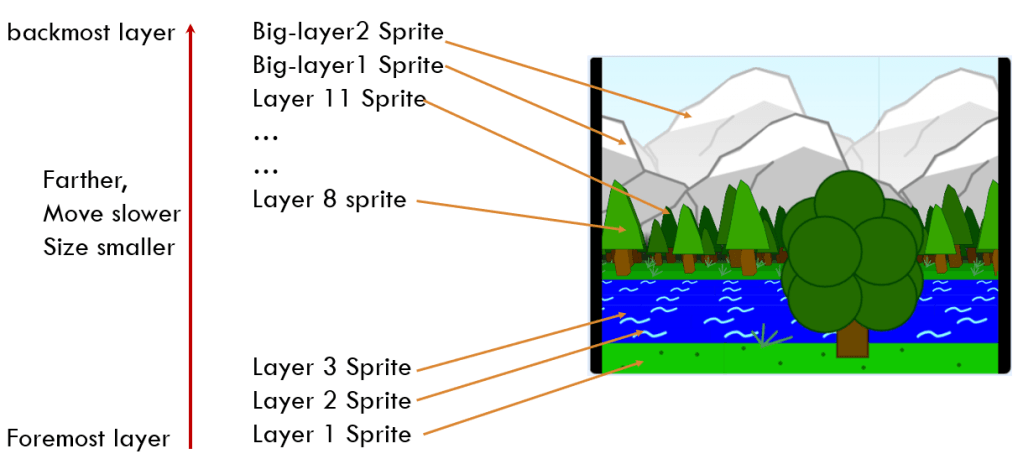
The layers are arranged sequentially. Layer 1 is put in the foremost and followed by Layer 2, Layer 3… Layer 11, big layer1 and big layer2.
The alignment of layers not only influences their overlapping relationship, but also their scrolling speed. Those rules are very important in creating 3d Landscape..
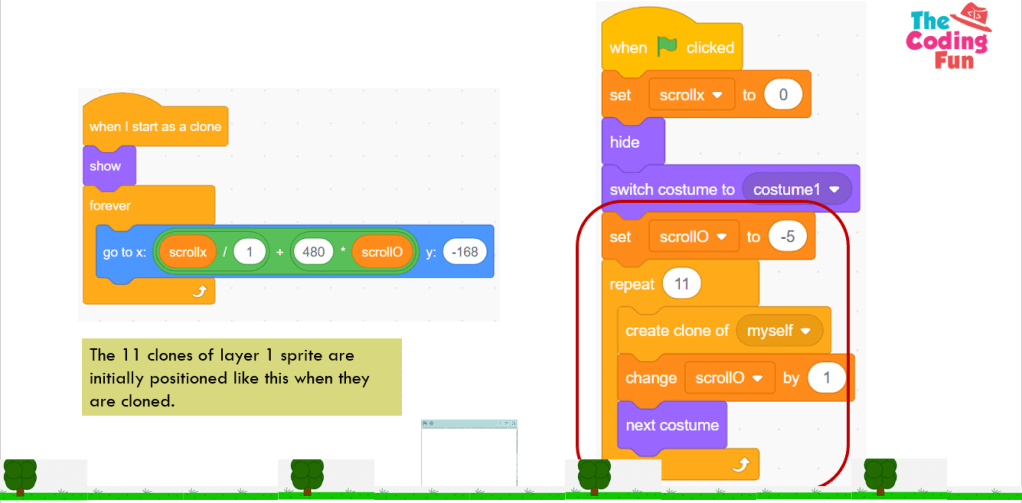
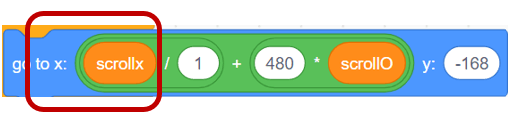
Layer 1’s Code
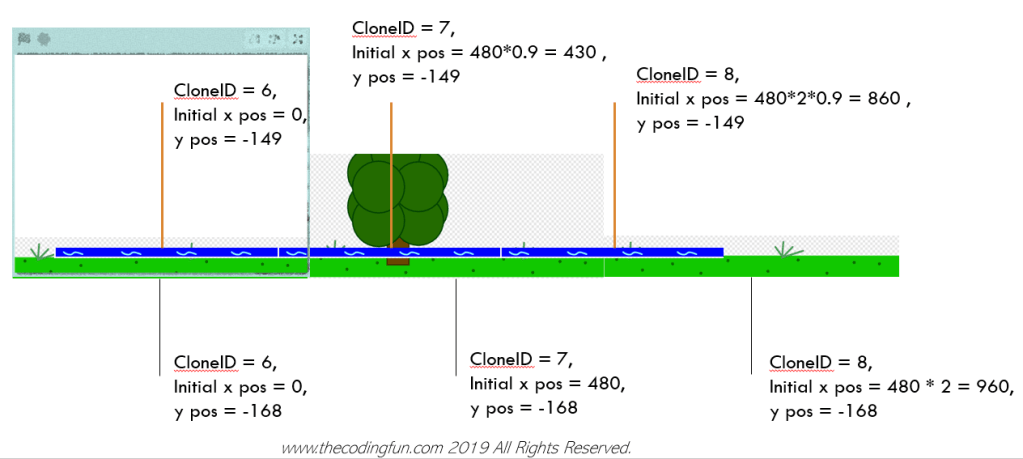
Layer 1 sprite is cloned 11 times in the code. The 11 clones are aligned side by side horizontally. Since Layer 1 sprite has the same length of that of stage, that is 480, the 1st clone is located at (-480*5, -168), and 2nd clone is located at (-480*4, -168), etc. The 6th clone is located at (0, -168), and the 11th clone is located at (480*5, -168). It forms a symmetrical layout to facilitate the scrolling toward either left or right.
There is one point needing special attention. scrollO is a variable “for this sprite only”. Only using this type of variable, scrollO could have different value for each cloned sprite, so that each cloned one could maintain its unique position.
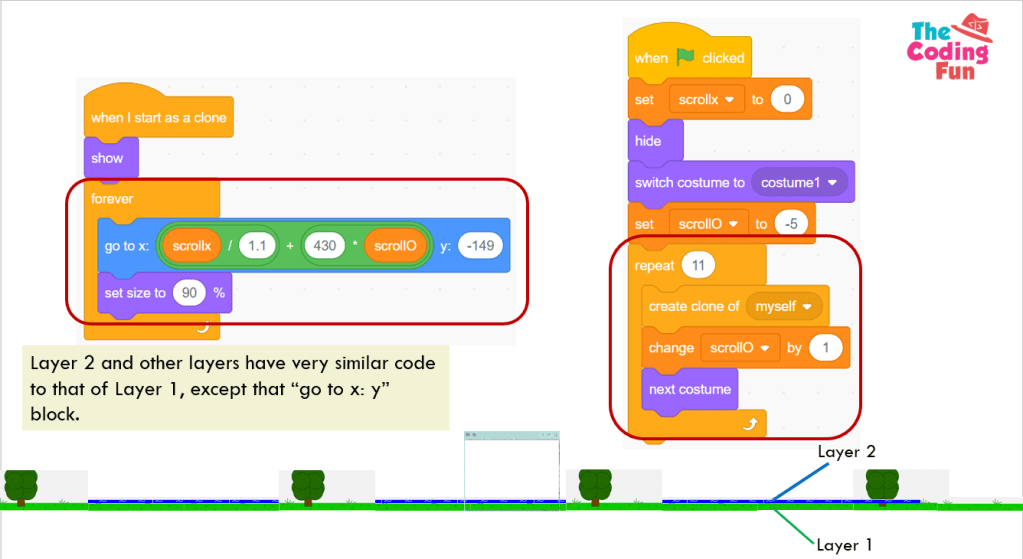
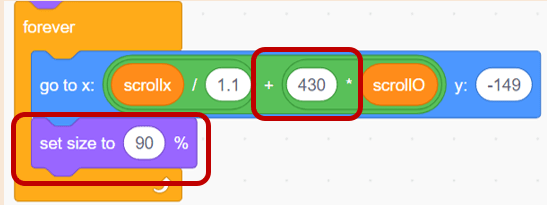
Layer 2’s Code
Layer 2’s code is very similar to that of Layer 1. except that “go to x: y:” block. the difference of number in this block is key to realize 3D effect landscape. I will explain it in detail in the following sections.
Compare the Code of Different Layers
As I mentioned above, Layer 2’s code is different from that of Layer 1’s in that “go to x: y:” block. So how did the author fill in those numbers? Did he input number by trial and error, or by calculation based on some rules? I would say both. 🙂


Based on the above demonstration, the author set Layer 2’s sprite shrink into 90% size, which is based on trial and error. You could set it shrink into 95% size or 88% size based on your preference of visual effect. After setting the size, the author calculated the position of each cloned object to ensure them align side to side horizontally. To realize it, he used the size information (480*90% is around 430) to position them. Finally, he calculated the scrolling speed which is also related to the size information.
For Those Sprites in the Farther Distance
For Layer 7 to layer 11 sprites, the author created 22 clones and set scrollO from -10 to 10, which is different from 11 clones for layer 1 to layer 6 sprites whose scrollO is from -5 to 5.
The author made such an arrangement because those sprites’ size shrink too fast (e.g. Layer 11’s size shrinks to 18%), and when using 11 clones, those layers must scroll very slowly to keep the viewpoint synchronized with other layers. However, it will look wield when you view the landscape by trial and error. Therefore, the author created twice amount of clones, and meanwhile, made those layers scroll twice the speed of that when 11 clones were created. It looks better in this setting.

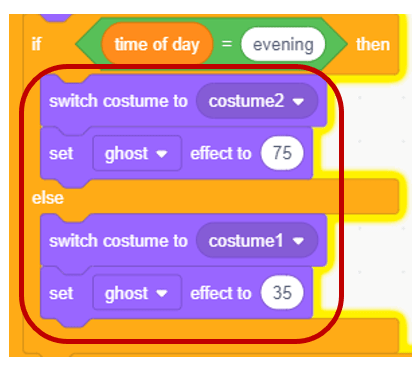
Sprite 1 – Weather Cover
Sprite 1 is simply a pure color object. Based on different weather conditions, it sets to different color and ghost value, so that to create a translucent effect for the landscape, kind of like a filtering effect in the picture editing software.
Summary
Through analyzing this example project, I introduce some method to realize 3D effect in Scratch. Here are some important take-away:
Use a variable to control the scrolling position of the stage. All the other sprites would refer to this variable to position themselves.
To realize 3D landscape effect, the closer the sprites, the faster they move and the bigger their sizes are.
Put a colored layer in the front and adjust its ghost value to generate a translucent cover.
Hope You Enjoy Your Coding!
Note: All the analysis articles are copyright products of http://www.thecodingfun.com. Anyone re-posting them should credit author and original source. Anyone using them for commercial purposes or translating them into other languages should notify TheCodingFun and get confirmation first. All Rights Reserved.
