

In one of our senior level courses , we create a haze cover to simulate the limited visibility within the haze environment. Take a glimpse of the game below. The player controls the car to move left and right with limited visibility. Another example is to simulate a torch to seek treasure in the darkness. Interesting and challenging?
So how to realize this effect?
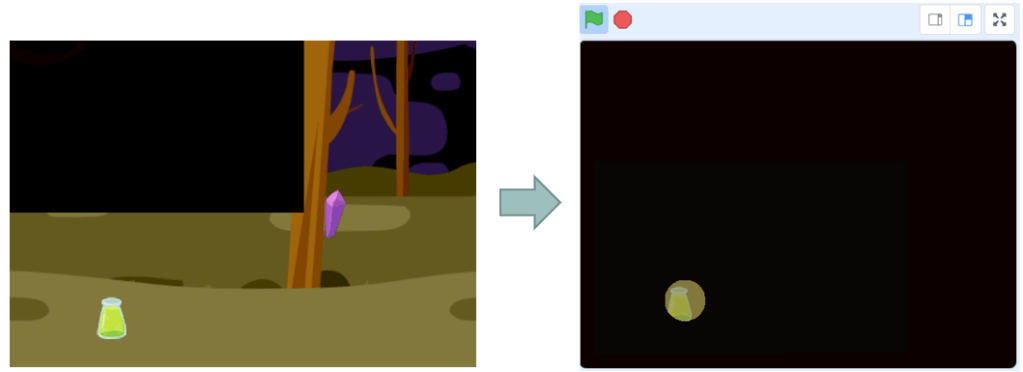
I will take the example of torch game. Before we make a torch effect, the backdrop and treasure sprites show on the below left. After applying the torch cover, the player can only see through the lighted up circle. The torch position follows the mouse pointer. All the other areas are covered by darkness. In this post, I will introduce not only one, but three different methods.
Method 1:
Create a big enough sprite which is dark except a transparent hole in the middle. The hole’s movement follows the mouse pointer, but the darkness should cover the whole stage.
The code implementation for the torch cover sprite is simple, just three lines.

However, when using this method, we need to know some information:
- Scratch has a limitation on the sprite size. When you draw a sprite the same size of stage, you could increase its size to 150 maximum. That means, you could not create a big enough sprite just by “Set Size to 200%”.
- You might think to upload a big sprite (say, 1920-pixel by 1440-pixel picture). However, after you upload it and open it in Scratch costume editor, it will shrink to the size of stage. It is not big enough, yet.
- Therefore, you need to manually stretch your image to make it big enough. Let me show you how to stretch it, see the video below:
Finally, when you stretch the image, the hole in the middle will also be stretched. You will get a hole much bigger than the original size.
Method 2:
For this method, we create a sprite which has a transparent hole in the middle and the same size as stage. Meanwhile, create 8 black sprites which align in the following way. When they move together with the mouse, it will keep this alignment so that it is just like one big enough sprite and always cover the stage.
Backdrop 0 will use the same code as that in Method 1, while all the other 8 sprites will offset a certain value from the current mouse x and mouse y. The purpose is to keep the 9 sprites move in the same direction and angle, forming just like one complete image.
Using Method 2, you could get a very precise torch cover. When the mouse moves around the stage, there will not be any uncovered area. However, you should be careful in setting the offset value of both x and y direction, otherwise, the covered area becomes a bit messy.
Method 3:
Using Method 2, we do not need to stretch the image. However, did you find it cumbersome to create 8 identical black sprites? In Method 3, we can overcome this problem by only creating two sprites to solve the torch cover problem. One sprite is like the previous one, which has a transparent hole in the middle and other area is black. The code for it is also the same as that in the previous methods.
The significant change happens to the other sprite, which is totally black. We will use a different method to write its code:
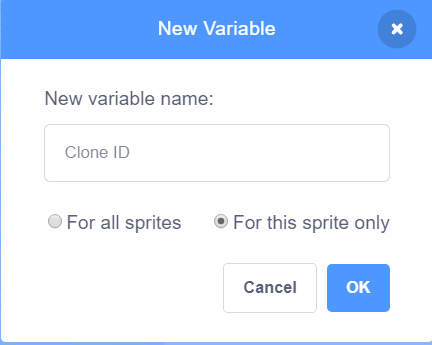
- Create a variable Clone ID “just for this sprite only”
- Create 8 clones for this sprite.
- Assign different value of Clone ID to each clone.
- In the event “when I start as a clone”, set different behavior for each clone.
Please note that if you create a variable Clone ID which is “for all sprites”, it is a global variable, or a “common” variable. No matter how many clones you create, the global variable will always keep the single value. The variable type “for this sprite only” has a “magical” power because it allows each clone to have its own copy of this variable and each variable value could be different for each clone.
Finally, you need to fill in the code for the event “when I start as a clone”, as shown below. Then done.
Conclusion
Just like solving math questions, We could find multiple solutions to a software design problem.
In Scratch, we need to know there is a constraint on a sprite’s size. When you want to create an extra big sprite, convert it to vector and stretch it by using Scratch costume editor.
For a cloned sprite, we could create a variable “for this sprite only” and assign a unique variable value to each clone. We could design different behavior for each clone.
Enjoy Your Coding and Have Fun!
Note: All the analysis articles are copyright products of http://www.thecodingfun.com. Anyone re-posting them should credit author and original source. Anyone using them for commercial purposes or translating them into other languages should notify TheCodingFun and get confirmation first. All Rights Reserved.

Thanks I have read your blog it is very helpful for me.
LikeLike
I enjoy your writing style genuinely loving this website .
LikeLike