
When we start to write Python code for LEGO MindStorms models, we tend to convert existing Scratch blockly code into Python version and check if it works. Although LEGO has made effort to create Python methods which could match the functionality of Scratch programming blocks, the Python code structure is much different from that of Scratch code.
In Scratch blockly code, when we want several code segements run parallel, we just need to start new code segments by using events blocks. Event blocks refer to those blocks with curved outline which could start a new code segment. However, Python code is designed to run sequentially and does not support parallel code segments. In this post, we will introduce how to “translate” Scratch blockly code into Python version, so that both programs could drive your LEGO model successfully.
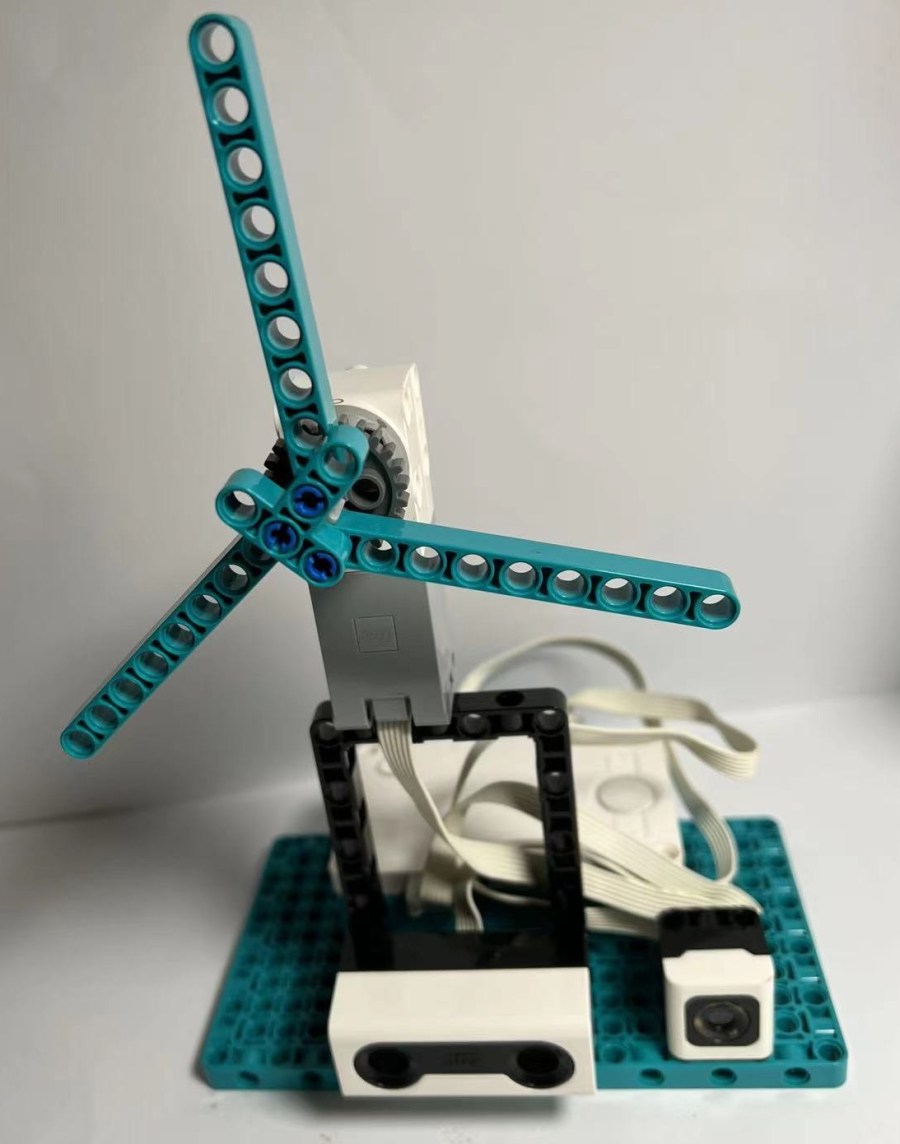
The article focuses on the code side, so I created a simple fan model. The fan blades are fixed to the motor and the motor is attached to smart hub via port A. Distance sensor is connected to smart hub via Port B. The fan could turn clockwise or counter-clockwise. Every time your hand approaches the distance sensor, the fan stops, When your hand is away from the distance sensor, the fan starts again, but in the opposite direction of the previous running.
The final effect is similar to that shown in Part 2, except that color sensor is not added.
Part 1
Scratch Blockly Code
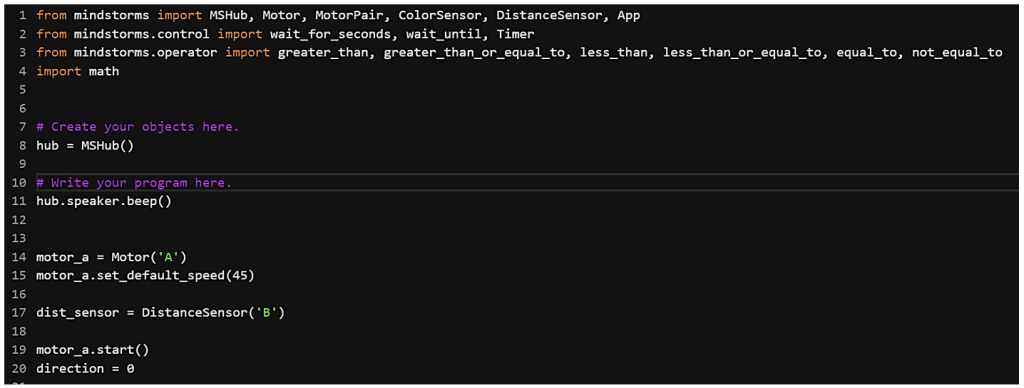
I paste the Scratch code here, as reference. When program starts, it sets motor A’s speed and direction (clockwise). It also sets variable “direction” to 0. When distance sensor (port B) is closer than 5 cm, motor A stops, and change the value of variable “direction”. When distance sensor (port B) is farther than 10 cm, motor A starts again, and its spinning direction is decided by the variable “direction”.
Using a few parallel code segments, we could control the model and its direction.

Python Code
So let’s convert the above Scratch blockly code into Python. Open Python Editor from LEGO MindStorms App, we could input the following code. Please note the line 1 to 4 are default header of importing section, and I keep them as they are.
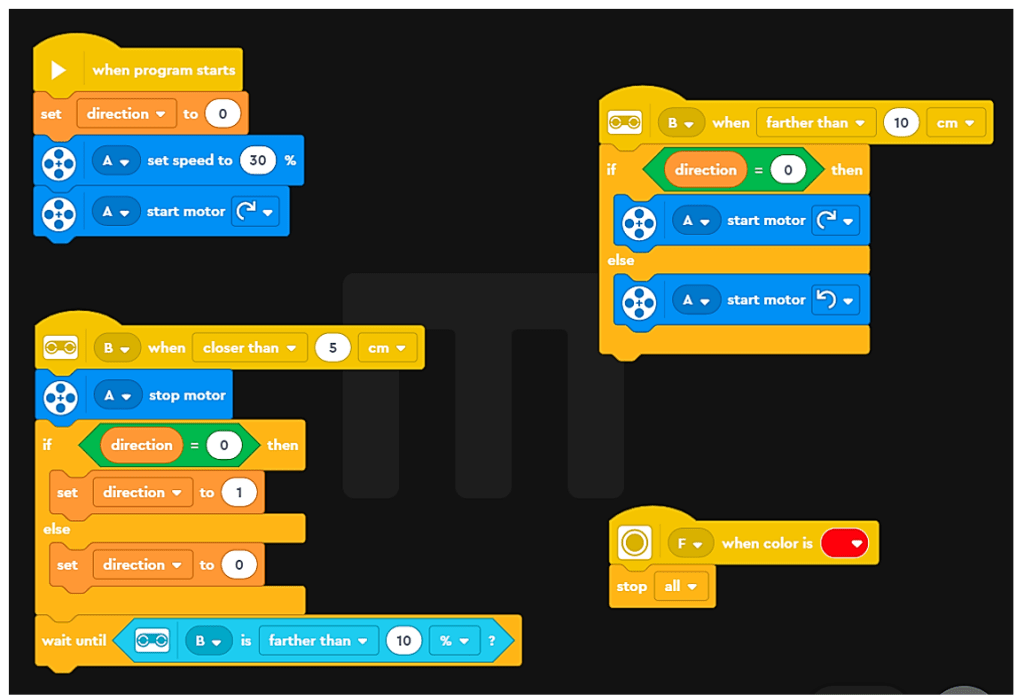
At line 15, the program sets the motor’s speed to 45, and starts motor at line 19. It also sets variable “direction” to 0. Till this point, nothing special.
From line 22 forward, the code structure is different from that of Scratch blockly language. As Python code runs sequentially, we need to wrap every activity within a main loop, which is defined as “while True” at line 22. Within the main loop, the distance sensor calls “wait_for_distance_closer_than” method. This method holds the program to wait until any object approaches the distance sensor. After that, the program changes the value of variable “direction” and stops the motor.
The distance sensor continues to call “wait_for_distance_farther_than” method. That means, when object is removed from the front side of distance sensor, “direction” value is updated and the motor starts again.
The whole process forms the main loop, which contains all the functionalities of the above Scratch blockly language.

Part 2 – Enhanced a little bit of functionality, but …
Now, let’s just add a little bit of functionlity. Compared to the above Scratch blockly code, I just add two blocks, as shown in the below picture. I connect the color sensor to port F of smart hub. When color sensor identifies Red color, stop the whole program.
The final effect would be like this:
You might think “it is easy! I just need to add an ‘if’ conditional judgement within the main loop”, but… if you add the code like the following image (line 25 to line 28), you may find that the code sometimes could not respond to the color change properly, or totally ignore the color change. Why is it happening?

The problem lies in the methods “wait_for_distance_closer_than” and “wait_for_distance_farther_than”. The two methods will make the program wait over there, until meeting the distance closer/father requirement. When the program is holding up there, other code could not run and the main loop could not respond to other code’s requirement. So, how to change Python code to make it respond to multiple sensors without any delaying?
The key is to replace “wait_for_xxx” methods. The following is a solution for your reference.
Updated Python Code

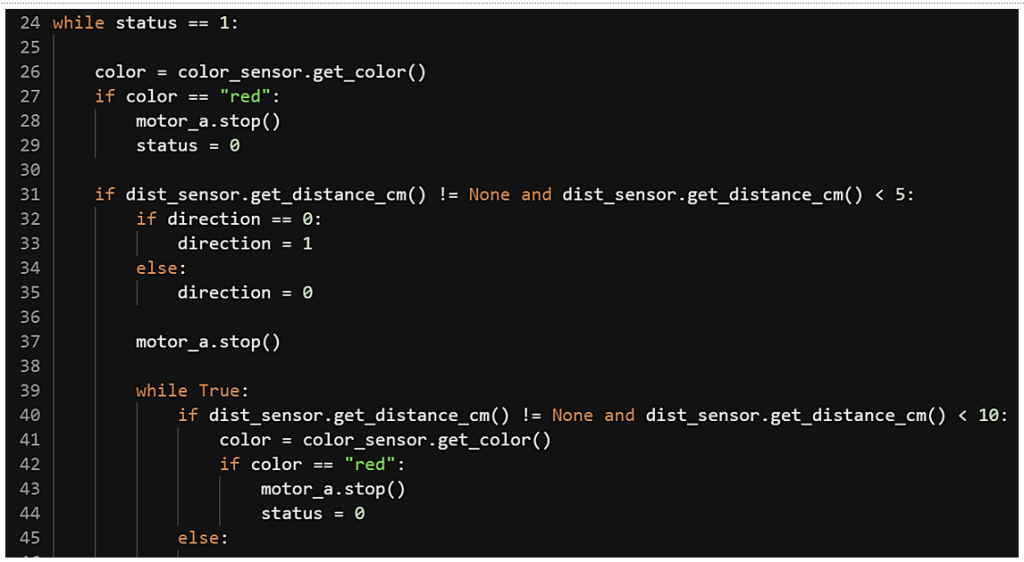
At line 22, we add a new variable called “status” and set its initial value to 1. For the main loop, instead of using “while True”, we use “while status == 1” to control the running. In this way, if we change status value to 0 within the main loop, the program will exit the loop in the next iteration and end.
Now, let’s take a look how to update the code structure within the main loop. Instead of using “wait_for_xxx” methods, we just make the program check sensor’s status constantly. At line 26, the code checks color sensor’s identified color. If it is Red, the code stops the motor and sets status to 0. As I mentioned above, when status is 0, the program exits the main loop in the next iteration, so program ends.
If color sensor is not identifying Red color, the code moves forward. At line 31, the code calls “dist_sensor.get_distance_cm()” method to get the distance value. If it is smaller than 5, the code changes the value of variable “direction” and stops the motor. From line 39 to line 55, the code enters a nested loop. Within this loop, it checks the status of color sensor and distance sensor frequently. If color sensor identifies Red color, end the program. If the distance sensor “get_distance_cm()” is bigger than 10, start the motor again.
Since the whole process checks the status of color sensor and distance sensor frequently, you will feel the code response speed is much better than the first solution. The key concept is to ensure that the code within main loop runs smoothly, without any delaying or waiting.

The example in today’s post illustrates a simple condition where we need to consider the program flow and how to use main loop to handle all the activities. There are much more complicated conditions if your program contains multiple motors and sensors. Hope today’s example could help you understand how to design Python code for LEGO MindStorms models. Enjoy the coding and have fun!
Note: All the analysis articles are copyright products of http://www.thecodingfun.com. Anyone re-posting them should credit author and original source. Anyone using them for commercial purposes or translating them into other languages should notify TheCodingFun and get confirmation first. All Rights Reserved.
