

As we know, LEGO MindStorms Inventor provides animation functionality. In the Animation Editor, we could specify the light matrix pattern, then call the “play animation” block to play it. However, how about we want a pattern rolling freely on the light matrix? just like what the below video shows. We could not use the built-in animation editor to realize this effect.
In today’s post, I would like to introduce how to implement this effect by using Python code. You could implement the same effect by using blockly language, but the method is the same.
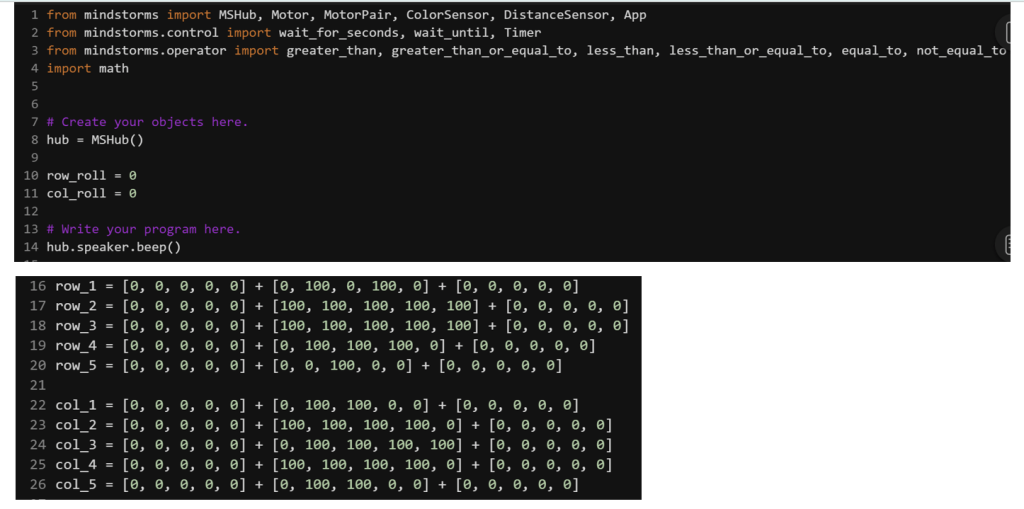
At the beginning of the Python file, we could keep all the default importing code as they are. At Line 10 and line 11, the program creates two variables “row_roll” and “col_roll”, which represent the rolling amount of the pattern in vertical direction and horizontal direction, respectively.
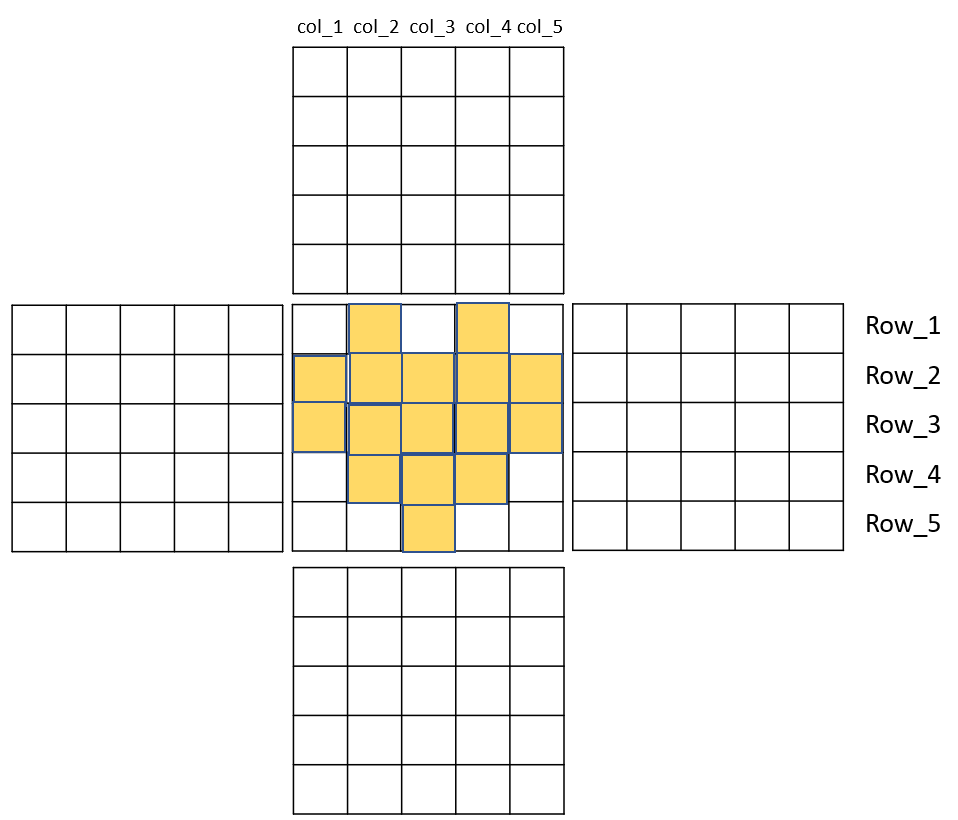
The above diagram shows the initial display of the pattern. The center grid represents the smart hub screen. In order for the pattern to roll vertically or horizontally while keeping all the data intact, we need to create five lists representing matrix columns. They are col_1, col_2, col_3, col_4 and col_5. Meanwhile, another five lists represent different rows. They are row_1, row_2, row_3, row_4 and row_5. If a pixel should be turned on, set its value in the corresponding list as 100, otherwise, set the value to 0.
Take col_1 as an example. All the value of the first six items are 0, followed by two items of value 100. After that, the list has seven items of value 0. The definition of the col_1 list structure is shown in the line 22. Other rows and columns are defined by using the same method, which are defined from line 16 to 26.
From line 55 to line 122, the code forms the main loop of the program. It checks the pitch angle and roll angle continuously to decide when to roll the pattern up, down, left or right. The value of pitch angle and roll angle could be acquired through the motion_sensor, which is a built-in sensor of LEGO MindStorms Inventor’s smart hub.
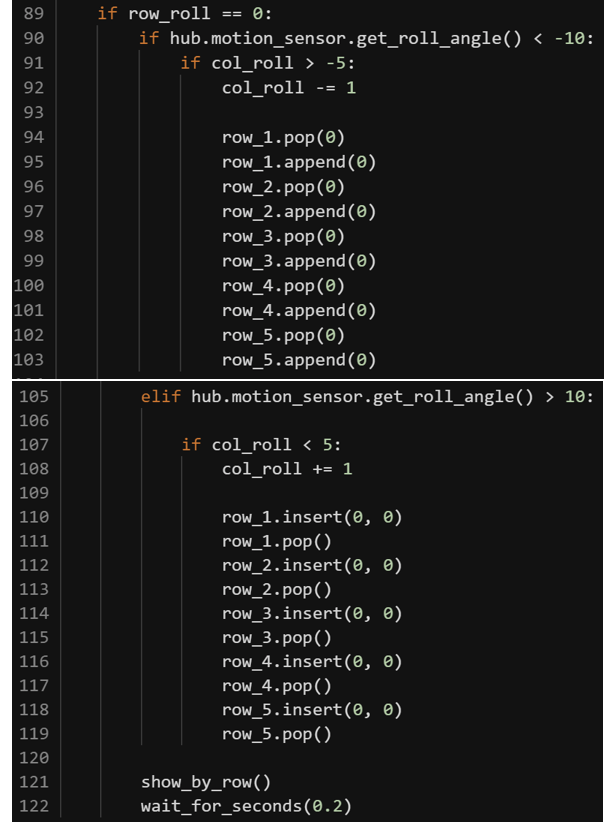
Now let me expain the coding logic within the main loop. At line 56, if col_roll is equal to 0, the pattern is not rolling horizontally. Only when the pattern has not horizontal offset, it is allowed to roll vertically. Same at line 89, when row_roll is equal to 0, meaning the pattern is not rolling vertically. Only when the pattern has not vertical offset, it is allowed to roll horizontally. You could see that we set constrains on the rolling condition, so that the pattern either rolls along vertically line, or horizontal line. This constraint could simplify our program logic and data storage.
If you want the pattern to roll horizontally or vertically to any position, as shown in the below diagram, you need more lists to store the pixel position values. You could try it by yourself.


At line 57, when the smart hub tiles forward, the pitch angle will be smaller than 0. Each list (col_1, col_2, col_3, col_4 and col_5) pops up the first item, and appends an item of value 0, so all the columns could still keep 15 items, but the items representing the pattern update their values.
The same logic applies when pitch angle is bigger than 10, roll angle smaller than -10, or roll angle bigger than 10. We use the same method to pop up one item from the list or append (or insert) one item in the list. The pattern data always keeps in the lists, but what shows on the smart hub screen is different.

At line 86, After adjusting the column lists, the program will call function “show_by_col” to display the updated lighting matrix. After adjusting the row lists, the program will call function “show_by_row” at line 121 to display the lighting matrix.
Let me explain “show_by_row” function here. As we mentioned above, each row list consists of 15 items, while the item index 5 to 9 will show on the smart hub’s column 0 to 4, respectively. Therefore, when using “hub.light_matrix.set_pixel” method, we need to consider the data index offset. Repeat the same operation for the row 1 to row 5, so each pixel is set to the proper brightness value. Same logic applies when writing function “show_by_col”.

That is all for the code of the rolling pattern. This is not the only solution. We could use other method such as “hub.light_matrix.show” method to set all the matrix pixels in a string. All the upcoming operation will be done on the string to reflect the position change of the pattern. Each method has its advantage and weakness. It is up to you to choose the one you prefer. Enjoy the coding and have fun!
Note: All the analysis articles are copyright products of http://www.thecodingfun.com. Anyone re-posting them should credit author and original source. Anyone using them for commercial purposes or translating them into other languages should notify TheCodingFun and get confirmation first. All Rights Reserved.
