

If you once played the LEGO MindStorms EV3, you might have built one of its sample projects Puppy, which I explained in my previous posts. Several years ago, when EV3 has not yet supported the Scratch blockly language, the puppy code is pretty complicated and confusing. In this post, I will use LEGO MindStorms Inventor to recreate such a pet dog, and write its code with both Scratch blockly language and Python.
The final effect is like this. The peg dog will get bored or feel “hungry”. As the pet owner, you need to play with it and feed it with the colorful blocks in time, otherwise, it will stop responding to you.
The overall structure of the model is much simpler than the project of LEGO MindStorms EV3. Therefore, I will concentrate on the code only. In this post, I will explain how to use Scratch blockly language to implement its functionality, while in the next post, I will switch to Python.
Initial Setting

When program starts, set both motors to the position of 0. We could spin the motor manually, so that both marks match, as shown in the below diagram. When the program calls “D go shortest path to position 0”, the motor will turn to the position where the two marks align, no matter what position the motor has spun to.
In this sample, left leg is connect to Port D, while right leg is connected to Port A. The program sets both motors to position 0 (which represents a sitting position of the pet). The ultrasonic sensor is lightened up and then turned off after 0.5 seconds. The initial status is done.

Two Blocks

The pet dog has response to user’s action. In the block “tapping”, the program uses motor pair so that both legs could move at the same time. Recall that the left leg is connected to Port D and right leg is connected to Port A, therefore, the motor pair should use “set movement motors to D+A”. Pay attention that if you swap the position of Port D and Port A to use “set movement motors to A+D”, the final effect will be different since the program takes Port A as the left motor.
When we use motor pair and set positive motor speed, both legs will move forward. When we set negative motor speed, both legs will move backward. After swaying the legs, the program sets both motors to the position of 0, so the pet dog resumes its initial “sitting” position.

The pet dog will run when the ultrasonic sensor identifies any object closer than 8 cm. We define a block called “running”, whose code is similar to the tapping block. The difference lies in the loop. The program repeats 5 times and within each iteration, the two motors in the motor pair run at opposite speed, that is to say, left motor runs at -50 speed, while right motor runs at 50 speed, and vice versa. The effect is that one leg moves forward while the other leg moves backward. At the end of the running procedure, both motors return to the position 0, so the pet dog resumes its initial “sitting” position.
Main Control Blocks
The following code segments include the main controlling logic. We have created two parallel code segments. The first one is used to calculate the hungry time and boring time. The pet dog needs our attention all the time. If we leave it unfed, it will become hungry and when it is starved, it will shut down finally. Therefore, we need a variable “hungry_time” to measure its hunger index. Meanwhile, we need to have a variable “boring_time” to store its boring index. If we do not tap it or walk it after certain seconds, the value of “boring_time” exceeds a threshold and it will warn us about its boredness status.
Now let’s take a look at the following sample code.
Code Segment 1
At the beginning of the program, both variables “hungry_time” and “boring_time” are set to 0. Time is also reset. Within the forever loop, both variables will add the elapsed time, and then the program resets the timer. The program then checks if hungry_time and bored_time exceed a threshold.
You might wonder that if that is all the logic, the pet dog will just be turned off after 35 seconds. No, we have another parallel code segment which will also play a role in controlling the two variables.


Code Segment 2
In the following parallel code segment, the program checks if the color sensor identifies any of red, blue or yellow color. If it does, it indicates that the pet dog is being fed. Every time it identifies those colorful blocks, “hungry_time” variable decreases by 3 and the smart hub will play a chewing sound. When “hungry_time” variable is smaller than 5, just set its value to 0 and indicate the pet dog is full. The block “wait until not ((B is color red) or (B is color blue) or (B is color yellow)) is to ensure that each feeding action will only trigger one time change of “hungry_time” value.
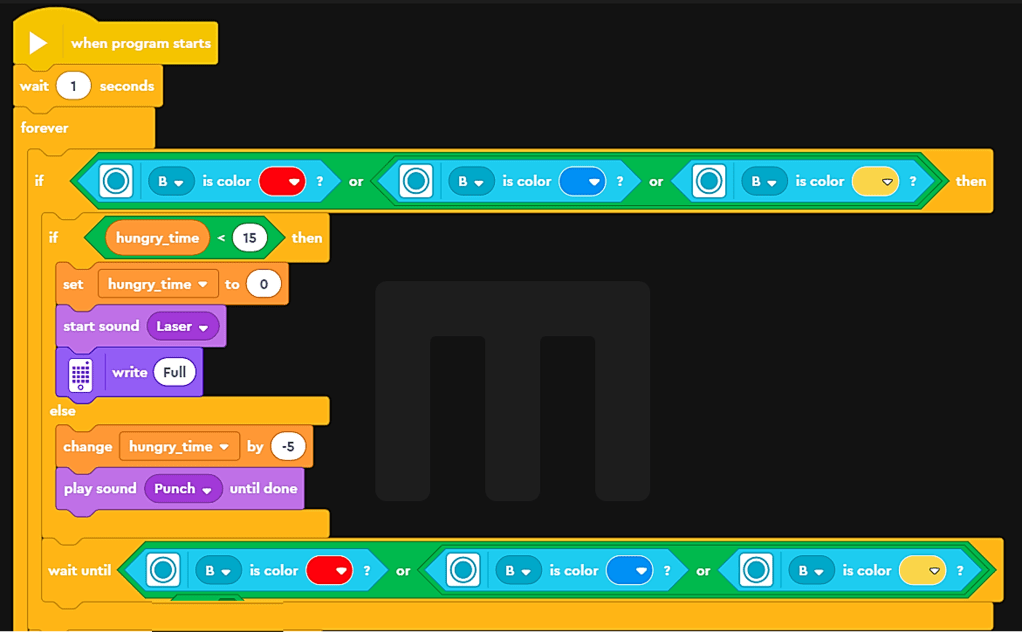

When the smart hub identifies tapping, “boring_time” is set to 0 and then call “tapping” block. When the ultrasonic sensor identifies any object smaller than 8 cm, it also sets “boring_time” to 0 and call “running” block. Please note that both “tapping” and “running” actions take time, so we set “boring_time” to 0 again after finish running the two blocks.
Through calling the two blocks “tapping” and “running” and simulating feeding, the value of “hungry_time” and “boring_time” will fluctuate dynamically depending on how you interact with the pet dog. Come to try the above code and have your own robot pet. It is a very demanding creature, right? However, if you want it to be less demanding, you could adjust its parameter threshold. For example, when “hungry_time” is bigger than 1800, the robot pet will declare hunger. In that way, it will give you much time to relax. Have fun with your robot pet!
Note: All the analysis articles are copyright products of http://www.thecodingfun.com. Anyone re-posting them should credit author and original source. Anyone using them for commercial purposes or translating them into other languages should notify TheCodingFun and get confirmation first. All Rights Reserved.

Pingback: Use LEGO MindStorms Inventor to Build a Pet Dog – Code it with Both Blockly Language and Python – Part Two – The Coding Fun