

In previous posts, I analyzed many games made of Scratch 3.0 platform. Among them, some use Pen functionality to draw life value bar (Airplane Game), draw the grid in puzzle game (Purple Game), draw blocks in Tetris game, or draw water streams to generate animation. You may have known that because of the fast speed of computer, if we draw something on the stage, erase it quickly and update the drawing, they form a continuous moving animation.
In this post, I will analyse a new project, which uses Pen functionality to make animation. The final effect is shown below. The clock face could change size continuously, while the star pattern spins at a constant speed. Now let’s take a look how to realize this effect!
First Method and Its Issue
First, let’s use Pen functionality to create a static clock face. You might say, OK, that is easy. We could just create a sprite and then stamp it twelve times at different directions. That is one way and also recommended in Scratch 3.0.
Today, we will try to use an alternative way. That is, we draw all the patterns with Pen. We could create a block called “Draw a clock”. In this block, we iterates twelve times to generate twelve patterns in an evenly distributed directions, as shown below:

For star pattern, we could make another block and use similar method, as shown below.

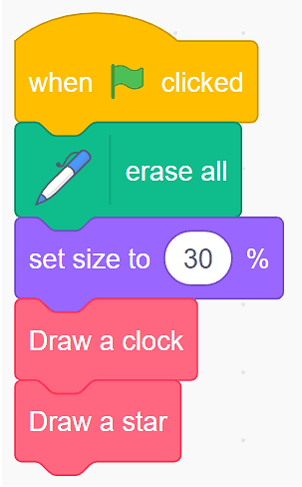
We only need to call the above two blocks in “when Green Flag clicked” code segment. However, the key problem for the above method is that all the pen strokes are drawn in a sequential way. If we would animate the pattern, the final effect could be like the below video, which is not what we want.
The project address of this method: https://scratch.mit.edu/projects/566288357/
Therefore, let’s try another way to realize the synchronization of different drawing strokes.
Updated Version
The Scratch code of the updated version could be found at this address: https://scratch.mit.edu/projects/566295029/
Clock Sprite
When Green Flag clicked, the program creates 12 clones representing the 12 directions on the clock face. We creates a variable “Clone_ID” which is “For this sprite only”. Therefore, each clone of Clock sprite has its own unique value of this variable “Clone_ID”.
After that, the program enters a forever block. Within this loop, the program changes the value of variable “step”, making it change within a range of 0 to 5 every 0.1 seconds.
If we create a clone, the next step is to write code segment of “when I start as a clone”. For each clone, it first goes to coordinate (0, 0) and points in a direction related to Clone_ID. Since there are 12 directions representing the 12 numbers on the clock face, each direction has 30 degree difference from the previous one. Therefore, the direction could be expressed like “point in direction 30 * Clone_ID”.
For each clone, its movement along the direction are different in each loop. Those clones will “move (100 + (step mod 6) * 3) steps”. The “mod” operator here decides that the movement iterates in a cyclical way, making the clock face change its size continuously and generating an animated effect.
Star Sprite
If Clock Sprite needs to create 12 clones, the Star sprite needs to create 5 clones to represent 5 edges of the star pattern. Again, it will use a variable “Clone_ID”, so that each clone has a unique value. Another variable “loop” is similar to the variable “step” in terms of functionality. “step” variable is used to control the size change of the clock face, while “loop” variable is used to control the turning speed of each edge.
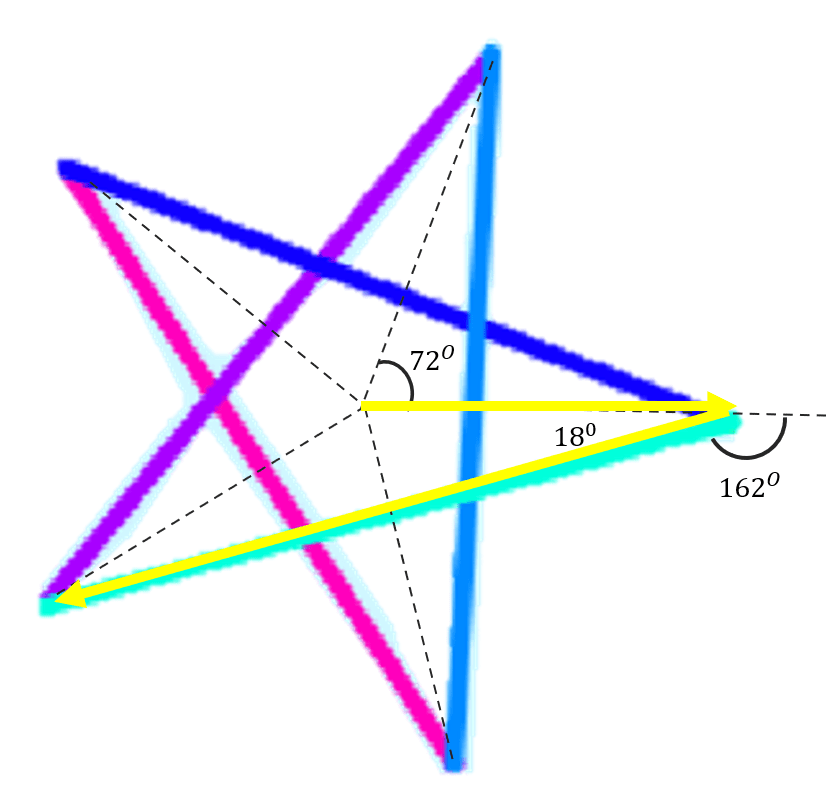
In “when I start as a clone” code segment, each clone starts at the center of the stage first. It points in a direction related to Clone_ID and “loop” variable. Please note that at this moment, pen is up, so it means we are not drawing anything on the stage. After pointing to a direction and moving 100 steps, “pen down” and the sprite turns 162 degrees and draws one line with a certain color for 190 steps. This process is illustrated in the above diagram as yellow pen strokes.
Since each corner of the star pattern is evenly distributed, we could use our math concept to calculate the angles between different lines. For each edge, it calls “point in direction Clone_ID * 72 – (loop mod 120) * 3”. This block decides that each edge will start drawing with 72 degree difference from the previous one. Each edge’s final direction is decided by “(loop mod 120) * 3”.
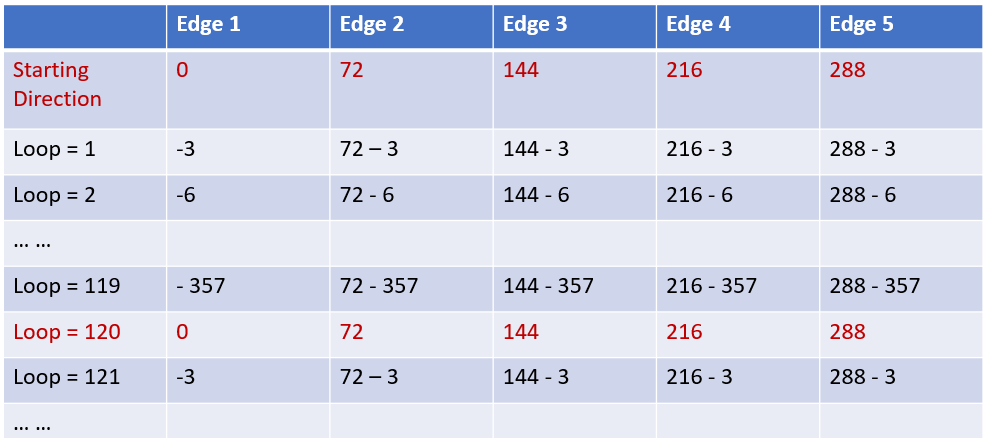
The following table illustrates how the final direction of each ege changes with “loop” variable. You could see that when loop = 0 and loop = 120, each edge goes back to the same direction. It forms a cyclical motion.
That is all the analysis of the drawing project. It is not a complicated project in terms of the code block numbers. However, it uses some math geometry concepts to calcuate the angles, which is key to draw accurate patterns. Hope you enjoy this analyis. Enjoy the coding and have fun!
Note: All the analysis articles are copyright products of http://www.thecodingfun.com. Anyone re-posting them should credit author and original source. Anyone using them for commercial purposes or translating them into other languages should notify TheCodingFun and get confirmation first. All Rights Reserved.
