
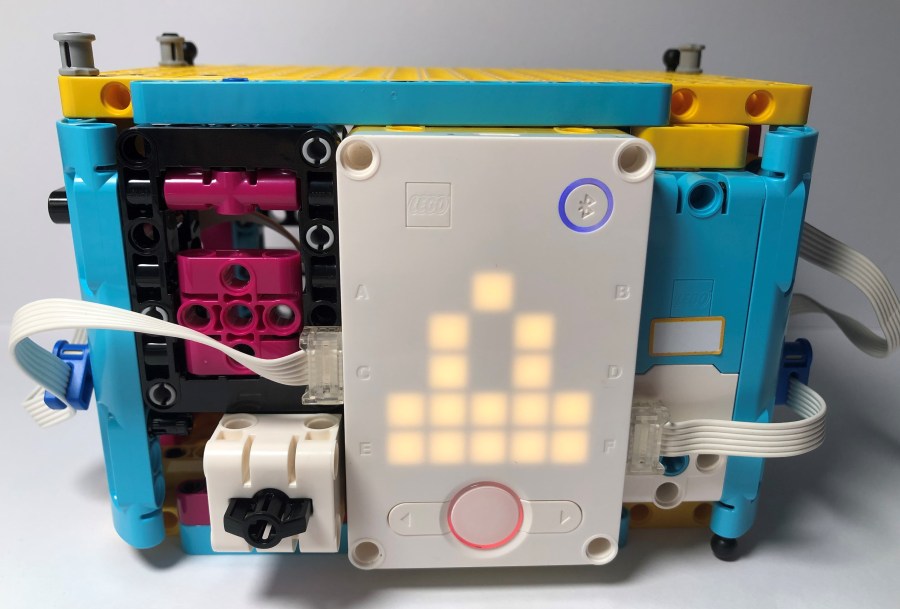
In my previous post, I introduced how to upgrade the model and programming blocks of the demo project – Security Box. In this post, I would “translate” the programming blocks into Python code. I would say it is an efficient way to get familiar with LEGO Spike Python module and improve your Python coding skills.
Since this is a “translated” project from Spike programming block, you’d better refer to my previous post as a reference. So let’s start now.
Python File Head
When you create a Python project from LEGO Spike Prime software, the default Python file has imported all the relevant modules, as shown below. It also creates an object “hub” which is of PrimeHub type and calls method hub.light_matrix.show_image (‘HAPPY’) to show a happy face on the light matrix. All of those codes are added by default and you could keep them as they are.
Here I just create three constants which represent three status of the security box. They will be used later.

“set_light_matrix” Function
This function will specify the image shown on the light matrix. In programming block version, we could specify the light shape or image through visual editing in “turn on” block, as shown below.
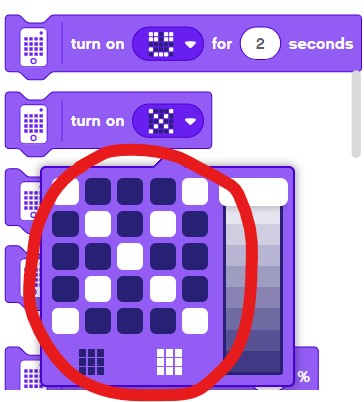
However, in Python code, there is not such convenience. We need to specify the light on/off status by calling “set_pixel” method. This function “set_light_matrix” is written to wrap all the necessary steps to create three images representing three status of the security box.
For the method “set_pixel (x, y, brightness = 100)”, please note that input parameter “x” represents column index ranging from 0 to 4, while input parameter “y” represents row index ranging from 0 to 4, too. This is not consistent with what the help document mentions. The brightness 100 indicates the light turned on, and brightness 0 indicates the light turned off.
In the following code, when we want to set Lock or Open image, first we would turn off lights of the first three rows and on lights of the 4th and 5th rows. After that, depending on the value of input parameter, the program turns on some lights on the first three rows to generate Lock or Open image.

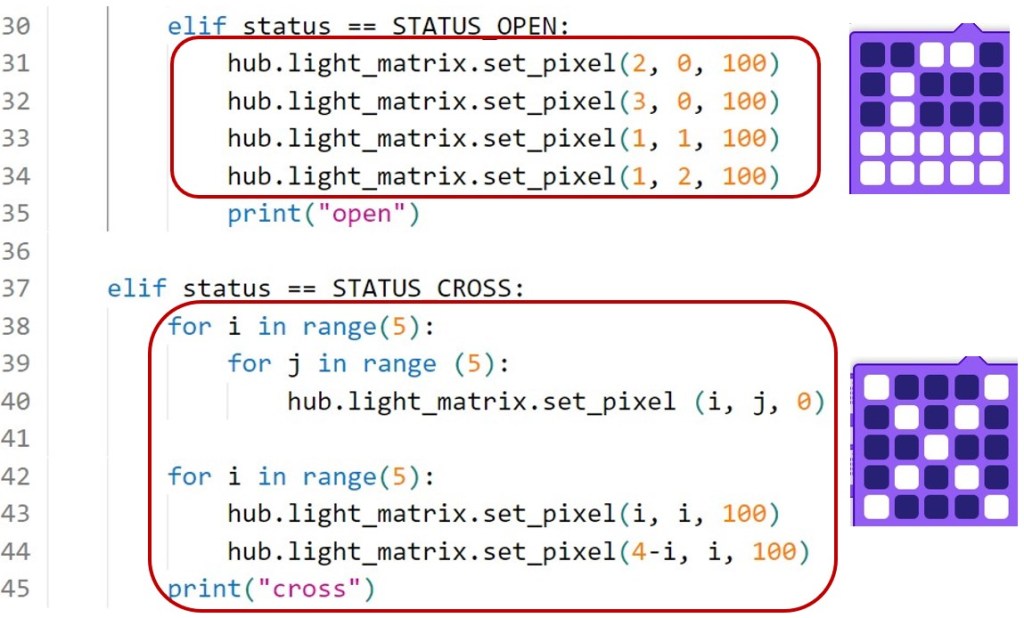
To show “cross” image, the method is a bit different. First, the program turns off all the light pixels. It then turns on the lights at diagonal positions.
“main” function
The “main” function wraps all the functionalities of the program. At the beginning, it initializes the relevant variables. “stored_pwd” variable stores the pre-set password. You could customize its value to what you want. The initial value of “input_pwd” is an empty string.
“b_locked” variable represents the status of the security box. If the box is locked, “b_locked” value is True, otherwise, its value is False. “input_num” variable indicates the number displaying on light matrix. All of those codes could look like “direct translation” from programming blocks.
After setting the variables, the program sets security box to STATUS_LOCK by turning motor to position 0 and showing Lock image on the light matrix.

The program then enters a while loop. it will continuously check if left or right button is pressed. If left button is pressed, it will decrease “input_num” variable by 1 each time and show the updated value of “input_num” on light matrix. The same method applies for Right button.
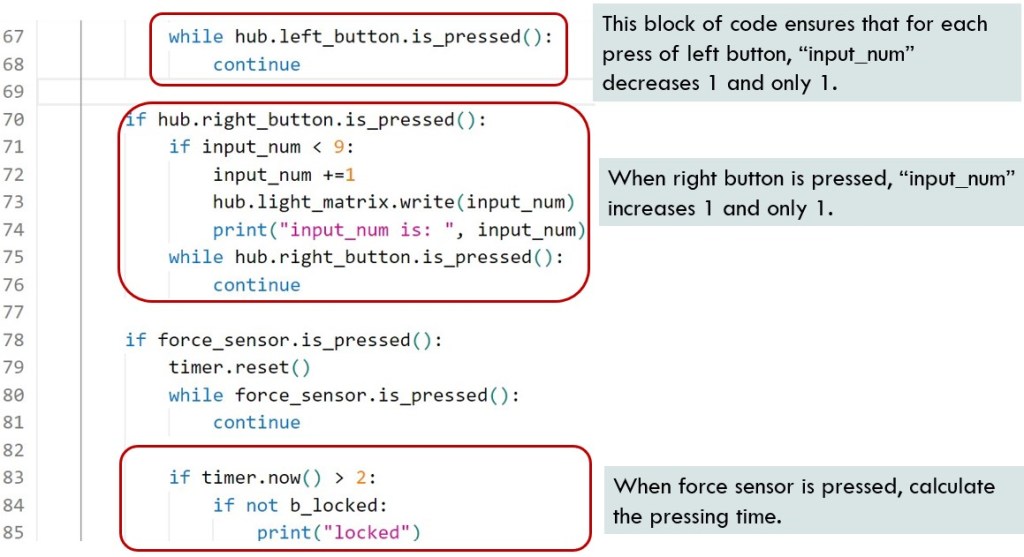
The program also checks if force sensor is pressed. If identifying the press of force sensor, the program waits for the sensor get released and check the press time. if timer > 2 seconds, it means the user plans to open or close the box. Depending on the value of “b_locked” variable, the program will either open or lock the box. e.g. If b_locked is False, indicating the box is currently opened, the program will lock the box.
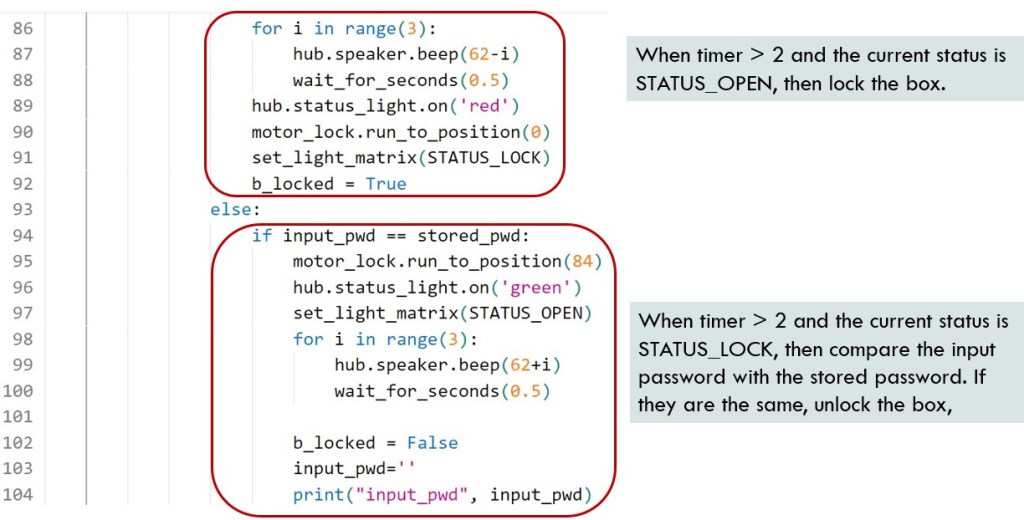
If b_locked is True, indicating the box has been locked and the user wants to open it, the program will compare “input_pwd” with “stored_pwd”. If the values match, the program will turn the motor to a position of 84 and open the box. Otherwise, the program will show cross sign on light matrix and still lock the box.

The last scenario is simple. When force sensor is pressed swiftly, the input number will be converted to string type and appended to variable “input_pwd”. The program will continue monitoring the press of Left button, Right button and Force Sensor.
That is all for the Python version of Security Box. Finally, do not forget to call “main()” to execute your code. If you would like to see the original code, here you could download:
Enjoy the coding and have fun!
Note: All the analysis articles are copyright products of http://www.thecodingfun.com. Anyone re-posting them should credit author and original source. Anyone using them for commercial purposes or translating them into other languages should notify TheCodingFun and get confirmation first. All Rights Reserved.
