

In the previous posts, I analyzed the “Player” sprite and part of “Logic” sprite. As I mentioned, the “Logic” sprite is the core of the whole game and it is much more complicated than the other sprites. In this post, I will continue introducing the “Logic” sprite.
First, let us recall the main code segment in “Logic” sprite – “when I receive game” code segment, which calls several other key blocks. One of the most important blocks is “Playerticks” as shown below. In the previous post, I have introduced the “Hurtbox (p)” called by “Playerticks”, and now I will continue.

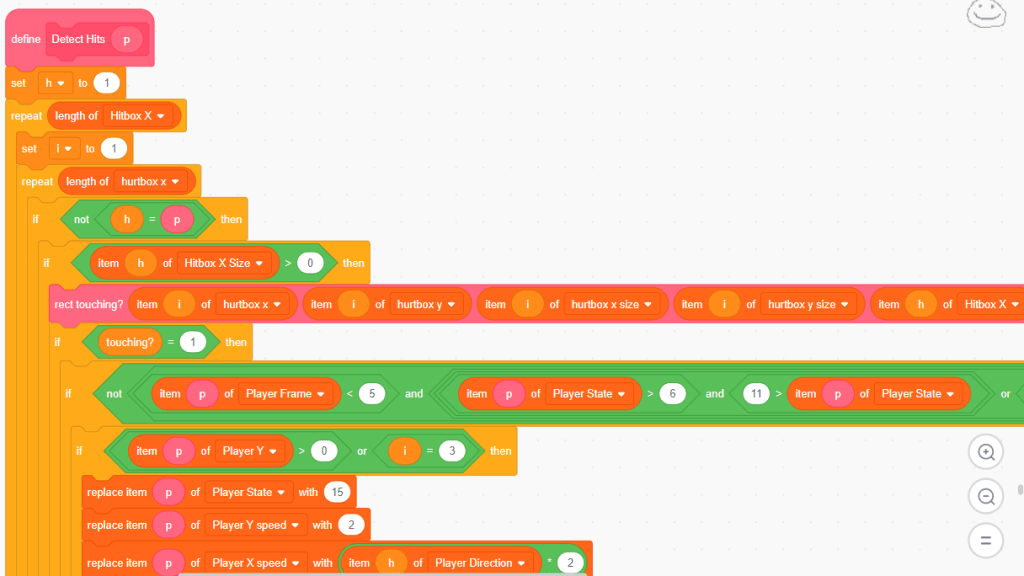
“Detect Hits” Block
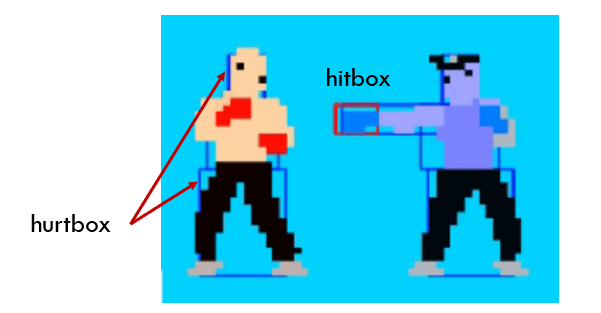
This block is very, very long. It first called “rect touching?” block to check if the hurtbox of player x overlaps with hitbox of player y, and vice versa. Please note the difference between hurtbox and hitbox. hurtbox is a three-item list which records the position and size of three rectangles surrounding the player’s body (blue rectangle), while hurtbox refers to the rectangle which the player’s legs or fists could reach out to hurt the other player (red rectangle).When the two overlap, that means the attacking takes effect, and the attacked player’s state (costume) will change properly to reflect his response.
Just think that each player has 18 states. The attacking only takes effect within a certain frames (usually frame number > 5 and frame number <11) of each state. The code also needs to consider the interaction of the two players. All of those factors explain why this block is so long and complicated.


“Rect Touching?” Block
This block receives the input parameters representing the position and size of two rectangles and returns 1 if they overlaps, or else returns 0.

“Inputs” Block
This block fills in the list of “Current Inputs” with the key pressing status. Those keys control the moving direction, jumping, crouching, or attacking behavior of player 1 and player 2.

“Tick (p)” Block
The block name is very intuitive. Just imaging that you are making a video and each time the clock ticks, your sprite needs to change its status (gesture) and the frames move forward. For the input parameter p, it represents player 1 or 2. the block will check player’s state variable, and then assign different state to it, such as Idle, Walk, Crouch, etc. The realization of those effects is done in separate blocks. I will introduce one example of those gesture blocks – “Low kick” block.


“Low kick” Block
In “Low kick” block, when the frame is bigger than 15, the player will resume to Idle state. Only when Frame > 4 and Frame < 8, the player’s low kick behavior has attacking capability by calling “add hitbox” block.

“add hitbox” Block
This block will add a red rectangle surrounding the fist or legs area of the player. If the other player’s hurtbox overlaps with this hitbox, the other player is attacked by this player.

Till now, I have introduced the most important sprites and blocks in this game. There are other three sprites “health”, “projectiles” and “effects”.

“Health” sprite shows the health value for each player. When health value is less than zero, the player it represents fails in this game. “projectiles” and “effects” sprites enhance the fighting effects (see the above diagram). Since this game has already occupied three posts, I will not introduce them and leave for you to explore. 🙂
So continue enjoying the coding and having fun!
Note: All the analysis articles are copyright products of http://www.thecodingfun.com. Anyone re-posting them should credit author and original source. Anyone using them for commercial purposes or translating them into other languages should notify TheCodingFun and get confirmation first. All Rights Reserved.
