
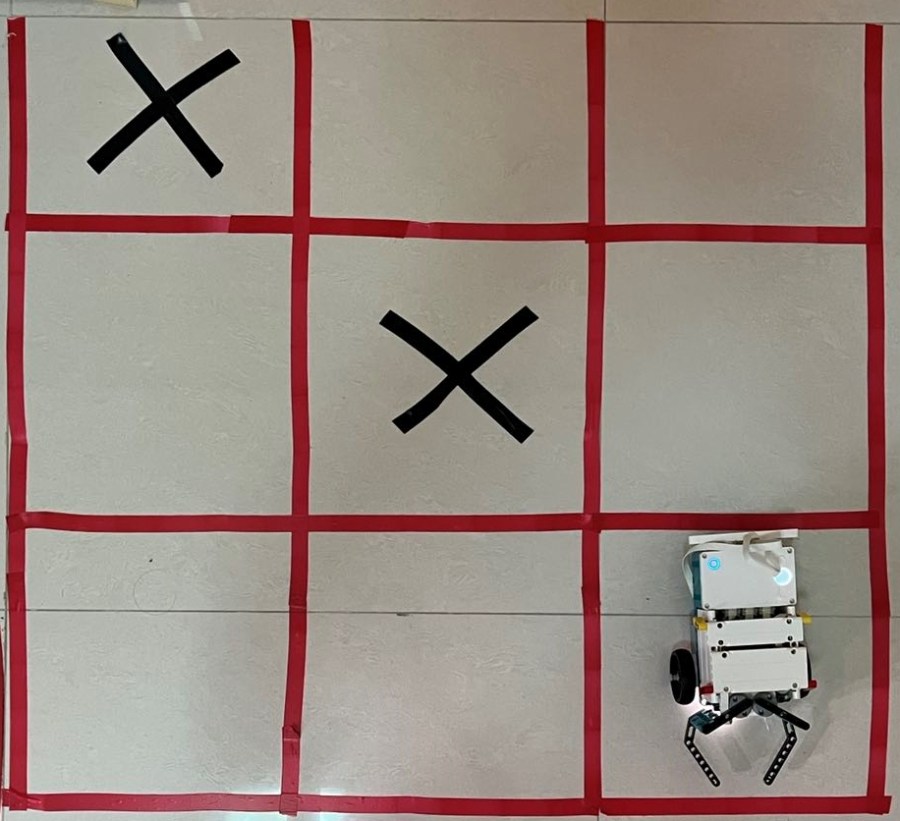
When we have a LEGO MindStorms set, we could create different models to simulate real world mechanics or creature. We could make the robot carry a stuff, follow a route to transfer the stuff. There is no limitation for the creation. In this post, I would like to introduce a project of having the robot play tic-tac-toe game. The final effect could be like this:
If you have played tic-tac-toe game, you would know that when two chesses align horizontally, vertically or diagonally, you win the game. In the above video, the LEGO robot identifes two black marks, and goes to the square on the third row, first column to form a straight line. That is its solution.
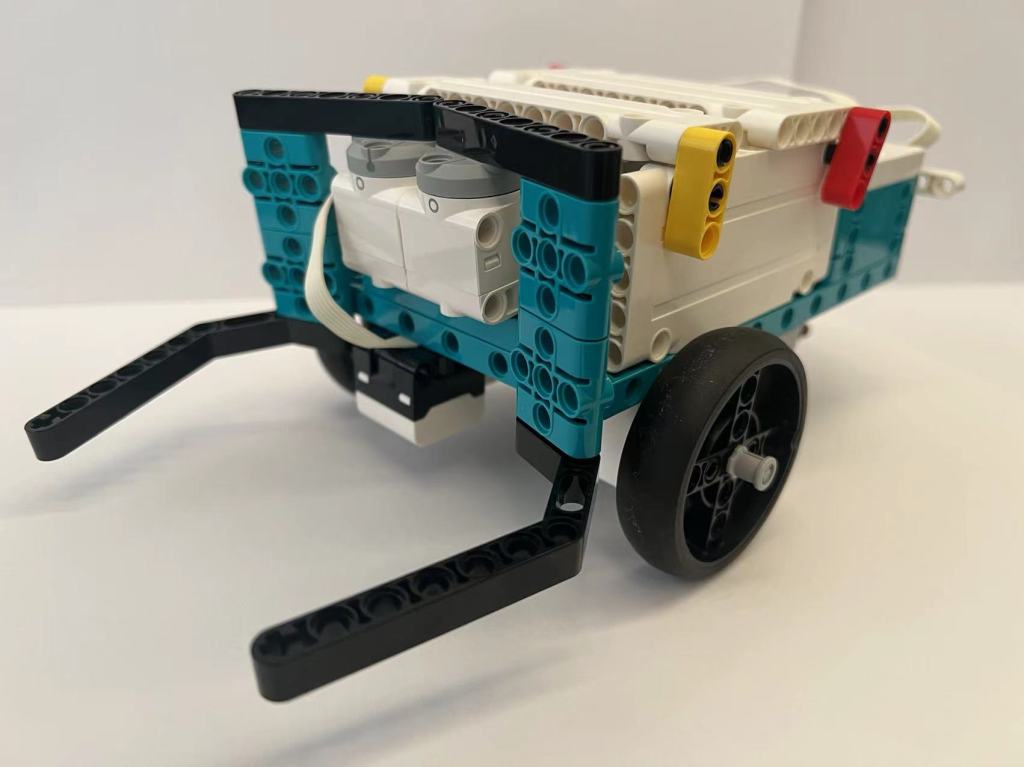
Here, I would not introduce the model in detail, since this is just a typical vehicle model which you could build easily with LEGO MindStorms Inventor. Please note that the front clip is not used in this project. A color sensor is mounted at the bottom of the chassis to identify the red grid line of the grid. The model is shown here for your reference.
The post will focus on how to implement this mission through programming. The whole task could be decomposed into several sub tasks.
Step 1: Scan the whole grid
Record the marked squares
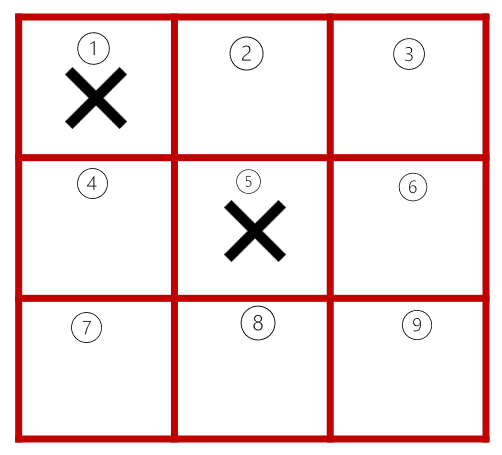
When scanning the whole grid, the robot needs to check which square has the black mark. After scanning, the robot needs to record the mark’s position. For example, in the following diagram, square 1 and square 5 have black marks, so the robot needs to record “1” and “5” in a list, let’s call it “chess layout”.
Control movement direction and distance
For the scanning process, one challenge is how to control the robot move to each square accurately. The grid line between each square could help the program position the robot properly in the grid. In the video, we could see that the robot pauses and beeps to indicate that it identifies the line and positions itself well.
The other challenge is how to keep correct direction. Compared to previous LEGO MindStorms EV3 model, the motors of LEGO MindStorms Inventor are much less powerful, so it is easier for the motors to skid on the ground and deviate the predefined direction. Even the program sets both motor pair move at the same speed, it could not ensure the vehicle move forward straight.
To solve the direction control issue, the most convenient method is to use two color sensors, mounted symmetrically on the vehicle. Whenver identifying a grid line, both color sensors should identify the line. If you have two color sensors, you could use this solution. However, since the LEGO MindStorms Inventor set only contains one color sensor by default, we need to seek help from the built-in gyro sensor of the smart hub.

Use one color sensor and built-in gyro sensor to control direction
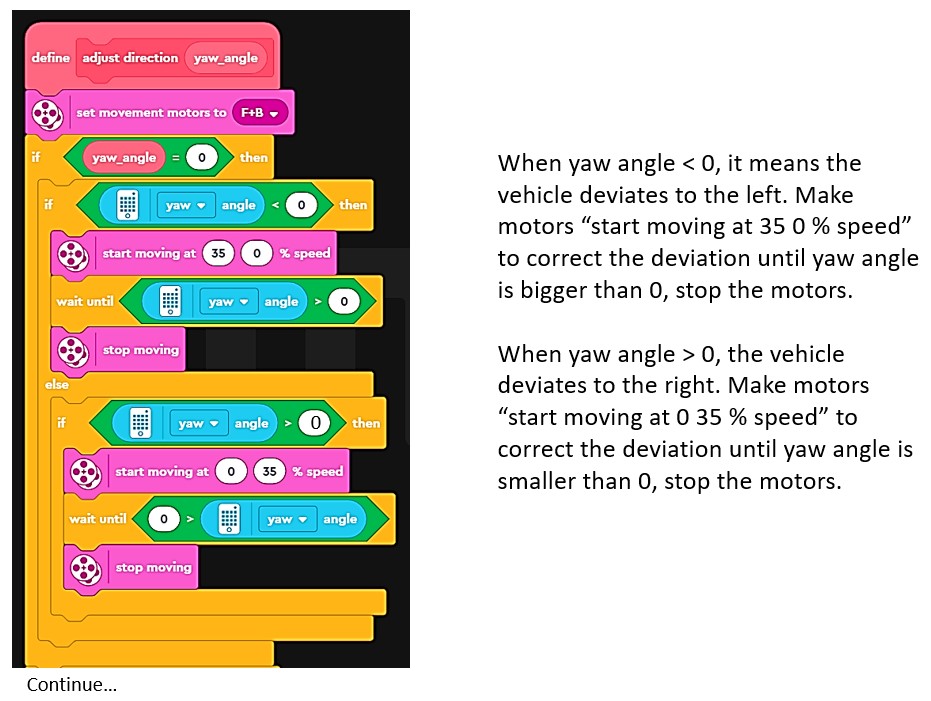
I am not planning to introduce the built-in gyro sensor in this post. Just briefly introducing the roll, pitch and yaw angle used in the gyro sensor. In this model, since the smart hub is having its front surface facing up, when the vehicle turns, the yaw angle will change accordingly. As the following diagram shows, when the smart hub turns right, yaw angle increases. When the smart hub turns left, yaw angle decreases. The yaw angle always changes between -180 and 180. If we set the starting direction as yaw angle 0 by calling block “set yaw angle to 0”, we could adjust its direction by referring to the original yaw angle 0, so as the robot could correct its deviation and keep its correct direction.
.

Sample code for controlling direction is shown below, just for reference.
Check the black mark
Once the robot reaches the grid line and aligns itself well, it could move forward to check the black mark in the square. However, what if the square has not the black mark? After looping for certain times without identifying any black mark, the program will stop the loop and believe that the square has not black mark, then the program runs forward to identify the next grid line. Sample code is provided for your reference.

Step 2: Find the solution
Once the robot scans the whole grid, it needs to decide which number is missing and try to find a square to move to. The square represents the solution to solve this tic-tac-toe puzzle. In the first step, the program has recorded all the marked squares’ index. For example, if square 1 and square 5 are marked, the program records 1 and 5 in a list, let’s call the list “chess layout”.
The program will also store all the known solutions in a list called “combination”. For a 3 square by 3 square tic-tac-toe game, there are limited solutions. They can be represented by three horizontal solutions “123”, “456”, “789”, three vertical solutions “147”, “258”, “369” and two diagonal solutions “159” and “357”. The sample code for this part is shown below for your reference. Since Scratch blocks are limited in functionality, the code looks a bit complicated. If we write the program with Python, the code could be more concise.

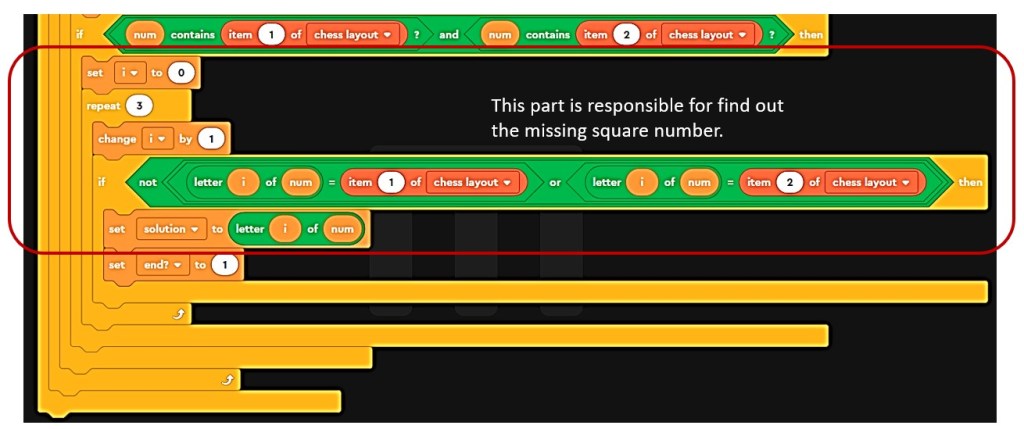
First, the program checks how many squares are marked. When there are less than two marked squares, it indicates that there is no solution for this game, so we keep solution variable to 0, representing “no solution”. When there are two marked squares, the program enters a loop to check if marked square numbers are included in any predefined solutions. For example, the recorded square number 1 and 5 could be found in the predefined solution “159”, the program only needs to find the missing number “9” and then store it to the variable “solution”.
Step 3: Go to the destination square
Once a solution is found, the robot needs to go to the square to indicate its choice. Actually, this step is similar to step 1, because the robot needs to find the square accurately, without deviating its direction. Depending on the value of solution variable, the robot needs to turn back, move forward or left/right turn to find its destination square. We use nested conditional structure to differentiate different routes. The following code snippet contains three conditions, just for your reference.

Done! the above explanation covers the core solution. Now, no matter which squares you put the black marks, the robot could always know what is the solution and go to the destination square automatically. Isn’t it fun?
Please note the above sample code does not represent all the code because for this project, there are 300 plus code blocks so I will not list all of them here. If you are interested in implementing the project, welcome to attend our LEGO MindStorms Tic-tac-toe Game Workshop. You could choose to attend either online or offline sessions (offline is only for Singapore).

Note: All the analysis articles are copyright products of http://www.thecodingfun.com. Anyone re-posting them should credit author and original source. Anyone using them for commercial purposes or translating them into other languages should notify TheCodingFun and get confirmation first. All Rights Reserved.
