

Have you ever played Gomoku game? Its rule is simple. There are two types of chess pieces, white and black for two players, respectively. When either of the player connects own five chess pieces in a line, he/she wins. The chess pieces could be arranged in horizontal, vertical or diagonal directions.
In this post, I would like to introduce a Gomoku game coded in Scratch 3.0. Its interface is anything but difficult, but the core of the game lies in how to design the algorithm to judge who wins the game. Let’s begin now!
The initial project link is located at: https://scratch.mit.edu/projects/182893550
Since the initial project contains some Chinese characters, an updated version could be found at: https://scratch.mit.edu/projects/440204222/. The analysis is based on this updated version.
Backdrop Sprite
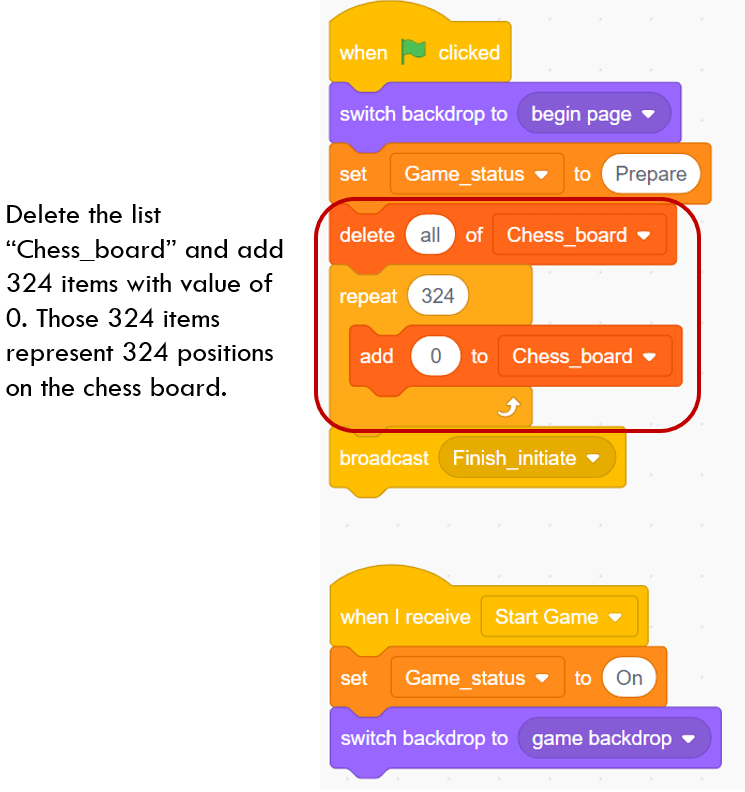
“when Green Flag clicked” and “when I receive Start Game” Code Segments
Backdrop sprite is responsible for initiaing some variables and lists, and then specify different backdrop costumes according to the status of the game. Please note there is a list called “Chess_board”. In code segment “when Green Flag clicked”, the program deletes all the items in the list and refills it with 324 items of value 0. The 324 items represent the positions of chess pieces in each row and column interaction. the value “0” represents that the initial status of the chess board is empty. No any chess piece occupies the chess board.
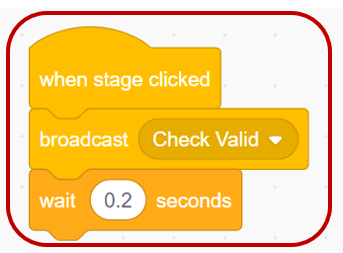
“when Stage clicked” Code Segment
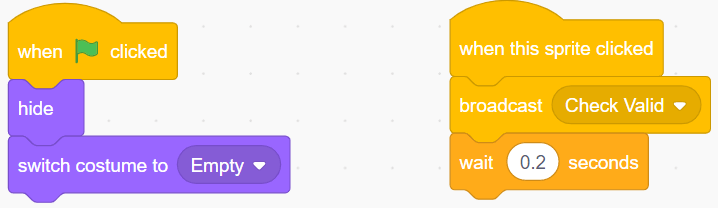
This code segment identifies the mouse clicking on the stage. Later on, you will notice that Cursor sprite also has an event procedure called “when this sprite clicked”. Both of them contain the same code blocks. Both of them just try to catch the mouse clicking action and broadcast “Check Valid” message. So the problem is: why don’t we just let the Backdrop or Cursor sprite catch the event? why should we bother writing the same code on both sprites?
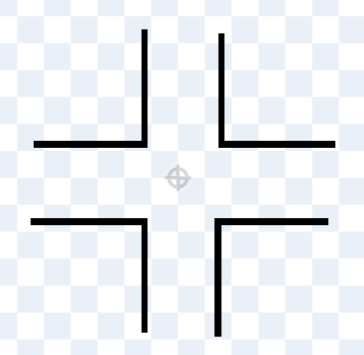
This is due to the special design of Cursor sprite, which consists of four polygonal lines. If user clicks on the lines, “when this sprite clicked” code segment of Cursor sprite will be invoked. However, most of time, user might not be able to click on the thin line accurately, instead actually he/she is clicking on the stage. Under this scenario, “when stage clicked” event procedure of Backdrop sprite will be invoked. Either way could capture mouse clicking and broadcast “Check Valid” message.
After calling “broadcast Check Valid” message, the program also calls “wait 0.2 seconds”. The purpose is to leave a bit time for the receiver of “Check Valid” message to finish its task. Otherwise, when the user clicks the stage too fast, the receiver of “Check Valid” message could not work properly.
Map Sprite
The main functionality of Map sprite is just to draw the chess board when it receives “Start Game” message.

In the following “Draw_board” block, it first erases previous drawing trace and sets pen size and pen color. It repeats 18 times to draw parallel horizontal lines with the space between each line keeping at 20 units. After that, it repeats 18 times again to draw 18 vertical lines. Each line keeps a distance of 20 units from another. The results is a 18*18 line chess board, which could contain maximum of 18*18 = 324 chess pieces at the line intersections.

Cursor Sprite
The Cursor sprite is responsible for capturing the position of mouse and then putting chess piece precisely on the intersection of lines. So how does the program realize it?
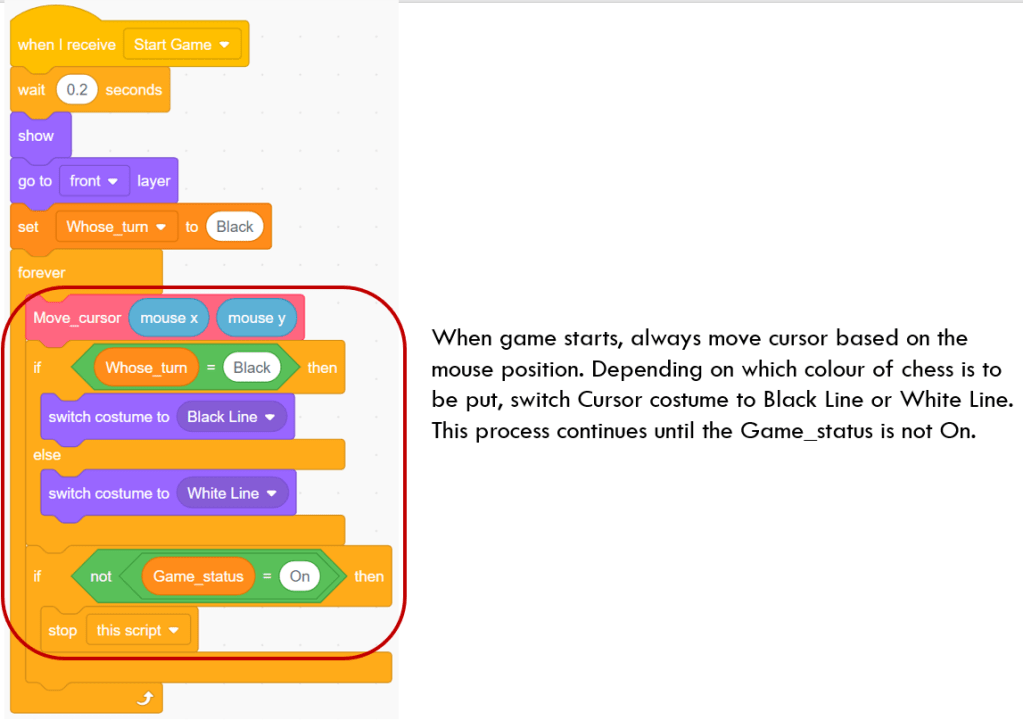
After Cursor sprite receives “Start Game” message (which is sent out by Start button), it enters into a forever block. Within this iteration block, the program will call another block called “Move_cursor” to transform the mouse x and mouse y position into the intersection’s x and y position on the chess board and put cursor sprite on that position accurately.
You might wonder if there is difference between mouse position and Cursor’s position. Yes, there really is difference. For example, when mouse clicks at “mouse x” = -223, “mouse y” = 162, Cursor sprite could not be put directly on that position. Instead, it should be put into the nearest intersection point. In this case, the nearest intersection’s position is x = – 230, y = 170. This conversion is done by the block “Move_cursor”, which I will explain below soon.
Please note that computer program runs pretty fast. When wrapping “Move_cursor” in a forever block, it iterates continuously and we will notice that cursor moves promptly to the nearest intersection point whenever user moves the mouse. In each iteration following the block “Move_cursor”, the program checks the chess piece colour of the current move and switches Cursor sprite’s costume accordingly. The whole process continues until “Game_status” variable changes to other values than “On”, indicating the end of game.
“Move_cursor” Block
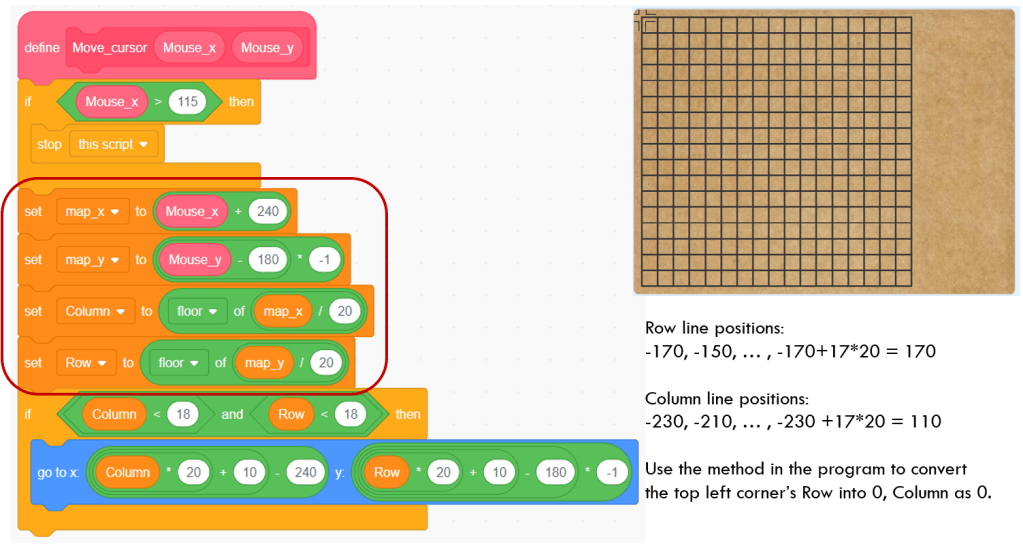
In the “Move_cursor” block, we could learn how to transform the mouse position into discrete intersection position on the chess board. Let’s recall that in the previous Map sprite, “Draw_board” block draws chess board by specifying 18 horizontal line from y position of -170 to 170 (-170 + 17*20 = 170). The vertical lines of the chess board range from x position of -230 to 110 (-230 + 17*20 = 110).
If mouse clicks in the area of chess board, say “mouse x” < 115, the program sets “map_x” to “Mouse_x + 240” and “map_y” to “180 – Mouse_y”. Therefore, “map_x” will fall into a range of 0 to 355, and “map_y” falls into a range of 0 to 360.
Through setting “column” variable to “floor of (map_x / 20)”, the program transforms the mouse x position into column value of 0 to 17. Throught setting “row” variable to “floor of (map_y / 20)”, the program also transforms the mouse y position into row value of 0 to 17. The intersection point at top left corner will be set to row = 0, column =0. Amazing!
“when this sprite clicked” Code Segment
As I mentioned in the previous “when stage clicked” code segment, in order to ensure capturing mouse clicking action, Cursor sprite will also broadcast “Check Valid” message when mouse clicks on it.
“when I receive Check Valid” Code Segment
So what will Cursor sprite do when it receives “Check Valid” message? The program first checks if the “Game_status” is On. It will continue only when Game_status is On. In the next step, the program checks if the cursor’s position (Row *18 + Column) has been occupied or not. If the corresponding item value in “Chess_board” list is 0, it means that it is not occupied, so “check_valid” will continue,
It then sets the item value in the Chess_board list to 1 or 2, depending on chess piece colour of the current move. Please note that once updating the item value in “Chess_board” list, the program immdediately sets “whose_turn” variable to the opponent’s color. In this way, when user clicks fast on the board, white and black chess pieces could make their moves alternatively.
At the end of the code segment, it broadcasts two messages – “Put Chess” and “Rule”. The receivers of “Put Chess” message is White Chess a Black Chess sprites, which will move to the cursor’s position. The receiver of “Rule” message is Rule sprite, which judges if the player of the current move wins the game. I will introduce those sprites in the next post.

Just like “when stage clicked” block, “when this sprite clicked” code segment also uses “wait for 0.2 seconds” following “broadcast Check Valid”. This waiting block ensures “when I receive Check Valid” to finish running before the next mouse clicking is captured. Otherwise, the variables “Whose_turn” and list “Chess_board” would not get updated properly, and you might notice that same color chess pieces move in a row.
The above is the code of the Cursor sprite. It is responsible for converting mouse position into accurate row and column index and updates the value of “Chess_board” list. In the next post, I will continue analyzing the other sprites, and especially focus on explaining how to judge the winner.
Keep tuned and do not forget to enjoy the coding and have fun!
Note: All the analysis articles are copyright products of http://www.thecodingfun.com. Anyone re-posting them should credit author and original source. Anyone using them for commercial purposes or translating them into other languages should notify TheCodingFun and get confirmation first. All Rights Reserved.

Pingback: Learn Scratch by Reading and Analyzing Others’ Project – a GomoKu Game – Part 2 – The Coding Fun