
In the previous post, I introduced the vertical movement of the sprite, that is, jumping and landing issues in a platform game. In this post, I will introduce the horizontal movement of your sprite. That is, how to make your sprite run and walk on the stage.
Generally, there are two methods to realize the horizontal movement. I will introduce the simpler method first, and then a more complicated but more vivid method.
Method 1
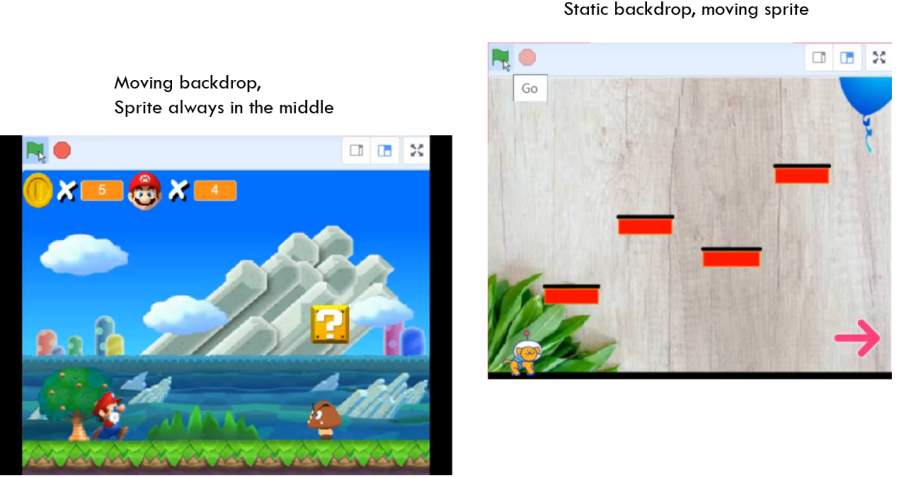
Static Backdrop, Moving Sprite
In the above demo video, the backdrop keeps static, and the sprite moves left or right freely. To make the puppy move horizontally, I only need to write two simple code segments shown below.
Respond to Left and Right Key Press

Features of This Method

Method 2
Moving background, Keeping Sprite’s Position Unchanged
This method will move the background sprite, so the player feels that the landscape is always changing. As shown below, when Mario the sprite is moving right, the background moves left. When Mario is walking left, the background moves to the opposite direction.
If you continue observing, you will notice that Mario actually always stays in the middle position (horizontally) of the stage. The overall effect is much better than the first method, isn’t it? Now, Let me show you the key code segments to realize this effect.
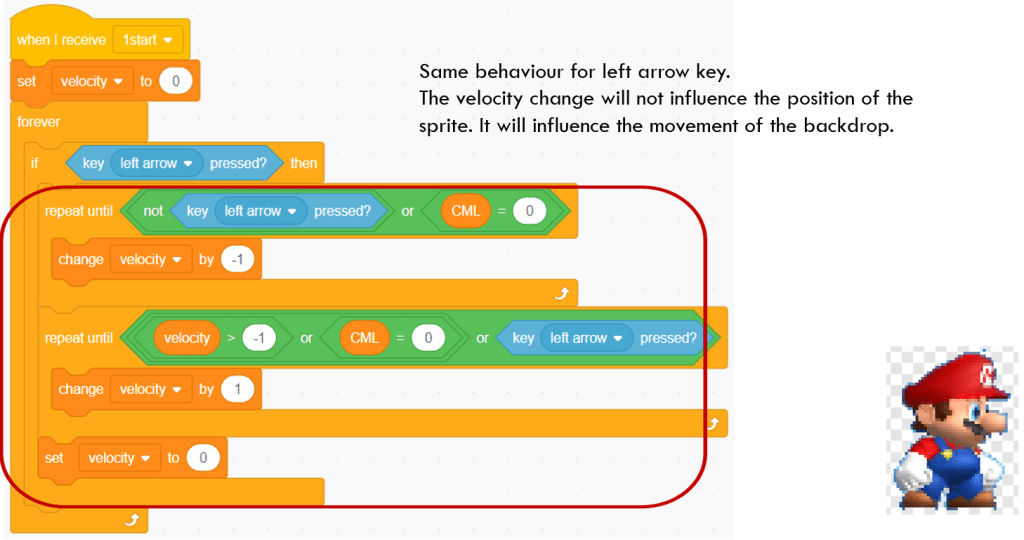
Horizontal Velocity
In this method, when a player presses left or right key for a few seconds, there will be an acceleration effect for Mario. The acceleration is represented by a variable “velocity”. After the key is released, the velocity will gradually decrease to 0.
The velocity variable decides how much the background sprite will scroll left or right. I will introduce the usage of velocity below.

Decide the Value of “scrollx”
Variable “scrollx” represents the total horizontal offset of the background sprite. The change of scrollx is decided by velocity. As I analyzed before, when Mario moves right, assuming velocity =3. In order to keep Mario in the middle of the stage, the background could move to the left the same amount of distance, represented by velocity * (-1) = -3.
The vice is versa. When Mario moves left, velocity < 0, assuming equal to -2. In order to keep Mario in the middle of the stage, the background position could move right by a distance of velocity * (-1) = 2. The final effect should be the same to the eyes of players. That is why the program uses “change scrollx by (velocity * -1). The code “set x to 0” will keep Mario to the middle of the stage.
Please also note that the change of scrollx is a continuous process because the relevant code is wrapped in a forever statement. So how and where to use “scrollx” to scroll the background? Please continue watching.

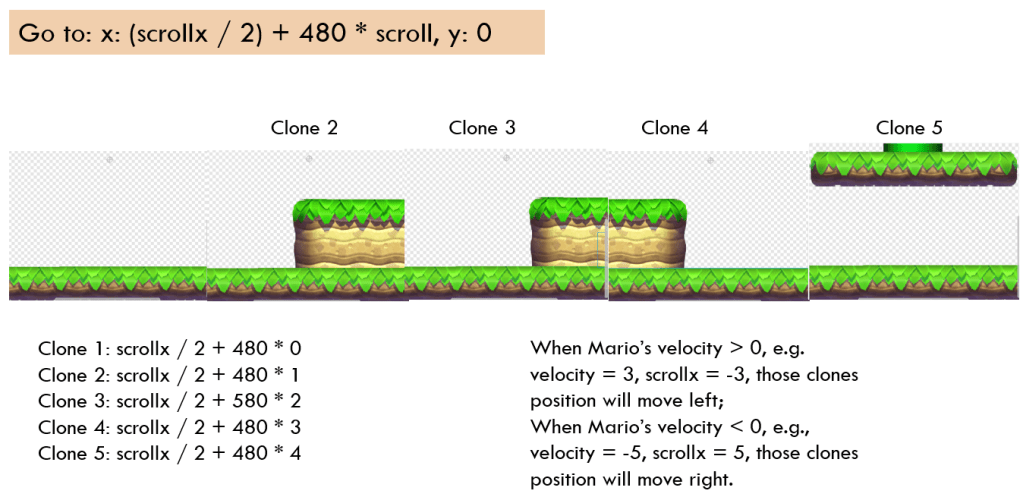
Create Ground Sprite’s Clones, and Update Their Positions
In the previous analysis for method 2, I focus on the core code segments for Mario the sprite. Now let me switch to Ground sprite. There are other sprites, such as poisonous flowers or magic mushrooms, which use the similar code. Once you understand how to design the code for the ground sprite, you could apply those code segments to other sprites.
The ground sprites have multiple costumes. When one game level begins, it creates clone and assign each clone a value from local variable “ScrollO”, so that each clone has a particular “ID” – ScrollO.
In the code segment “when I receive gtc”, each clone will find its proper x position by ” go to x: scrollx / 2 + 480 * ScrollO, y: 0″. The final effect is that different clones with different costumes align side by side to form a wide landscape. It will update its x position continuously because message “gtc” is not broadcast once, but continuously like the ticking of clock. I will introduce the clock below.

Further Explanation of Clone Position
Create a Base Clock
In the above analysis, I mentioned the “gtc” message and it is broadcast continuous. In this demo project, you could see that “gtc” message is broadcast from Stage sprite and it is wrapped in a forever statement.
The below diagram also shows that not only the ground sprite will receive the “gtc” message, but also many other sprites, such as Item Block, Coin, gloomba, etc. They need to position themselves on the wide landscape to decide when to show up and when not to.
Please note that you do no have to put the clock code in Stage sprite. You definitely could put the code in Mario, Ground or any other sprites. However, it is just more reasonable to put it in Stage sprite.
Features of This Method

That is all for this topic. Hopefully, you have learned how to design your own platform game by referring the above code and embedding your own creation elements. Stay tuned for our other posts and don’t forget to Enjoy the coding and have fun!
Note: All the analysis articles are copyright products of http://www.thecodingfun.com. Anyone re-posting them should credit author and original source. Anyone using them for commercial purposes or translating them into other languages should notify TheCodingFun and get confirmation first. All Rights Reserved.
