

LEGO WeDo 2.0 Programming Blocks have friendly interface, but if you want to program some fun things inside, you might get frustrated. There are not so many functionality blocks to choose from, and lack of many basic functions such as conditional judgement, variable creation, or control structures, etc. Since generally WeDo 2.0 focuses on mechanical structure of the model and scientific and engineering concept learning, the programming function is an auxiliary one, helping kids to experience simple programming.

However, if you are seriously enough to use WeDo 2.0, you could find some ways to work around WeDo 2.0 programming constraints and inject some flexibility to LEGO WeDo 2.0 models. In this post, let me introduce some tips to make LEGO WeDo 2.0 stretch to its full length.
1. Use Random Values

Random Input block can be used as input for many blocks, such as Wait For block, Play Sound block and Motor Power block etc. Using random value makes the program have change each time.
You do not need to worry if the Random Input block will input an invalid value to a block. Since the range of numbers is determined by the block to which it is attached.
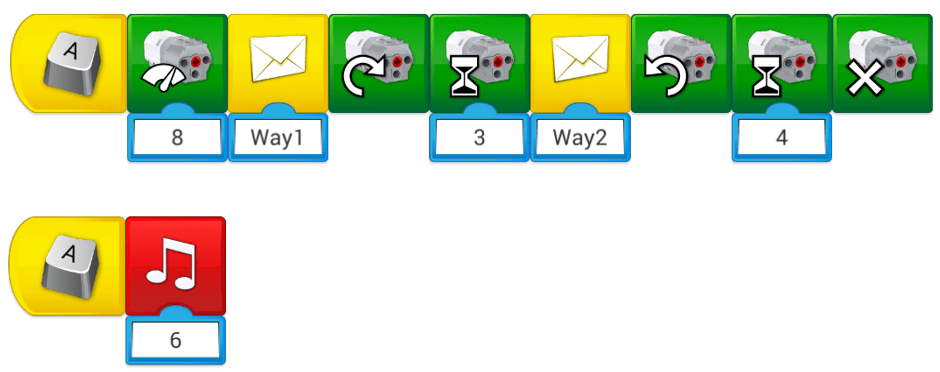
2. Use “Send Message” and “Start On Receiving Message” Blocks

In the above example, if put Play Sound block into the same coding string as the other blocks, the program will pause at Play Sound block until the music finishes playing, thus it blocks the program from executing the following blocks. When there are Play Sound block and other blocks needing to run simultaneously, the best way is to put Play Sound block in a parallel execution segment by using “Send Message” and “Start by Receiving Message” block.
3. Use Display Block as Variable Input

LEGO WeDo 2.0 Programming Block is not a complete programming language, so is lack of many functions of other programming language. One limitation is that it can not define and use new variable.
The only variable you could use is Display block. You could use Display block to set value to it, and use Add to Display block, Subtract from Display block, Multiple Display block and Divide Display block to change its value, and then use Display input block to pass the display value to other blocks.
In the above example, we set Display Block’s value to 0. In the loop of 5, let its value increase by 1 each time, and pass this value to Motor Power block. In this way, motor power’s value is changing in each loop cycle.
4. Use Sensor Status to Control Motor

When sensor status is input to Wait For block, it is equivalent to “Wait Until (sensor status is met)” statement.
When sensor status is input to Loop block, it has the meaning of “Loop (doing things) Until (sensor status is met)” statement.
5. Always Show Background and Text

Feel that the WeDo 2.0 programming is too simple and short? add image and text! Always try to show the background image and the text on the screen. Meanwhile, you could also add music.
Unlike Play Sound block, Display Background block and Display block will not prevent the execution of other blocks. It is easy to insert them into a coding string.
6. Start Running with Parallel Code
If you want to run multiple string of codes, it will not work by pressing the green Start button. Under this condition, you could use “Start on Key Press” block. Once you press the letter on keyboard, all of the program strings with the same letter will start at the same time.
Please note that the default key is Capital A. To change the letter of activation, long press on the block to get access to the keyboard. Remember that is Case Sensitive.
7. Use Sound to Control Motor

Use Sound Level block as input to control the power of motor, the waiting time or other execution. Remember that the volume number normally ranges from 0 to 10, which is different from the decibel scale.
Finally, if you combine all of the above tips together, you can make your program fun and rock!
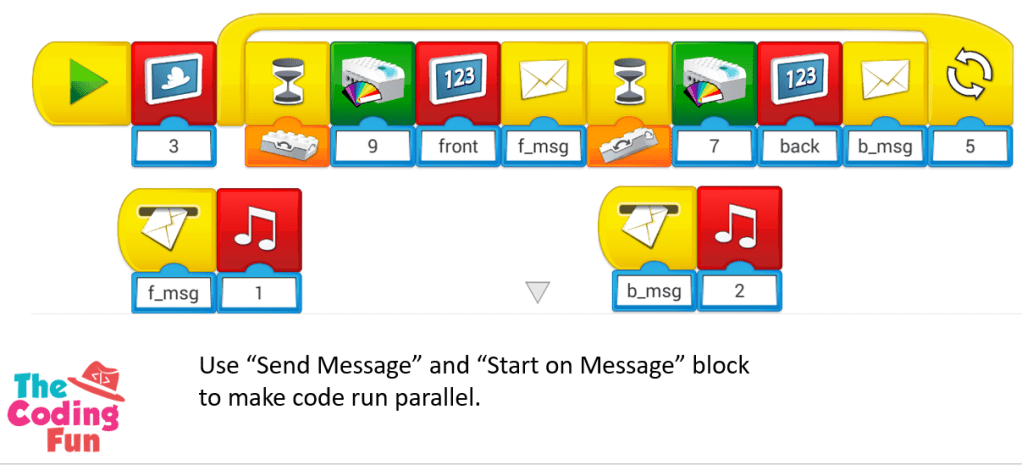
What does the program do?
- It displays a background image 3.
- It wait for tilt sensor tilt down.
- It makes the Smarthub show red color light (number 9).
- It shows message “front” on the screen.
- It sends a message called “f_msg” and then begins playing music 1.
- Then, it waits for tilt sensor to tilt up.
- It makes the Smarthub show color light number 7.
- It shows message “back” on the screen.
- It sends a message called “b_msg” and then begins playing music 2.
- It repeats the above sequence 5 times.
Enjoy Your Coding and Have Fun!
Note: All the analysis articles are copyright products of http://www.thecodingfun.com. Anyone re-posting them should credit author and original source. Anyone using them for commercial purposes or translating them into other languages should notify TheCodingFun and get confirmation first. All Rights Reserved.

Like!! Thank you for publishing this awesome article.
LikeLike