In the previous post, I introduced the design of the scrolling backdrop and ground objects. Now let’s check how the Super Mario the key character is designed.
Code for Mario

All the above code segments are written for Super Mario. They look complicated but they have the same purpose: define the gesture of Super Mario when it is running, walking, zoning out or loses one life. Actually, the code segments above do not specify the movement or position change. All those behaviors are defined by another important sprite Hitbox.
Connection between Mario and Hitbox

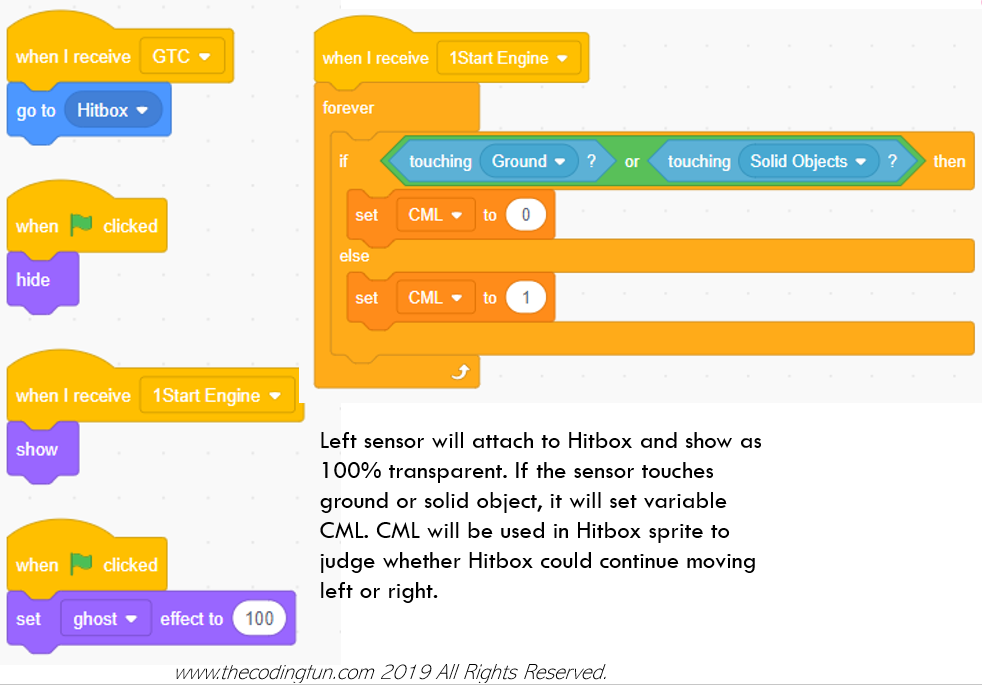
The connection between Mario and Hitbox is through GTC message. As I mentioned in the Post I, the stage sprite will continuously broadcast GTC message, which behaves like a clock for the whole project. When the Super Mario receives GTC message, it will always “go to Hitbox”, which means that Super Mario will always bind into Hitbox. Wherever Hitbox goes, Super Mario will go together. Please also notice that Hitbox has a ghost effect of 100, so it is completely transparent. Through defining the movement of Hitbox, the author defines Super Mario’s movement.
Hitbox’ Code
I will explain the code of Hitbox in detail, so Let me just separate its code segments into several parts based on the functionality.
– Define Scrollx and X velocity

The above code of Hitbox is important because it sets the value of Scrollx and X Velocity. Scrollx defines the position of all the fixed or non-fixed ground objects and backdrop. X Velocity defines the movement speed of Hitbox and also Mario in the X direction.
Define Death Behavior
When Hitbox touches some moving objects, or drops from platform, it will lose one life and life value is reduced by 1. The death behavior is realized by making Hitbox drop with accelerated speed until the Hitbox drops to the bottom of the stage and disappears.

– Define Left and Right Arrow Key Behaviors
The game player can press left or right arrow key and move Hitbox left or right. Note X Velocity the variable will change value. That means, if the player keeps pressing left or right arrow key, the Super Mario will accelerate moving in x direction until it reaches the maximum speed 8 (max. value 8 is specified in Hitbox’ Code mentioned above).

– Define Up Arrow Key Behavior
When up arrow key is pressed, the player will trigger jumping behavior of Hitbox. Please note there is another condition “falling? < 3”. I am not very sure why the author uses a threshold value of 3 here. Anyway, the author tries to constrain the jumping behavior happen only when Hitbox is standing on the ground. Therefore, if Hitbox is falling and “falling?” variable > 3, it could not jump to save itself from falling. It is reasonable.

– Define Hitbox’ Dropping Behavior
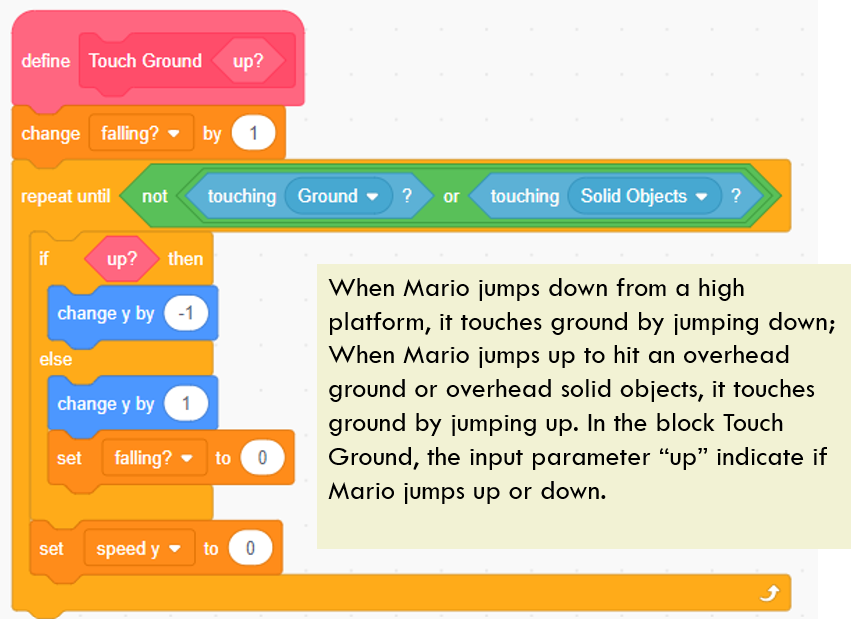
In a simpler game setting, once the sprite touches something, the game designer could explicitly define a behavior for a sprite, for example, move to a specific position, disappear, or change visual appearance. While in a platform game, since the sprite could move flexible in the setting, the game designer should define rules to make sprite adapt to the environment.
The above code segment defines rules to allow Hitbox (or Super Mario, because the two are always at the same position) to drop into a correct Y position. There are several scenarios when Hitbox needs to drop. First, the Hitbox jumps down from a higher platform to a lower one. Second, the Hitbox drops from the ground into the river or trench. Finally, the Hitbox jumps but its “head” bumps onto a overhead solid object or ground. Depending on various scenarios, the Hitbox will adjust its Y position till it does not touch ground or solid objects.
– Adjust Dropping Speed

In the above code, the author simulates the effect of gravity. Whenever the sprite Hitbox drops, the dropping speed will accelerate till it touches the ground.
Sensors’ Code

Sensors are attached to Hitbox and completely transparent. Since they are smaller, they can identify the position of obstacles and ground more accurately.
There are several sensor sprites in the project, but not all of the sensors work. Some sensors are left there by the author for the future development of the game.
Wrap Up
Till now, I have introduced the main sprites and functionality of the game. There are other sprites working for the game. For example, Music sprite is responsible for the music and sound effect for different scenarios. NSMB sprite, which is responsible for showing the total collected coins and life value at the top of the screen. Sprite 1 consists of three black screens, showing the text information such as Game Over or Pass All Levels, or transient effect. Their code is easier to understand so I will not address them in this post.
Now you have known how to analyze a good Scratch work and you could learn by yourself. Enjoy you coding!
Note: All the analysis articles are copyright products of http://www.thecodingfun.com. Anyone re-posting them should credit author and original source. Anyone using them for commercial purposes or translating them into other languages should notify TheCodingFun and get confirmation first. All Rights Reserved.

Hey, Parzian, my single advice is to concentrate on your interested topics and take them seriously. Meanwhile, you could imagine some day you will get them published, so as to give yourself more momentum to do this thing.
LikeLike
Hola ,can you give me afew advice about a career in blog writing? gracias
LikeLike
I am glad that I found this weblog, just the right info that I was searching for! .
LikeLike