
In Scratch website, the most popular games are definitely those platform games, jumping, running high and low, and dodging from the obstacles or monsters. However, many beginners will meet issues on how to make the sprites move freely. Here in this post series, I will introduce two methods to control the movement of sprites. The two methods could apply to almost various scenarios. So let’s begin!

There are two key issues related to platform game. One is how to control your sprite to move, the other is how to control the movement of backdrop.
In this post, I will introduce two ways to control the movement of sprite and leave the second issue in the next post.
Simple Way to Implement
Jumping Upward

When up arrow key is pressed, the program should firstly verify if the dog is standing on the ground or any solid surface. The simple way to verify is to paint an unique color at the feet of the dog, and paint another color at the surface of the platforms. When the two colors touch, it means that the dog is standing on the solid surface and could get ready for jumping.
Why is the above step necessary? If the dog could jump when its feet do not touch ground, it is not a normal dog. It is a bird, isn’t it?
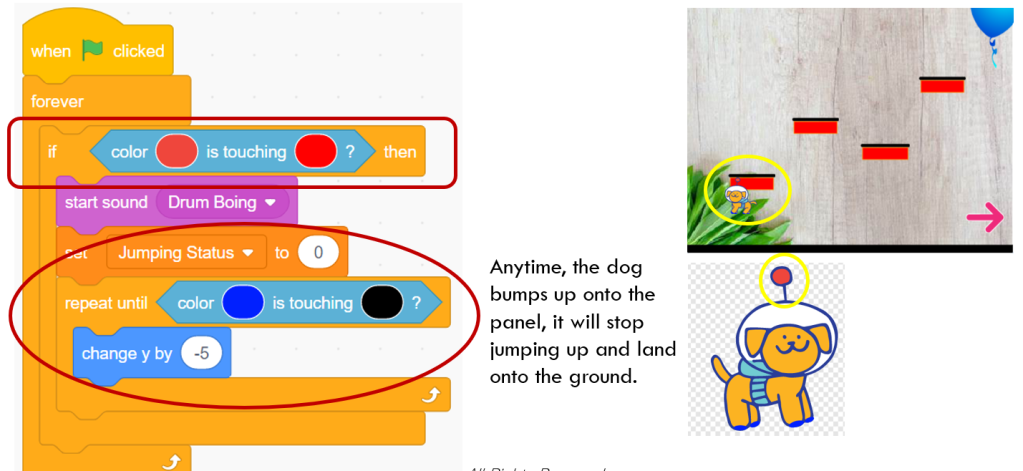
Another issue is bumping up things when the dog jumps upward. Again, the program uses color to identify the bumping. When the program finds that bumping happens, it sets variable “Jumping Status” to 0 to stop moving forward, and begins falling process. It is shown in the above diagram.
Falling and Landing Issue

Due to gravity, the dog will always return to ground. In this block, the program first check the value of variable “Jumping Status”. If it is equal to 0, representing that the dog is not moving upward. Under this condition, decrease y by 5 steps in each iteration until dog’s feet land on the ground.
So how about I do not judge the status of “Jumping Status”? Then, when the dog is jumping upward, this block of program will always drag it down.
Features of this Method
This method uses different color to represent the head, the feet and platform, so easier to be understood by Scratch beginners. When the sprite jumps upward, decelerate the speed because of the gravity. While the sprite falls, it uses stable dropping speed to reduce the complexity.
In general, this method is suitable for beginners, but lacks of precision in controlling the sprite. the sprite could not land on the ground accurately, making it look like
Improved Method

In this method, one code segment (above) will always change y by a variable “speed y”. In each iteration after changing y, the code segment will call “Touch Ground” block to check if the Mario touches the ground or overhead objects and then make adjustment in y direction.
The last step in this iteration tests if up arrow key is pressed. If it is, set variable “speed y” to a big value of 22, and then repeat the iteration.
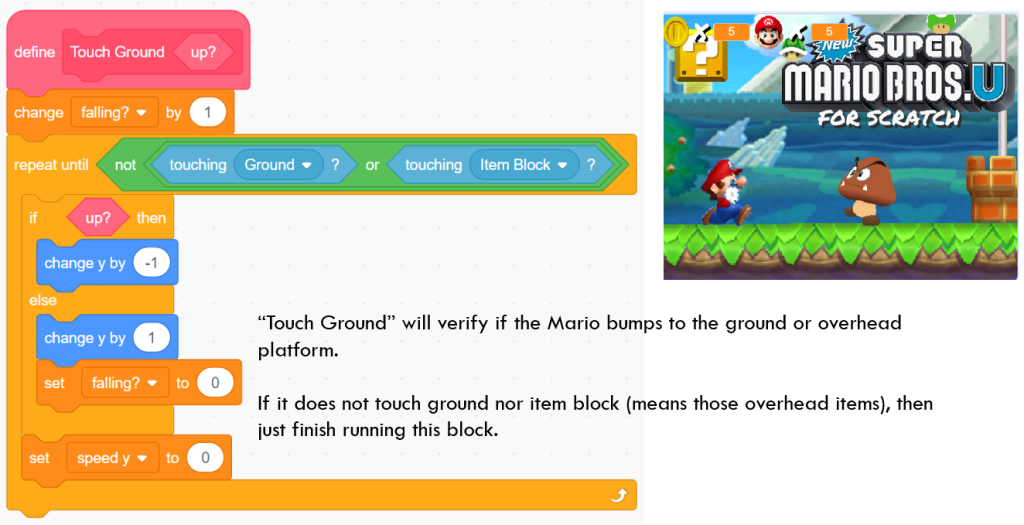
“Touch Ground” block
This block is written to handle landing issue.
The logic behind the “Touch Ground” block is a bit tricky. If the sprite does not touch ground nor item block (means those overhead items), then just finish running this block and continue other routines in the loop in the above diagram.
If it touches something and is moving upward (“speed y” > 0), make Mario drop a bit (change y by -1), and set “speed y” to 0, so Mario will not move upward further.
If it touches something and is falling (“speed y” < 0), make Mario move upward a bit (change y by 1), and set “speed y” to 0, so it will not drop further. Using this method, the sprite actually leaves 1 y-position above the platform, kind of “floating” on the solid surface, but you will not notice this trick by nick eye actually.
Features of this Method
Through combining the above two code segments, this method could control the sprite movement more accurately and faster. Furthermore, you don’t need to use specific color for the head and feet.
If you could understand the logic behind this method, it is strongly recommended.
So which method do you prefer to control the vertical movement of your sprite? In the next post, I will introduce how to control the movement of your sprite in the x position (horizontally). Stay tuned!
And don’t forget to enjoy the coding and have fun!
Note: All the analysis articles are copyright products of http://www.thecodingfun.com. Anyone re-posting them should credit author and original source. Anyone using them for commercial purposes or translating them into other languages should notify TheCodingFun and get confirmation first. All Rights Reserved.

Like!! Thank you for publishing this awesome article.
LikeLike
Pingback: Design a Jumping and Running Platform Game in Scratch, That is What You Need to Know – Part 2 – Coding Courses Designed for Kids